
Some distributions set up cron jobs that warn you when disk usage exceeds a certain percentage. But when your usage gets flagged as high, it’s deciding what goes and what stays that takes time. Finding the right file or folder to get rid of can be a chore if you have a huge disk. But don’t panic. Among all that clutter, you’ve got some simple tools to bring order to chaos.
The CLI way
The df utility displays the disk space usage on all mounted filesystems. The -T option prints the filesystem type as well. By default, df measures the size in 1K blocks, which could be a little difficult for a desktop user to decipher. Use the -h option to get more understandable output:
$ df -h -T
Filesystem Type Size Used Avail Use% Mounted on
/dev/hda6 ext3 20G 9.3G 9.1G 51% /
/dev/hda7 reiserfs 13G 2.1G 11G 17% /mnt/suse
/dev/sda1 vfat 241M 152M 90M 63% /media/usbdisk
You can use the du command to determine which files or directories need to be deleted — or at least trimmed. A simple du will print usage for the present working directory and its subdirectories, along with the size of each directory.
If you want the size of an particular directory, specify it with du directoryname . For instance, du -h /home/bodhi/podcasts will print the size of the podcasts directory in a more readable format than the kilobytes used by default. The -c option prints the grand total size of the directory at the end. The -a option also displays the file names along with directories and can be of use when you want to see a list of files in a particular directory. The -s option will display a summary, without showing all of the subdirectories.
Running du -ch | grep total prints just one line with the total size of the directory. If there’s a particular type of file that you would like to be excluded while calculating a directory’s usage, specify it with the –exclude=type option. Here we’ll check the disk usage of the current directory, and display all file names with their disk usage, and then sort them numerically using the sort utility:
$ du -ah | sort -n4.2M
./eweek.10.28.05.mp34.5M
./LQ-Podcast-101105.mp34.8M
./LQ-Podcast-110905.mp319M
./LQRadio-Episode3.mp320M
./LQRadio-Searls.mp336M
./LQRadio-HiserAndAdelstein.mp3197M
.
The KDE way
Depending on how your system is set up, command-line utilities might not work well for you. Scrolling through a long list of directories can be tedious. That’s where GUI usage analysis tools shine.
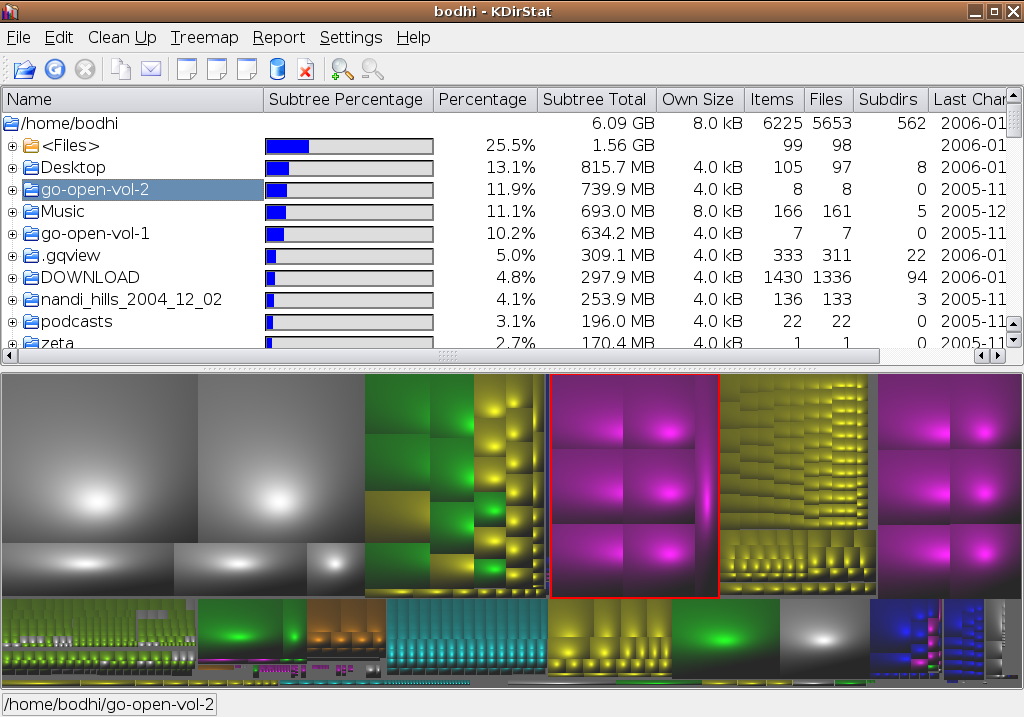
KDirStat is a directory statistics utility for KDE, though it will run outside of KDE as long as you have the right libraries installed. If you don’t already have it, download the source tarball and build it yourself. On startup it asks you to select a directory, then scans the directory while a Pac-Man animation moves about in the Toolbar area.
Once the scan is complete, the KDirStat screen splits into a two-paned display, with the top showing the contents of the directory and its usage both graphically and in percentage. The loose files are neatly tucked under the Files item. All items display their “Last Change” date, along with their size. All directories and subdirectories show the number of items and files they have inside of them, the number of subdirectories that they contain, and the total size in human readable format.
|   | |
| KDirStat in use – click to enlarge |
The Treemap view in the bottom half of the screen summarizes the complete directory view as a series of colored squares, with the size of the square reflecting the size of the file. It is useful when trying to locate large files embedded deep within several subdirectories. Clicking on a file or directory in either view selects it in the other as well. You can also open files directly from the KDirStat interface if you’re not quite sure what they contain.
Once you have located a file or directory that you can let go of, use one of the various KDirStat’s predefined cleanup actions. You can either delete the resource permanently, move it to the trash, or compress it into a bzipped tar archive. You can edit KDirStat’s actions if you want to, or to define your own cleanup actions. You also have the option of sending an email to the owner of that file or directory, which may come in handy for admins.
The GNOME way
Baobab does for GNOME users what KDirStat does for KDE users — search and destroy. Like KDirStat, Baobab can be used with other desktops and window managers as well. If it’s not already installed on your system, find a package for your distro or download the tarball and install it.
On startup Baobab displays the total filesystem usage and capacity. You can scan all the filesystems, a selected directory, or a remote filesystem from the Actions menu. Baobab prints the directory tree as soon as it starts scanning. Alternatively, you can also enter baobab path-to-directory at the command line.
|   | |
| Baobab with graphic map – click to enlarge |
If you select a particular folder, the context menu will display three option. “Open” will launch Nautilus and display the contents of the folder. “List all files in folder” will display the contents of the folder under the “File search” tab. “Folder graphical map” will display a graphical treemap of the selected folder. Since the treemaps open in a separate window, you can open treemaps of multiple folders at the same time.
To use Baobab to search for files, go to Actions -> Search for a file. Once you specify the name of the file you want to look up (Baobab supports * and ? wildcards) and the directory to look into, Baobab displays the results under the File Search tab. To delete a file or directory, select it, bring up the context menu, and choose Delete to move it to Trash.
Conclusion
The CLI utilities, du and df, when combined with dd to copy and convert files, can be handy for administers to write disk usage and backup scripts. But desktop users are probably better off using the graphical utilities. KDirStat and Baobab have similar functions, but has better deletion features.


