By Alexey Volkov, Bo Li, Ben Chen, Maksym Yezhov, Pete Luferenko, and Volv Grebennikov – Shopify
Machine learning work is full of loops: form a hypothesis, build a pipeline, run it, read the metrics, adjust, repeat. Tangle is already where Shopify’s ML experiments run, giving engineers a shared platform to build and execute pipelines.
Tangent is an autonomous agent that orchestrates ML experimentation workflows on top of Tangle, deciding what to run, running it, and reporting back. Around Tangent we built a Linux-based platform for hosting these agents securely so they can persist, work remotely, and reach the services they need without ever holding a credential. This is done using containerized isolation, a certificate-issuing proxy, and per-instance persistent storage (details below).
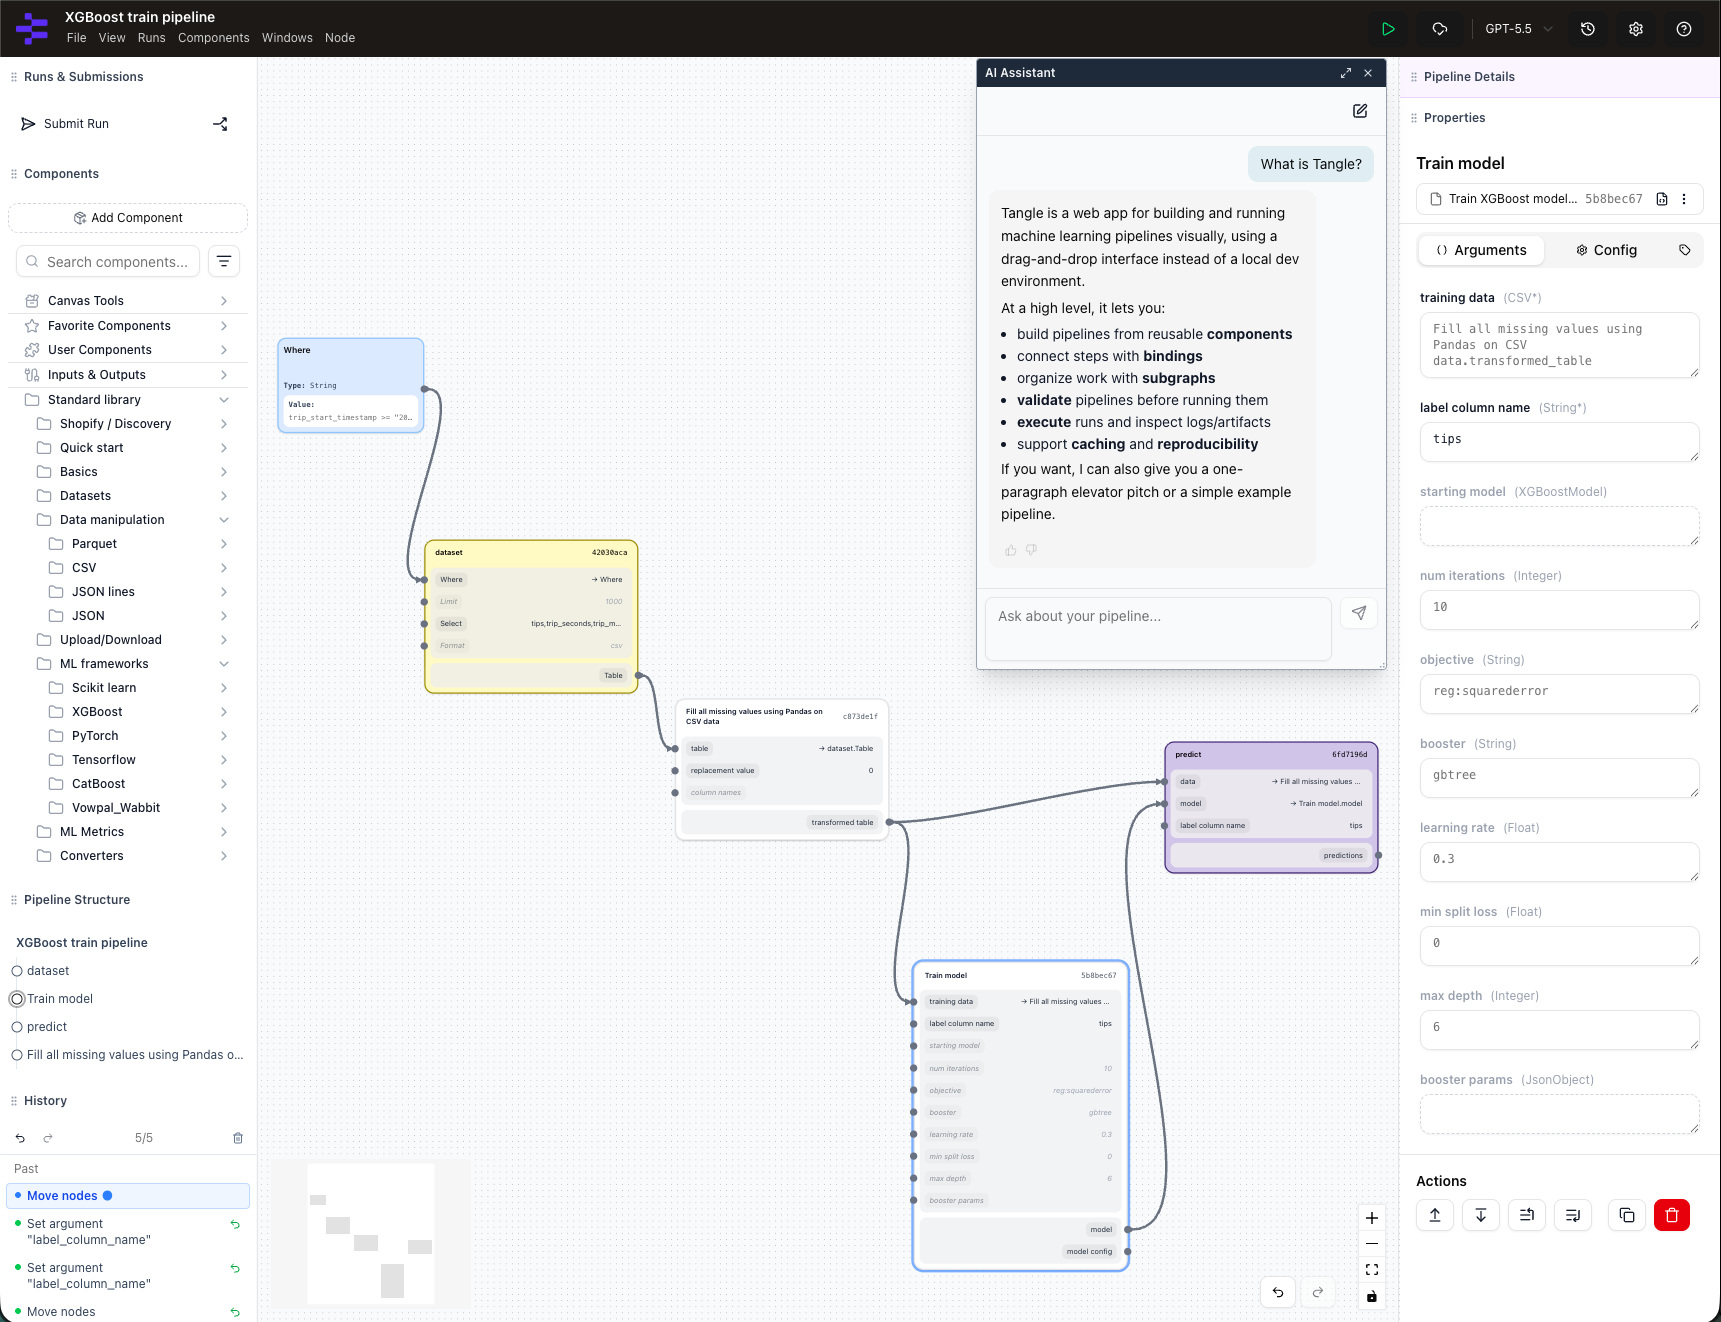
What is Tangle?
Tangle is an open source, platform-agnostic ML experimentation platform with a powerful drag-and-drop visual editor. Users drag components onto a canvas, wire outputs to inputs to form a pipeline graph, and submit it for execution locally or in the cloud. A caching layer skips or reuses previously executed steps, including steps still in flight, so iteration is fast and cheap. All pipeline runs are stored forever (including graphs, components, and logs), making pipelines reproducible even after years have passed.
Because runs and caches are shared, teammates can inspect, copy, and modify each other’s pipelines in seconds, with no cloning a private notebook and hoping the environment matches. Tangle has similarities with other OSS tools like Airflow and Kubeflow Pipelines; its caching model and visual editor are what make fast experimentation loops possible. Any containerized CLI program written in any language can be used as a Tangle component, and those components exchange data as files in any format (CSV, Parquet, JSON, etc.).
Tangle composes components the way shell scripts, makefiles, and *nix pipes do. More information about Tangle is available at tangleml.com and you can immediately try it out.
What is Tangent?
Tangent is an autonomous ML engineering agent designed to accelerate your Tangle experimentation workflows. It follows the pattern Andrej Karpathy recently popularized as autoresearch. Tangent takes that idea from a single training script on one GPU to full experiment pipelines running on Tangle, with a fleet of specialized subagents, gated checkpoints, and persistent memory. You point it at a scenario, a model, a metric to improve, a dataset, and it iterates: it analyzes results, forms hypotheses, modifies pipelines, submits runs, monitors them, and synthesizes what it learned. How much you delegate is up to you. Tangent works interactively, so you can hand it a single step (build this component, debug this failed run, analyze these metrics), or you can hand off the entire loop with one command and let it run:
tangent auto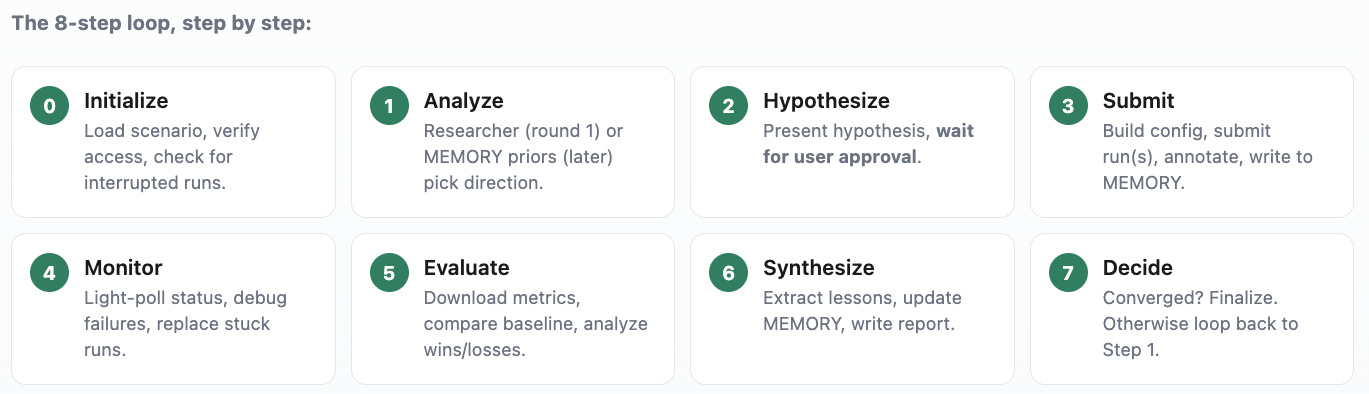
Under the hood is an eight-step loop with gated checkpoints. The agent won’t advance until every item on a step’s checklist passes, and it reloads its instructions and context at each gate so it doesn’t drift over a long run. Memory is persistent and plain-text: a MEMORY.md holds the best-known configuration and hard-won lessons; daily session logs capture the play-by-play, and per-run learnings are archived to object storage.
The Tangent Skill
Tangent’s brain is a skill, written in Markdown. The entry point is a single SKILL.md, backed by a fleet of subagent skills: a researcher, a builder, a debugger, a reviewer, and more. Because skills are just files, they’re portable, reviewable in a pull request, and harness-agnostic, the same skill drives whichever coding agent you prefer.
That portability matters because Tangent runs on open agent harnesses instead of one proprietary client. To add a capability, you write a Markdown file and commit it. There is no binary to build or ship. Markdown was chosen deliberately over a config format or DSL: it’s diffable in a normal PR, requires no schema or parser to validate, and both humans and the coding agent read it natively. The skill file doubles as its own documentation.
# Tangent
A skill is just Markdown. This file is the entry point; each subagent is
its own Markdown file, loaded on demand.

## Commands
tangent <subagent>   Read agents/<subagent>.md and follow it.
tangent auto          Run the autonomous 8-step experiment loop.

## Subagents                Agent file
tangent builder             agents/builder.md
tangent debugger            agents/debugger.md
tangent researcher          agents/researcher.md
tangent reviewer             agents/reviewer.md
tangent reporter            agents/reporter.md

## Auto Mode - the loop
0 Initialize -> 1 Analyze -> 2 Hypothesize -> 3 Submit ->
4 Monitor -> 5 Evaluate -> 6 Synthesize -> 7 Decide -> (loop)

Each step has a gate. The agent won't advance until every item on the
step's checklist passes - and it re-reads its instructions at each
gate so it doesn't drift over a long run.
Tangent Agent Hosting Platform
Our Tangent Agent Hosting Platform helps users deploy persistent Tangent instances that communicate with Tangle, cloud providers, and other external services. Each Tangent instance is a multi-agent space: a Linux-based VM/container that can host multiple agentic apps (TUI, API, WebUI). Because every Tangent component runs as a standard Linux process inside a container, Tangent inherits mature Linux networking, storage, and isolation primitives instead of introducing a custom runtime. Instance data (like agent sessions and memories) is persisted across restarts. There are also cross-instance shared memories.
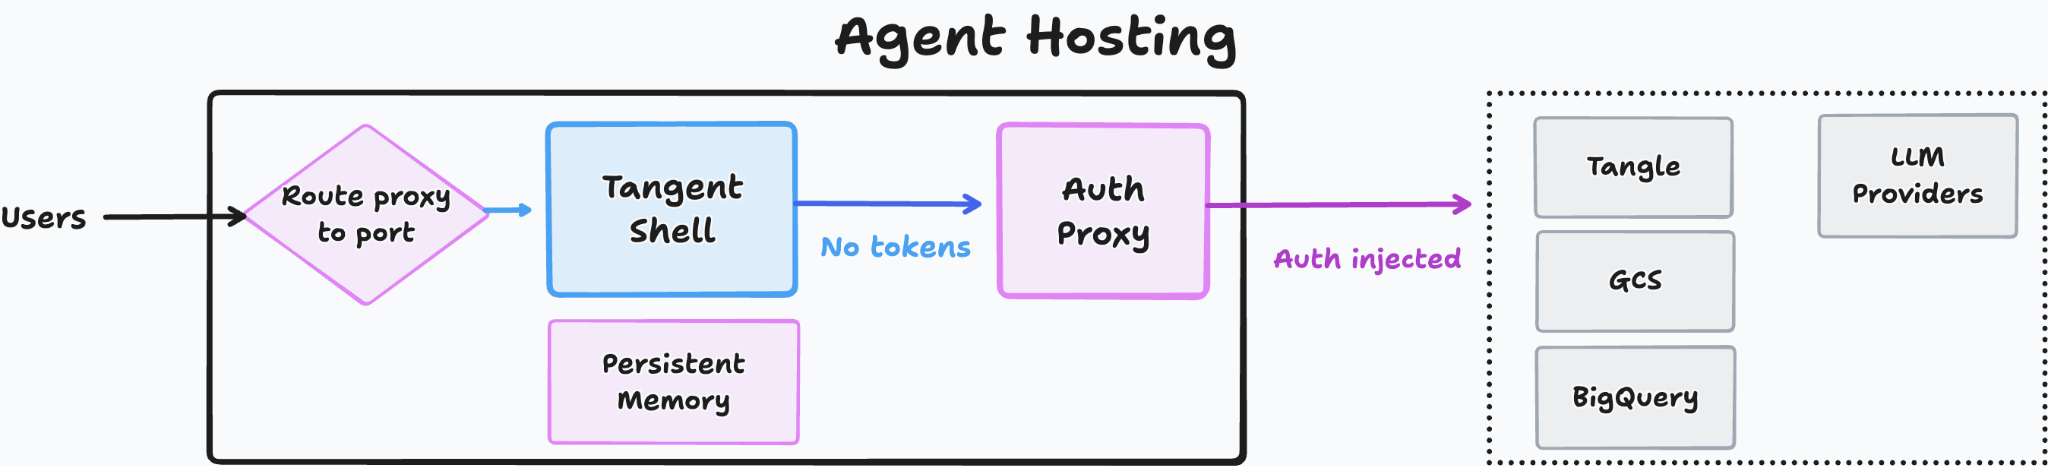
Auth Proxy
Agents need access to services, but there is always a risk of agents reading the credentials and leaking them to AI providers. Tangent solves this by adding a system-wide proxy which lives in a separate container. The proxy intercepts and modifies HTTP requests coming from the agentic tools. Auth proxy automatically adds auth headers and can modify request URLs (e.g. redirect api.aicompany.com to some AI proxy). To modify HTTPS requests, auth proxy creates new SSL certificates on the fly. The agent container’s OS and programs are configured to trust those certificates via a generated certificate authority.
Implementation details
In the Kubernetes version, each instance is a StatefulSet: a container Pod running agents, apps, and proxies, backed by a per-instance PersistentVolume and a shared memory volume mount.
Tangent Shell
To work natively with Tangle, we built a custom Agent Host image. The Tangent Shell is an environment where agents run remotely, keep their memory and sessions across restarts, and keep working long after you close your laptop. Tangent Shell orchestrates multiple agents: it splits a request into slices, delegates them to parallel sub-agents, and coordinates results through a Prime agent that owns the session.
Tangent Shell is built to meet the ML expert’s needs. Each session boots pre-loaded with the Tangent skill toolkit and Tangle API tools, instructed to assist with Tangle-based ML experiments: building and optimizing ML training pipelines, testing hypotheses, ablation studies, hyperparameter optimization, etc. With the help of triggers (like webhooks, timers, and schedules), Tangent Shell is able to monitor pipeline executions and implement deep experimentation plans. The agent knows how to operate inside the rich UI, and how to render visual artifacts (Markdown, PNG, HTML).
The Shell is open source. Agent Bundles (packaged sets of prompts, tools, skills, workflows, and triggers) extend it without touching core code.
A real use case
We used Tangent to rebuild a large reranking model end to end. An engineer set the direction (which features to try, what training data to add) and reviewed results at each step. Tangent built, ran, and analyzed the experiments. Working through the loop, it tried a sequence of changes and measured each one against the previous best:
| Step | What the agent changed | R@90% prec. | R@95% prec. | R@97% prec. |
|---|---|---|---|---|
| Previous pipeline | Prior distillation training, standard features & data | 67.3% | 54.4% | 33.6% |
| + Standardized pipeline | Migrated onto a reproducible trainer (on par; enables fast iteration) | 69.5% | 51.9% | 35.2% |
| + Richer product features | Added structured metadata, taxonomy, text descriptions, and predicted attributes (biggest single lift) | 71.3% | 58.7% | 48.5% |
| + More & harder training data | Added search-derived, sampled, and hard-negative pairs | 75.6% | 60.2% | 43.9% |
Open source and contributing
Tangle, the Tangent skills, the Hosting Platform, and Tangent Shell are all released under Apache 2.0. Development happens in the open on GitHub, and the projects accept pull requests for new subagent skills, Agent Bundles, and core fixes. Tangle is maintained by its creator, Alexey Volkov, with Shopify as the project’s initial sponsor and infrastructure steward. If you build a subagent skill or Agent Bundle you think others would find useful, we welcome the PR.
Where to find Tangle and Tangent
- Tangle website: https://tangleml.com/
- Tangle source repo: https://github.com/TangleML/tangle
- Tangle CLI and Tangent skills: https://github.com/TangleML/tangle-cli
- Tangent Agent Hosting Platform: https://github.com/TangleML/tangent
- Tangent Shell: https://github.com/TangleML/tangent-shell
")