
By Matt Zand and Kevin Downs
In a nutshell, an archive is a single file that contains a collection of other files and/or directories. Archive files are typically used for a transfer (locally or over the internet) or make a backup copy of a collection of files and directories which allow you to work with only one file (if compressed, it has a lower size than the sum of all files within it) instead of many. Likewise, archives are used for software application packaging. This single file can be easily compressed for ease of transfer while the files in the archive retain the structure and permissions of the original files.
We can use the tar tool to create, list, and extract files from archives. Archives made with tar are normally called “tar files,” “tar archives,” or—since all the archived files are rolled into one—“tarballs.”
This tutorial shows how to use tar to create an archive, list the contents of an archive, and extract the files from an archive. Two common options used with all three of these operations are ‘-f’ and ‘-v’: to specify the name of the archive file, use ‘-f’ followed by the file name; use the ‘-v’ (“verbose”) option to have tar output the names of files as they are processed. While the ‘-v’ option is not necessary, it lets you observe the progress of your tar operation.
For the remainder of this tutorial, we cover 3 topics: 1- Create an archive file, 2- List contents of an archive file, and 3- Extract contents from an archive file. We conclude this tutorial by surveying 6 practical questions related to archive file management. What you take away from this tutorial is essential for performing tasks related to cybersecurity and cloud technology.
1- Creating an Archive File
To create an archive with tar, use the ‘-c’ (“create”) option, and specify the name of the archive file to create with the ‘-f’ option. It’s common practice to use a name with a ‘.tar’ extension, such as ‘my-backup.tar’. Note that unless specifically mentioned otherwise, all commands and command parameters used in the remainder of this article are used in lowercase. Keep in mind that while typing commands in this article on your terminal, you need not type the $ prompt sign that comes at the beginning of each command line.
Give as arguments the names of the files to be archived; to create an archive of a directory and all of the files and subdirectories it contains, give the directory’s name as an argument.
To create an archive called ‘project.tar’ from the contents of the ‘project’ directory, type:
$ tar -cvf project.tar project
This command creates an archive file called ‘project.tar’ containing the ‘project’ directory and all of its contents. The original ‘project’ directory remains unchanged.
Use the ‘-z’ option to compress the archive as it is being written. This yields the same output as creating an uncompressed archive and then using gzip to compress it, but it eliminates the extra step.
To create a compressed archive called ‘project.tar.gz’ from the contents of the ‘project’ directory, type:
$ tar -zcvf project.tar.gz project
This command creates a compressed archive file, ‘project.tar.gz’, containing the ‘project’ directory and all of its contents. The original ‘project’ directory remains unchanged.
NOTE: While using the ‘-z’ option, you should specify the archive name with a ‘.tar.gz’ extension and not a ‘.tar’ extension, so the file name shows that the archive is compressed. Although not required, it is a good practice to follow.
Gzip is not the only form of compression. There is also bzip2 and and xz. When we see a file with an extension of xz we know it has been compressed using xz. When we see a file with the extension of .bz2 we can infer it was compressed using bzip2. We are going to steer away from bzip2 as it is becoming unmaintained and focus on xz. When compressing using xz it is going to take longer for the files to compressed. However, it is typically worth the wait as the compression is much more effective, meaning the resulting file will usually be smaller than other compression methods used. Even better is the fact that decompression, or expanding the file, is not much different between the different methods of compression. Below we see an example of how to utilize xz when compressing a file using tar
$ tar -Jcvf project.tar.xz project
We simply switch -z for gzip to uppercase -J for xz. Here are some outputs to display the differences between the forms of compression:
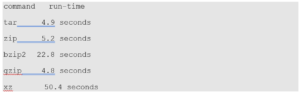
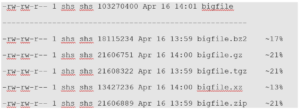
As you can see xz does take the longest to compress. However it does the best job of reducing files size, so it’s worth the wait. The larger the file is the better the compression becomes too!
2- Listing Contents of an Archive File
To list the contents of a tar archive without extracting them, use tar with the ‘-t’ option.
To list the contents of an archive called ‘project.tar’, type:
$ tar -tvf project.tar
This command lists the contents of the ‘project.tar’ archive. Using the ‘-v’ option along with the ‘-t’ option causes tar to output the permissions and modification time of each file, along with its file name—the same format used by the ls command with the ‘-l’ option.
To list the contents of a compressed archive called ‘project.tar.gz’, type:
$ tar -tvf project.tar
3- Extracting contents from an Archive File
To extract (or unpack) the contents of a tar archive, use tar with the ‘-x’ (“extract”) option.
To extract the contents of an archive called ‘project.tar’, type:
$ tar -xvf project.tar
This command extracts the contents of the ‘project.tar’ archive into the current directory.
If an archive is compressed, which usually means it will have a ‘.tar.gz’ or ‘.tgz’ extension, include the ‘-z’ option.
To extract the contents of a compressed archive called ‘project.tar.gz’, type:
$ tar -zxvf project.tar.gz
NOTE: If there are files or subdirectories in the current directory with the same name as any of those in the archive, those files will be overwritten when the archive is extracted. If you don’t know what files are included in an archive, consider listing the contents of the archive first.
Another reason to list the contents of an archive before extracting them is to determine whether the files in the archive are contained in a directory. If not, and the current directory contains many unrelated files, you might confuse them with the files extracted from the archive.
To extract the files into a directory of their own, make a new directory, move the archive to that directory, and change to that directory, where you can then extract the files from the archive.
Now that we have learned how to create an Archive file and list/extract its contents, we can move on to discuss the following 9 practical questions that are frequently asked by Linux professionals.
- Can we add content to an archive file without unpacking it?
Unfortunately, once a file has been compressed there is no way to add content to it. You would have to “unpack” it or extract the contents, edit or add content, and then compress the file again. If it’s a small file this process will not take long. If it’s a larger file then be prepared for it to take a while.
- Can we delete content from an archive file without unpacking it?
This depends on the version of tar being used. Newer versions of tar will support a –delete.
For example, let’s say we have files file1 and file2 . They can be removed from file.tar with the following:
$ tar -vf file.tar –delete file1 file2
To remove a directory dir1:
$ tar -f file.tar –delete dir1/*
- What are the differences between compressing a folder and archiving it?
The simplest way to look at the difference between archiving and compressing is to look at the end result. When you archive files you are combining multiple files into one. So if we archive 10 100kb files you will end up with one 1000kb file. On the other hand if we compress those files we could end up with a file that is only a few kb or close to 100kb.
- How to compress archive files?
As we saw above you can create and archive files using the tar command with the cvf options. To compress the archive file we made there are two options; run the archive file through compression such as gzip. Or use a compression flag when using the tar command. The most common compression flags are- z for gzip, -j for bzip and -J for xz. We can see the first method below:
$ gzip file.tar
Or we can just use a compression flag when using the tar command, here we’ll see the gzip flag “z”:
$ tar -cvzf file.tar /some/directory
- How to create archives of multiple directories and/or files at one time?
It is not uncommon to be in situations where we want to archive multiple files or directories at once. And it’s not as difficult as you think to tar multiple files and directories at one time. You simply supply which files or directories you want to tar as arguments to the tar command:
$ tar -cvzf file.tar file1 file2 file3
or
$ tar -cvzf file.tar /some/directory1 /some/directory2
- How to skip directories and/or files when creating an archive?
You may run into a situation where you want to archive a directory or file but you don’t need certain files to be archived. To avoid archiving those files or “exclude” them you would use the –exclude option with tar:
$ tar –exclude ‘/some/directory’ -cvf file.tar /home/user
So in this example /home/user would be archived but it would exclude the /some/directory if it was under /home/user. It’s important that you put the –exclude option before the source and destination as well as to encapsulate the file or directory being excluded with single quotation marks.
Summary
The tar command is useful for creating backups or compressing files you no longer need. It’s good practice to back up files before changing them. If something doesn’t work how it’s intended to after the change you will always be able to revert back to the old file. Compressing files no longer in use helps keep systems clean and lowers the disk space usage. There are other utilities available but tar has reigned supreme for its versatility, ease of use and popularity.
Resources
If you like to learn more about Linux, reading the following articles and tutorials are highly recommended:
- Comprehensive Review of Linux File System Architecture and Management
- Comprehensive Review of How Linux File and Directory System Works
- Comprehensive list of all Linux OS distributions
- Comprehensive list of all special purpose Linux distributions
- Linux System Admin Guide- Best Practices for Making and Managing Backup Operations
- Linux System Admin Guide- Overview of Linux Virtual Memory and Disk Buffer Cache
- Linux System Admin Guide- Best Practices for Monitoring Linux Systems
- Linux System Admin Guide- Best Practices for Performing Linux Boots and Shutdowns
About the Authors
Matt Zand is a serial entrepreneur and the founder of 3 tech startups: DC Web Makers, Coding Bootcamps and High School Technology Services. He is a leading author of Hands-on Smart Contract Development with Hyperledger Fabric book by O’Reilly Media. He has written more than 100 technical articles and tutorials on blockchain development for Hyperledger, Ethereum and Corda R3 platforms. At DC Web Makers, he leads a team of blockchain experts for consulting and deploying enterprise decentralized applications. As chief architect, he has designed and developed blockchain courses and training programs for Coding Bootcamps. He has a master’s degree in business management from the University of Maryland. Prior to blockchain development and consulting, he worked as senior web and mobile App developer and consultant, angel investor, business advisor for a few startup companies. You can connect with him on LI: https://www.linkedin.com/in/matt-zand-64047871
Kevin Downs is Red Hat Certified System Administrator or RHCSA. At his current job at IBM as Sys Admin, he is in charge of administering hundreds of servers running on different Linux distributions. He is a Lead Linux Instructor at Coding Bootcamps where he has authored 5 self-paced Courses.
The post How to Create and Manage Archive Files in Linux appeared first on Linux Foundation – Training.

