
Securing SSH with two factor authentication using Google Authenticator
Two-step verification (also known as Two-factor authentication, abbreviated to TFA) is a process involving two stages to verify the identity of an entity trying to access services in a computer or in a network. This is a special case of a multi-factor authentication which might involve only one of the three authentication factors (a knowledge factor, a possession factor, and an inheritance factor) for both steps. If each step involves a different authentication factor then the two-step verification is additionally two-factor authentication.
Google’s two-step verification process
Google was one of the first Internet companies to introduce a two-step verification process. To access a Google service using the two-step verification process, a user has to go through the following two stages:
The first step is to log in using the username and password. This is an application of the knowledge factor.
The implementation of the second step requires a mobile phone or the Google Authenticator application, which is an application of the possession factor.
If the user opts to use a mobile phone, he/she has to register his/her phone number with Google. When one attempts to authenticate with username and password, Google will send via SMS a new, unique code to the phone. Receiving the SMS demonstrates that the user has the phone (or, in the case of GSM like networks the appropriate SIM chip).
If the user opts to use the Google Authenticator (or another supported code generator application), he/she simply opens the application, which generates a new code every 30 seconds. This code is to be entered to complete the log in process. As a backup option in case the registered mobile phone or device running Google Authenticator is lost, stolen, or otherwise unavailable, the user can print a set of static single-use backup codes (also the knowledge factor) and store them in a safe place.
The following are some other sites which offer two-step verification service:
- Amazon Web Services
- ANX
- App.net
- Apple ID
- Authy
- Battle.net
- Bitstamp
- Blockchain.info
- Box
- Dropbox
- eBay
- Etrade
- Evernote
- GitHub
- GoDaddy
- HootSuite
- Lastpass
- LocalBitcoins
- Microsoft
- MongoLab
- Namecheap
- PayPal
- SocialFlow
- timetotrade
- Tumblr
- Viaduct
- WordPress
- Yahoo! Mail
- innoview.gr
- zoho
Google Authenticator
Google Authenticator implements TOTP security tokens from RFC6238 in mobile apps made by Google, sometimes branded “two-step authentication”. The Authenticator provides a six digit one-time password users must provide in addition to their username and password to log into Google services or other sites. The Authenticator can also generate codes for third party applications, such as password managers or file hosting services. Some versions of the software are open source.
[Source: WikiPedia]

Note: Google Authenticator doesn’t “call home” to Google — all the work happens on your SSH server and your phone. Google Authenticator is a open-source software, that means you can check the codes yourself. I guess after what happened with openSSL, that’s not a bad idea after all.
In this article I will demonstrate how to secure SSH by setting up Two Factor Authentication (TFA) with Google Authenticator for the following Linux operating systems:
- Debian
- Ubuntu
- Linux Mint
- Kali Linux
- Red Hat
- CentOS
- Fedora
Google Authenticator can be used in the following smartphones:
- Android,
- iOS and
- Blackberry.
I am not too sure if you can use this on a Windows Based phone (i.e. new Nokia phones or Windows Mobiles devices). Feel free to try and report back.
App Download Links as follows:
- Android: https://play.google.com/store/apps/details?id=com.google.android.apps.authenticator2&hl=en
- iOS: https://itunes.apple.com/au/app/google-authenticator/id388497605?mt=8
- Blackberry: http://www.google.com/mobile/other
More detailed per device install instructions can be found on this page:
https://support.google.com/accounts/answer/1066447?hl=en
The implementation is exactly same except for some package name differences. So you can implement this in any Linux Operating System that uses these packages.
Requirements
Followings are the requirements for using Google Authenticator on your system:
- A PC running Linux
- A smartphone
- A running SSH server on your machine.
In case you don’t have SSH server running, just follow this guide to install openSSH server.
Contents [hide]
- Google’s two-step verification process
- Google Authenticator
- Requirements
- Step 1: Install dependencies for Google Authenticator Module
- Step 2: Download Google Authenticator Module
- Step 3: Compile and Install Google Authenticator PAM module
- Step 4: Run and configure Google Authenticator
- Step 5: Configure SSH to use Google Authenticator PAM Module
- Step 6: Configure your SmartPhone for Google Authenticator App
- Step 7: Login to your computer via SSH
- Alternatives to Google Authenticator SmartPhone App:
- Conclusion
Step 1: Install dependencies for Google Authenticator Module
You need to have either root or sudo privileges on the machine where you want to secure SSH by enabling Two Factor Authention using Google Authenticator. Login to your machine and use the following commands to install required dependency packages:
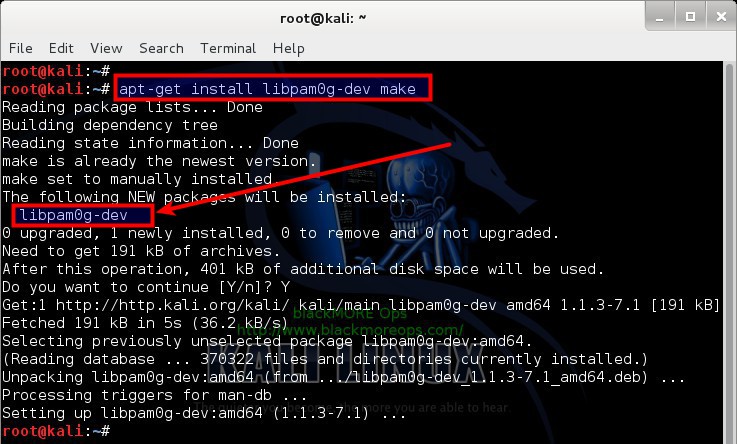
On Debian, Kali, Ubuntu, Linux Mint (they all are Debian based system that uses aptitude as package manager i.e. apt-get/aptitude)
apt-get install libpam0g-dev
On Red Hat, CentOS and Fedora (they all are RedHat based where you use yum as the package manager):
yum install pam-devel
That’s it. That should install the necessary dependencies on your system. In case you have a very restricted system where you dont have GCC, make and wget, you can install them using the following command(s):
yum install make gcc wget
(or)
apt-get install make gcc wget
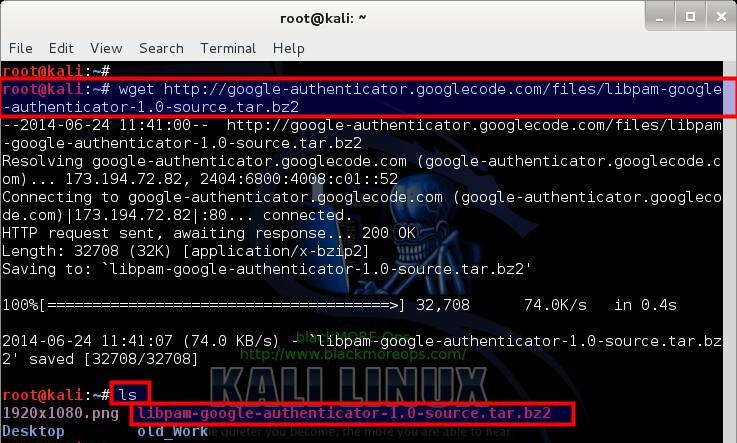
Step 2: Download Google Authenticator Module
Google Authenticator is available on GoogleCode website.
Link: https://code.google.com/p/google-authenticator/
You can just copy paste the codes below to download and extract Google Authenticator codes. I personally use Kali Linux, that means I am always logged in as root user, if you’re using any of the other Linux distributions like Debian, Ubuntu, Linux Mint, Red Hat, CentOS or Fedora where you don’t usually login as root user, then you should choose your own directory to download and extract these codes.
To download Source code of the Google Authenticator PAM library module use the following command:
root@kali:~# wget http://google-authenticator.googlecode.com/files/libpam-google-authenticator-1.0-source.tar.bz2
At the time of writing this article, v1.0 was available.
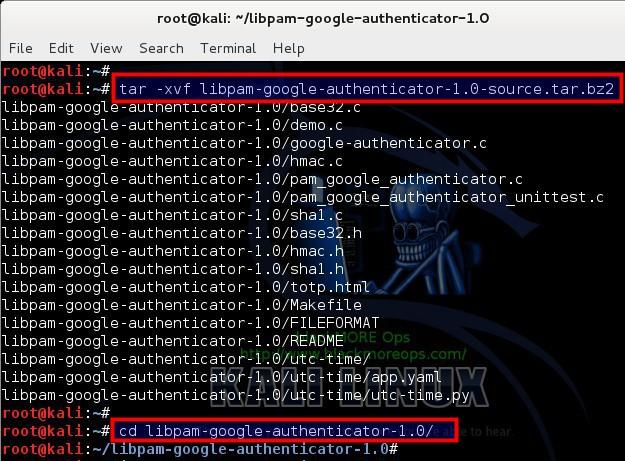
Now extract your tarball:
root@kali:~# tar -xvf libpam-google-authenticator-1.0-source.tar.bz2
Change directory to the extracted folder:
root@kali:~# cd libpam-google-authenticator-1.0/
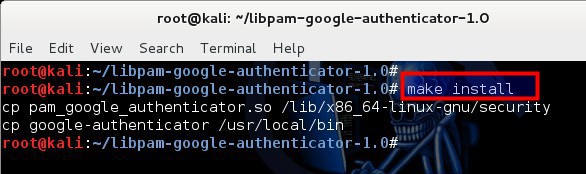
Step 3: Compile and Install Google Authenticator PAM module
So far we’ve installed dependencies, downloaded and extracted Google Authenticator PAM module. Now we need to compile the codes and install compiled software on our system.
use the following command to compile your downloaded source codes:
root@kali:~/libpam-google-authenticator-1.0# make

Now install Google Authenticator PAM module on your system:
root@kali:~/libpam-google-authenticator-1.0# make install
Step 4: Run and configure Google Authenticator
Just run Google Authenticator PAM module from command line to configure it for your system:
Run Google Authenticator PAM module using the following command:
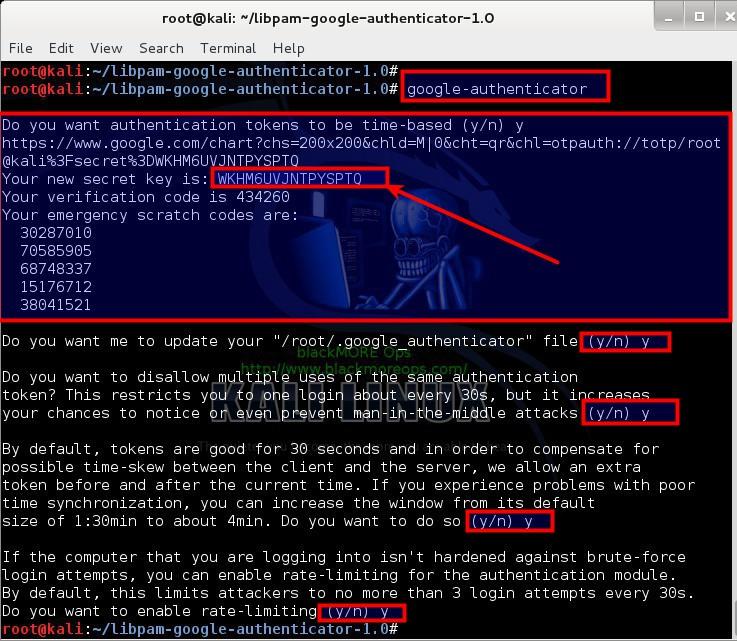
root@kali:~/libpam-google-authenticator-1.0# google-authenticator
It should present you with bunch of question where you get to choose Y or N . Let’s have a quick look at those questions and the outputs.
Do you want authentication tokens to be time-based (y/n) y
https://www.google.com/chart?chs=200x200&chld=M|0&cht=qr&chl=otpauth://totp/root@kali%3Fsecret%3DWKHM6UVJNTPYSPTQ
Your new secret key is: WKHM6UVJNTPYSPTQ
Your verification code is 434260
Your emergency scratch codes are:
  30287010
  70585905
  68748337
  15176712
  38041521
So on your first question, you get a secret key, Your new secret key is: WKHM6UVJNTPYSPTQ and 5 emergency scratch codes. You use the emergency key on your mobile so that you can get the correct verification code next time you login. Emergency codes are used when you’ve lost your mobile.
Next it asks you if you want to use this for your root account? Me being root users, I’ve chosen Yes.
Do you want me to update your "/root/.google_authenticator" file (y/n) y
Next up, it asks you if you want to disallow multiple uses of the same verification code. Unless you have a good reason not to, choose Yes.
Do you want to disallow multiple uses of the same authentication
token? This restricts you to one login about every 30s, but it increases
your chances to notice or even prevent man-in-the-middle attacks (y/n) y
Next part is time based login. From the point of getting the code on your mobile to typing in to your login prompt, 30 seconds should be more than enough. If you’r time sync is bad on your system or you’ve giving the code to someone over phone or you are a VERY slow keyboard warrior, I see no reason to change it. Select Yes here.
By default, tokens are good for 30 seconds and in order to compensate for
possible time-skew between the client and the server, we allow an extra
token before and after the current time. If you experience problems with poor
time synchronization, you can increase the window from its default
size of 1:30min to about 4min. Do you want to do so (y/n) y
Last up, well, of course we want to enable rate-limiting, by enabling this, you ensure that only 3 login attempts every 30s can be made.
If the computer that you are logging into isn't hardened against brute-force
login attempts, you can enable rate-limiting for the authentication module.
By default, this limits attackers to no more than 3 login attempts every 30s.
Do you want to enable rate-limiting (y/n) y
This finishes your initial setup for Google Authenticator PAM module. Now we need to configure PAM and SSH to actually use this technique. This is really awesome.
Note: Leave this terminal window open (DO NOT CLOSE). We need the codes for next steps.
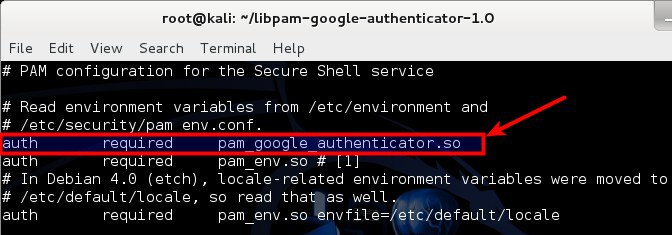
Step 5: Configure SSH to use Google Authenticator PAM Module
Open your PAM configuration file /etc/pam.d/sshd
root@kali:~# vi /etc/pam.d/sshd
and add the following line:
auth required pam_google_authenticator.so
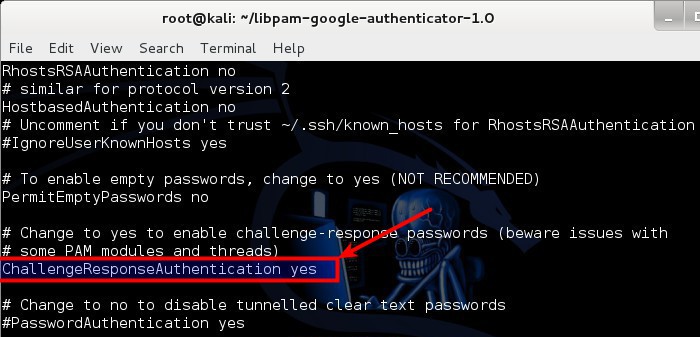
Next up, open your SSH configuration file /etc/ssh/sshd_config
root@kali:~# vi /etc/ssh/sshd_config
and modify the line containing ChallengeResponseAuthentication no:
ChallengeResponseAuthentication no
(change it to)
ChallengeResponseAuthentication yes
To have these changes take effect, restart SSH server:
service ssh restart
(or)
service sshd restart
(or)
/etc/init.d/ssh restart
(or)
/etc/init.d/sshd restart
Why 4 commands? Depending on your Linux distribution, some refers SSH Daemon as SSHD, some as SSH, some got service module installed, some requires you to go into /etc/init.d folder and restart SSH service manually.
Step 6: Configure your SmartPhone for Google Authenticator App
Like I said before, Google Authenticator can be used in the following smartphones:
- Android: https://play.google.com/store/apps/details?id=com.google.android.apps.authenticator2&hl=en
- iOS: https://itunes.apple.com/au/app/google-authenticator/id388497605?mt=8
- Blackberry: http://www.google.com/mobile/other
More detailed per device install instructions can be found on this page:
https://support.google.com/accounts/answer/1066447?hl=en
Assuming you managed to install the App properly, Launch your Google Authenticator app in your SmartPhone.
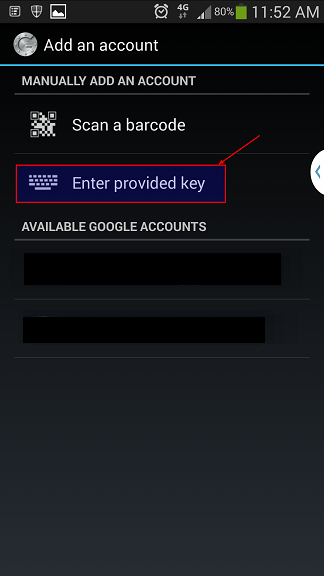
From Menu select Set up account
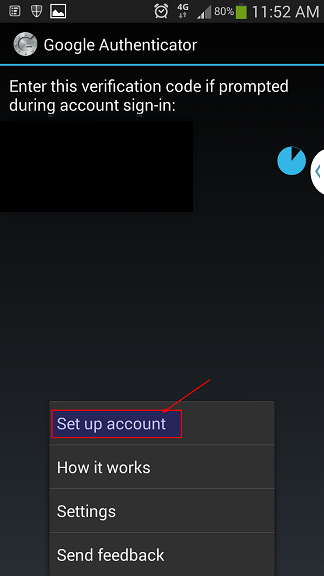
Step 6.1: Google Authenticator Setup Account
Remember the secret key you got when you initialized Google-Authenticator PAM module on your computer? I hope you still got that window open. Select Enter provided key.
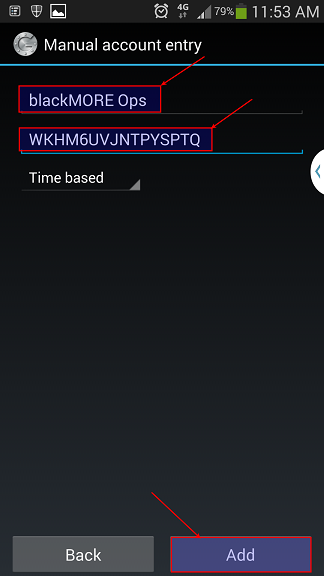
Next window you give it a name (something you can remember or relates to your workstation .. i.e. Home Workstation or My SuperAwesome LinuxBox … I’m going to use blackMORE Ops as the name.
Type in your Secret Key on the next field and click on Add button.
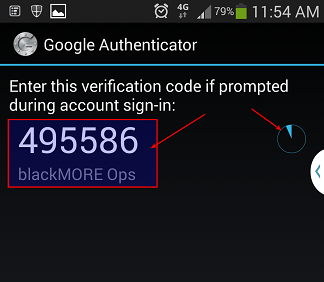
Once it’s added it will generate a one time verification code (pin number) that will keep changing every 30 seconds.
Step 7: Login to your computer via SSH
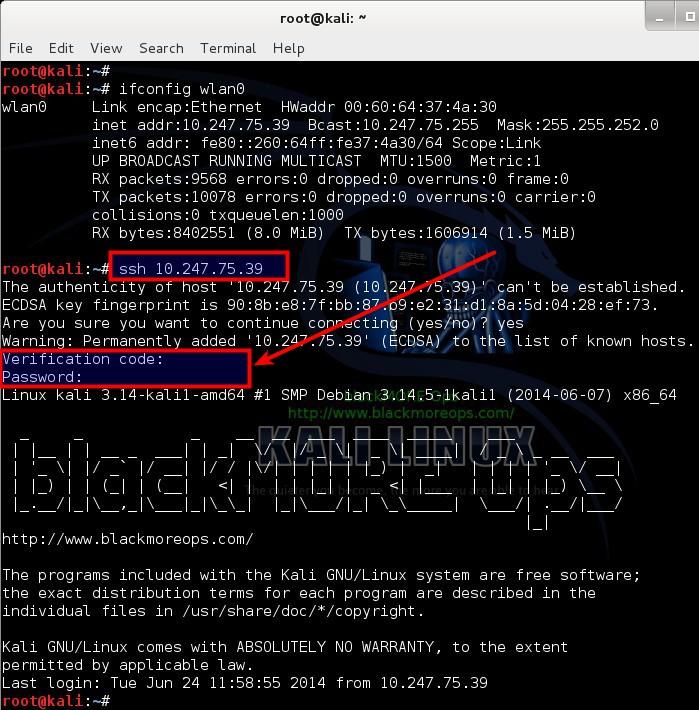
Because I am doing all these in the same computer I will just login to localhost (IP: 127.0.0.1) If you got 2 or more machines or VirtualBox/VMWare machines then you can try to login from a different one. One thing to note, you MUST have SSH server running.
In case you don’t have SSH server running, just follow this guide to install openSSH server.
So we type in the following command: (this is where you need to find out your SSH server’s IP address, I’ve shown using localhost or 127.0.0.1 IP but this can be anything from an IP, FQDN or Domain name.)
root@kali:~# ssh 127.0.0.1
and immediately you see a prompt asking for Verification code. This is your Google Authenticator code that you get from your Google Authenticator Mobile App.
Type in the numbers from your SmartPhones Google Authenticator App and then it will prompt your for your password. Type in your password to login now.
If you failed to type in the Verification code within 30 seconds, you have to try the next code shown on your SmartPhones Google Authenticator App. Awesome? Wouldn’t you agree?
Alternatives to Google Authenticator SmartPhone App:
In case you don’t own a SmartPhone or don’t want to use any, you can use the following add-on on your FireFox or IceWeasel browser:
FireFox/IceWeasel App: GAuth Authenticator https://marketplace.firefox.com/app/gauth-authenticator/

Interesting Fact:
[Update]
Got a response from the dev behind the Google Authenticator add-on for Chrome, Gerard Braad, who explained that Google have taken it down but gave no explanation as to why even after being asked several times.
The Firefox version is still available though and work great. Hopefully he may look into the issue with the Chrome version and re-submit.
Here is the FF version for those wishing to use it:
https://marketplace.firefox.com/app/gauth-authenticator/
Richard
How about that?
[ Source: https://productforums.google.com/forum/#!topic/chrome/P9rTLaeyHjg ]
Conclusion
Securing SSH with two factor authentication using Google Authenticator is possibly the best security model you can out there for free. You can always restrict SSH by IP, change port, rate-limit and do all sorts of crazy stuffs. But those who wants to open SSH to the outside world and implement all these extra security models (i.e. Brute-force detection etc.) have to constantly worry about the fact that who is trying is and what you’ve missed while securing your system. Securing SSH with two factor authentication using Google Authenticator possibly relieves you from that worry and you stop getting emails in the middle of the night saying someone tried to login via SSH X amount of times.
Let me know you thoughts and if you’ve found this useful. Thanks for reading and being on my website. Please share. This would be best for System Administrators on any Linux systems.


