
Don’t miss part 2!
With Android phones and tablets making their way into more and more pockets and bags, dipping a toe into Android coding is becoming more popular too. And it’s a great platform to code for — the API is largely well-documented and easy to use, and it’s just fun to write something that you can run on your own phone. You don’t even need a phone at first, because you can write and test code in an emulator on your Linux PC. In the first of this two-part intro to Android coding, get a basic timer app up and running and start learning about the Android API. This tutorial assumes some basic familiarity with Java, XML, and programming concepts, but even if you’re shaky on those, feel free to follow along!
Dev environment and getting started
A note on versions: the most recent version of Android is 4.2 (Jelly Bean), but as you can see from this Wikipedia chart, there aren’t many people using it yet. You’re better off coding for one or both of 4.0 (Ice Cream Sandwich) or 2.3 (Gingerbread), especially as Android is entirely forwards-compatible (so your 2.3 code will run on 4.2) but not always backwards-compatible. The code here should work on either 4.0 or 2.3.
The quickest way to get your dev environment set up is to download the Android Bundle. You’ll also need JDK 6 (not just JRE); note that Android is not compatible with gcj. If you already have Eclipse, or wish to use another IDE, you can set it up for Android as described here.
Now, create a project called Countdown either using Eclipse, or from the command line. I set the BuildSDK to 4.0.3, and minimum SDK to 2.2, and (in Eclipse) used the BlankActivity template.
My First Android Project: Layout
For our very first program, we’re going to do is to show a timer that counts down from 10 seconds when you click a button. Before writing the code, let’s create the interface — what the user will see when they start the app. Open up res/layout/activity_countdown.xmlto create an XML layout, using either the Eclipse graphical editor, or a text/XML editor, to enter this:
<RelativeLayout xmlns:android="http://schemas.android.com/apk/res/android"
    xmlns:tools="http://schemas.android.com/tools"
    android:layout_width="match_parent"
    android:layout_height="match_parent" >
      <TextView
          android:id="@+id/time_display_box"
          android:layout_width="wrap_content"
          android:layout_height="wrap_content"
          android:layout_alignParentTop="true"
          android:layout_centerHorizontal="true"
          android:layout_marginTop="60dp"
          android:text="@string/_00_30"
          android:textAppearance="?android:attr/textAppearanceLarge"/>
      <Button
          android:id="@+id/startbutton"
          android:layout_width="wrap_content"
          android:layout_height="wrap_content"
          android:layout_below="@+id/time_display_box"
          android:layout_centerHorizontal="true"
          android:layout_marginTop="41dp"
          android:text="@string/start" />

</RelativeLayout>
Note the references to @string/start and @string/__00_30. These values are stored in res/values/strings.xml:
<string name="start">Start</string>
<string name="_00_30">00:30</string>
This illustrates the standard way of referring to Android resources. It’s best practice to use string references rather than hard-coding strings.
My First Android Project: Code
Next, open up the CountdownActivity.java file in your editor, ready to write some code. You should already have an onCreate() method stub generated. onCreate() is always called when the Activity is first created, so you’ll often do setup and app logic startup here. (Eclipse may also have created an onCreateOptionsMenu()method stub, which we’ll ignore for now.) Enter this code:
public class CountdownActivity extends Activity {

  private static final int MILLIS_PER_SECOND = 1000;
  private static final int SECONDS_TO_COUNTDOWN = 30;
  private TextView     countdownDisplay;
  private CountDownTimer timer;
  @Override
  public void onCreate(Bundle savedInstanceState) {
    super.onCreate(savedInstanceState);
    setContentView(R.layout.activity_countdown);

    countdownDisplay = (TextView) findViewById(R.id.time_display_box);
    Button startButton = (Button) findViewById(R.id.startbutton);
    startButton.setOnClickListener(new View.OnClickListener() {
      public void onClick(View view) {
        try {
          showTimer(SECONDS_TO_COUNTDOWN * MILLIS_PER_SECOND);
        } catch (NumberFormatException e) {
          // method ignores invalid (non-integer) input and waits
          // for something it can use
        }
      }
    });
  }
}
You’ll notice the thing that makes this a surprisingly easy first project: the Android API includes a CountDownTimer that you can use. We set up this, and the countdown display, as private member variables. In onCreate() we use the built-in setContentView method to grab our XML layout The R.foo.barsyntax is a standard way to refer to Android XML resources in your code, so you’ll see it a lot.
findViewById is another method you’ll use a lot; here, it grabs the display and the Start button from the XML layout. For the Button to work when clicked, it needs an OnClickListener. This is an interface, so must be subclassed. We could create a whole new MyButton class to do this, but this is overkill for a single button. Instead, we do it inline, creating a new OnClickListener and its onClick() method. Ours simply calls showTimer() on the number of milliseconds we want to use (currently hard-coded).
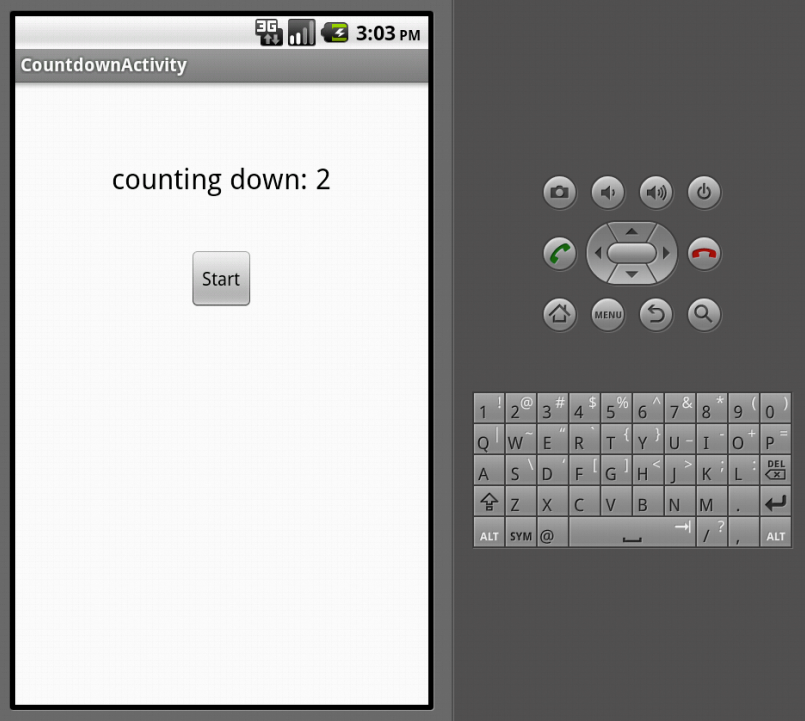
So what does showTimer()do?
private void showTimer(int countdownMillis) {
  if(timer != null) { timer.cancel(); }
  timer = new CountDownTimer(countdownMillis, MILLIS_PER_SECOND) {
  @Override
  public void onTick(long millisUntilFinished) {
    countdownDisplay.setText("counting down: " +
    millisUntilFinished / MILLIS_PER_SECOND);
  }
  @Override
    public void onFinish() {
      countdownDisplay.setText("KABOOM!");
    }
  }.start();
}
The CountDownTimer class does most of the work for us, which is nice. Just in case there’s already a running timer, we start off by cancelling it if it exists. Then we create a new timer, setting the number of milliseconds to count down (from the showTimer() parameter) and the milliseconds per count interval. This interval is how often the onTick()callback is fired.
CountDownTimer is another abstract class, and the __onTick()__ and __onFinish()__ methods must be implemented when it is subclassed. We override onTick() to decrease the countdown display by a second on every tick; and override onFinish() to set a display message once the countdown finishes. Finally, start() sets the timer going.
If you select ‘Run’ in Eclipse, you can choose to run this as an Android app, and an emulator will automatically be generated and run for you. Check out the Android docs if you need more information on setting up an emulator, or on running an app from the command line.
Congratulations, you’ve written your first Android app! In the second part of this series, we’ll have a closer look at the structure of an Android app, and make some improvements to the timer to input a countdown time, a Stop button, and menu options. We’ll also look at running it on a physical phone rather than the software emulator.
For more information in the mean time, you can check out the Android Development Training section of The Linux Foundation’s Linux training website.


