Open source has come a long, long way and video editing has not been left behind. You’ll find a number of video editing tools on Linux, but none of them are both as user-friendly and create as high-quality video as OpenShot Video Editor.
With this easy to use tool you can have your edited videos up on Youtube (or presented to your company/organization) in no time. With a very small learning curve, and numerous features, OpenShot will make you and your company look very good. Let’s take a look at how mult-track videos can be created in OpenShot.
The Goal
What I am going to show you is how to create a short video that will include multiple clips, images, sound, and transitions. You might think this task is a challenge, but once you understand how it works, it’s simple. Let’s take a look at the process.
How it Works
Essentially what you will do with OpenShot is:
- Import images or videos into a project.
- Import sound for your project.
- Adding the images, videos, and sound into tracks.
- Arrange the tracks so they suit your needs.
- Add transitions and fades.
- Export your project to a viewable video.
The hardest part of the list is knowing how to set up the transitions. Much of the rest is just dragging and dropping. We’ll take this one step at a time. But before we get into the editing/creating process, we have to install OpenShot first.
Installation
The installation of OpenShot is simple:
- Open up your Add/Remove Software tool (such as Ubuntu Software Center).
- Search for “openshot” (no quotes).
- Click the Install button.
- Enter your sudo password or administrator password.
- Allow the installation to complete.
Once installed, you will find OpenShot in Applications > Sound & Video. Note that if you want to add animated titles to your videos you will have to have Blender also installed.
Step 1: Importing Images and Video
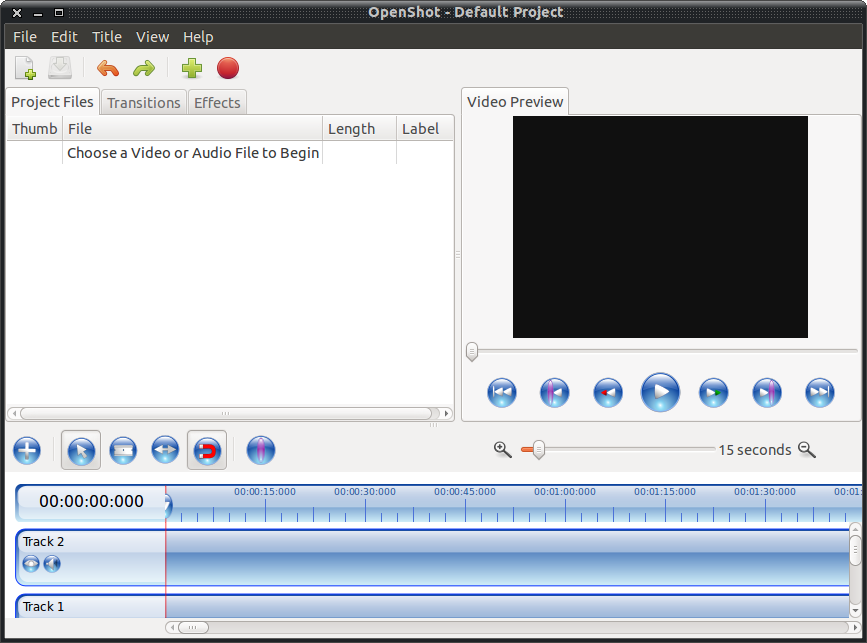
From the OpenShot main window (see Figure 1) click File > Import Files, navigate to the file(s) you want to import, and select them. If you want to select multiple files you can press the Ctrl key and select each file you want to import. When you have all the necessary files selected click the Add button.
When your files are imported into OpenShot they will be listed in the left pane. These files are then dragged into tracks at the bottom of the window. But before we do that, let’s prepare our project to include a music track.
Step 2: Adding Music
You can import sound for your project as easily as you can images or video clips. This will make your project more complex and, for a more complex project, you might need to add tracks. To have transitioning images/videos and sound, I would recommend at least three tracks. To add a track simply right click a track and select Add Track Above or Add Track Below. Your music will be dragged onto a track just as your images and videos. Of course, music licensing does apply in this situation. If you are looking for a source for open source music you can try a site like OPSOUND. The music you will find on that site is mostly Copyleft protected and can be used, re-mixed, shared, and re-imagine.
Step 3: Adding Your Images, Videos, and Music to Tracks
 Although this might seem very simple, there is a level of complexity to this step you might not suspect. The act of clicking and dragging is not the issue. For that you just click and drag the file from the left pane to the track you want to add it to. The complexity lies in where, precisely, you place the clip. NOTE: Once you drag an image, video, or sound to a track it is then referred to as a “clip”.
I would suggest adding your music clip to the bottom track and then, using a bit of logic and forethought, add your video and image clips between the first two tracks. Think about it this way, if you are going to transition between clips, you will want those clips to live on different tracks. Say you have five clips to add and you plan on transitioning into and out of each different clip. For this layout you will want to play clips 1, 3, and 5 on the first track and clips 2 and 4 on the second track.
Step 4: Arranging Your Clips
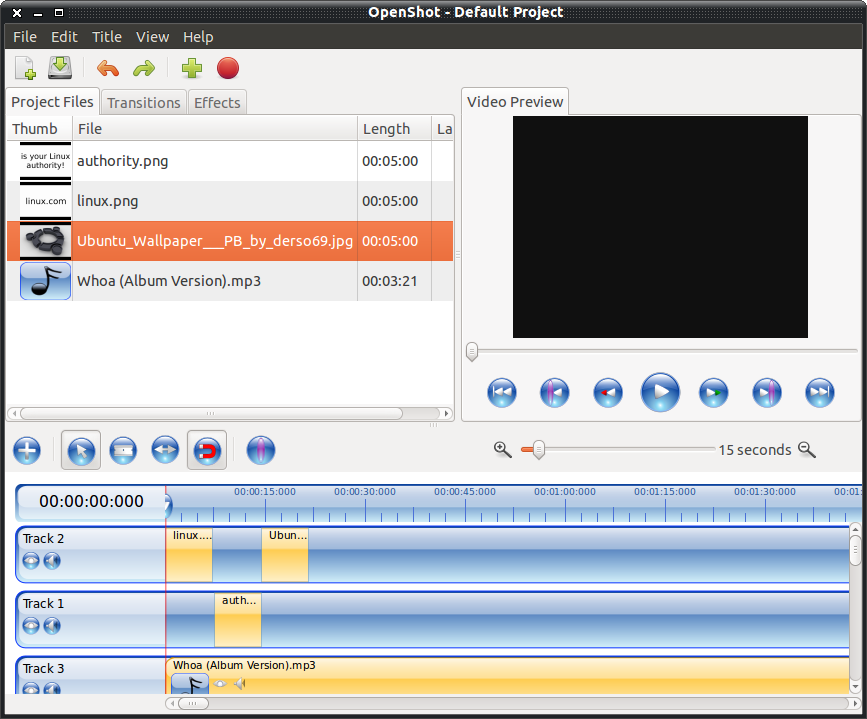
Remember, for the first clip in the project it needs to be placed with its left edge at 00:00:00:0000. If you do not place the first clip there you will have black space at the beginning of your finished video. Figure 2 shows OpenShot with clips added.
As you can see, I have arranged the clips in such a way that:
- Clip 1 can be transitioned into Clip 2.
- Clip 2 can be transitioned into Clip 3.
- Music will play underneath all clips (and must be trimmed before the project is complete).
You might think you could just align the three clips on a single track. That is not the case as it would be impossible to arrange any transitions for each clip.
Step 5: Add Transitions and Fades
Now comes the fun part. You don’t want your video to just jump from one clip to another without any semblance of transition. For these transitions you can use fades, transitions, or a combination of the two. To find out what type of transitions OpenShot offers, click on the Transitions tab. You will see a number of options available. As for fades, you have the following options:
- Slow fade in.
- Slow fade out.
- Slow fade in and out.
- Fast fade in.
- Fast fade out.
- Fast fade in and out.
To add a fade you simply right-click a clip and select the fade you want.
You can, of course, make a complete video with nothing but fading in and out of your tracks. But what fun is that? Let’s add transitions. To do this select the transition you want to add and then drag it to the clip you want to apply it to. Right? Ah…would it were that simple. All transitions have two directions: up or down. You can think of them this way:
- Up – transition into.
- Down – transition out of.
Here’s the time line of our very short video:
- Fade into clip one.
- Transition out of clip one.
- Transition into clip two.
- Transition out of clip two.
- Transition into clip three.
- Fade out of clip three.
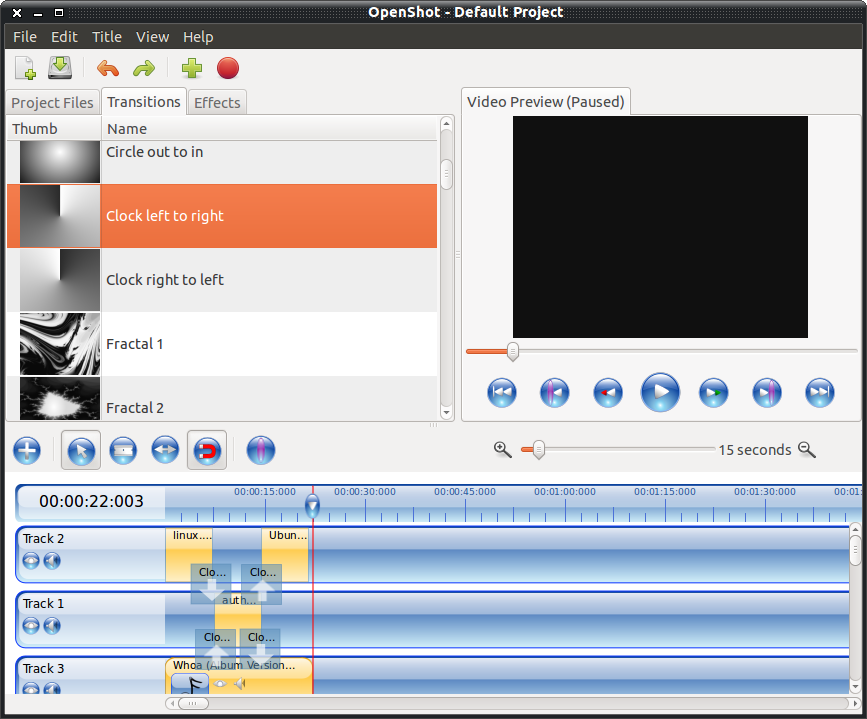
 Figure 3 shows all of the transitions added to the clips (as well as the music clip trimmed).
- Up: Transition into.
- Down: Transition out of.
As you can see, only the second clip has transitions both into and out of. When you add a transition, the default direction is up (into). In order to change the direction of the transition all you have to do is right-click the transition icon and select “Switch Direction”.
You will also want to make sure your “transition into” arrows point exactly to the left edge of the clip they effect. Conversely, you want to make sure your “transition out of” arrows point exactly to the right edge of the clip they effect.
Step 6: Exporting Your Video
Now that you have tweaked and approved your creation, it’s time to export it to a viewable format. Let’s export our project to a format suitable for Youtube viewing. Fortunately, OpenShot has a pre-set configuration for Youtube videos, so you won’t have to worry too much about digging in deep with audio and video settings.
In order to export your video you will first want to save your project. Do this by clicking File > Save Project. When the Save Project window opens you will need to give the project a name, select the save folder, estimate the project’s length in minutes, and select the Project Profile. There are quite a lot of profiles to choose from (ranging from PAL to NTSC to Widescreen, to HDV, and everything in between.) The default Project Profile is DV NTSC.
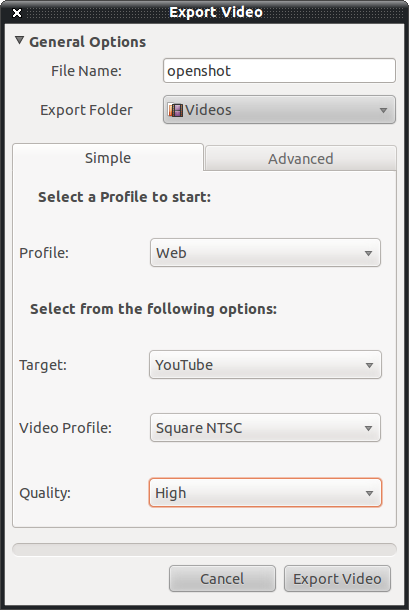
 After you have saved your project click File > Export Video. In this new window (see Figure 4) you will configure the following:
- Give the exported video a name.
- Locate the folder where the export will be saved to.
- Select a profile (for Youtube videos select Web).
- Target: The site the exported video should be formatted for.
- Video Profile: Your choices here will depend upon the Target you select. For Youtube videos there is only one choice.
- Quality: Low, Medium, or High. NOTE: The higher the quality, the larger the resultant file.
After you make your selections, click Export Video. Depending upon the length of your video, this process can take some time. For a short five minute video I had a render time of over twenty minutes. You should not only give youself plenty of time, you should also allow your machine to render the video before you do any more work (NOTE: This will, of course, depend upon the speed and power of your machine.)
When the video is exported you will have an MPEG video ready for uploading to Youtube!
Let Your Imagination Take Off
Of course we only grazed the surface of what OpenShot can do. But by demonstrating the simple task of creating a short, image-only video you should now have enough understanding of the program to help you create the videos your imagination and creativity have dreamed up.


