
One thing a Linux sysadmin must know how to do is recover from a change gone bad. It happens. You install, upgrade, or configure a system or service and things immediately go wrong. What do you do? If you’ve made a copy of the configuration file, you’re okay. If the software didn’t install too many dependencies (which could have, in turn, caused a systemic issue), then you can simply uninstall. But, there are times when you will want to be able to easily roll back those changes.
If you happen to be employing the Btrfs filesystem, this isn’t a problem. With Btrfs, you have access to an amazingly handy tool called Snapper that allows the taking of snapshots and rolling back to those snapshots (in the event of an issue). Snapper is a command-line program designed for filesystem snapshot management that allows you to create, delete, and compare snapshots as well as undo changes made between snapshots.
In this tutorial, I will walk you through the process of rolling back changes with Snapper, and I’ll be using the latest release of openSUSE Leap. It should also be noted that openSUSE and SUSE both offer a YaST plugin for Snapper that makes this process even easier. Before you venture into the land of the GUI, it’s always best to understand the underlying command first.
First steps
My test bed was a fresh install of openSUSE Leap. Because this was a fresh install, no Snapper configurations were available. You could open the YaST tool, go to Miscellaneous > Snapper and YaST would error out. To fix this, all you have to do is run a system upgrade with zypper. So, the command zypper upgrade would not only upgrade the system, it would create a Snapper configuration for /. You could also do this manually with the command:
snapper -c root create-config /
The above command creates a new configuration file, named “root” for the root directory (/). Configurations are crucial to Snapper; so much so that, without them, you’ll get nowhere. Fortunately, having a root config is all you need for basic usage of Snapper.
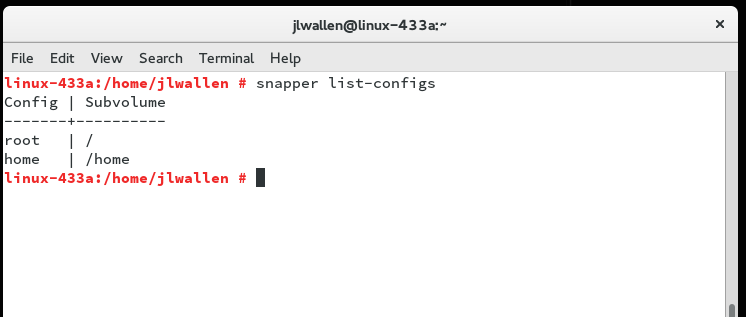
If you issue the command snapper list-configs, you’ll now see there is at least one configuration listed (Figure 1).
If you issue the command snapper-list, snapper will reply by listing all of the currently saved snapshots. If this is a fresh install, chances are there aren’t many… or any. Let’s create one.
Creating a snapshot
Suppose you’re about to install Apache and you want to first take a snapshot of the system before you install the web server. Everything on the server is running great and you’ve yet to install Apache. Let’s take a snapshot. Here’s the command you’d use:
snapper create --type pre --print-number --description "Before LAMP install"
Let’s break that command down.
-
snapper: That’s the command. Simple.
-
create: This tells Snapper you are going to create a new snapshot.
-
–type pre: This tells Snapper you’re creating a snapshot prior to changes being made.
-
–print-number: This instructs Snapper to print out the number associated with this snapshot (you will need this when creating the related post snapshot). This number is important.
-
–description: This is the human-readable description of the snapshot (very important in helping you discern which snapshots are associated with specific changes or periods).
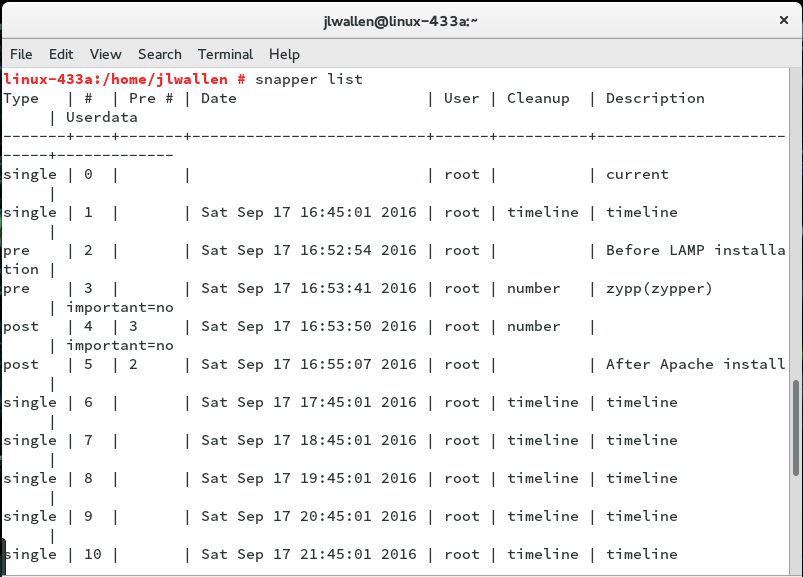
Now that you have the pre snapshot created, do whatever it is you need to do to the server (for our example, installing Apache). Once that task is complete, you have to then create an associated post snapshot. You see, for every important change on your server, you’ll want to create a pre and post snapshot (pre before you make a change, post after you make the change). That is how you can then roll back the changes.
To create the post snapshot, you’d issue the following command:
snapper create --type post --pre-number X --description "After the Apache install"
Where X is the number printed out when the pre type snapshot was created.
Remember, in creating the pre snapshot, Snapper will print out the ID number associated with the first snapshot… that is what you’ll use for –pre-number variable. Issue the command snapper list and you will see the pre and post snapshts listed (Figure 2).
Checking changes
This is where things start to get really handy. You can instruct Snapper to list out all changes made to the system between snapshots. So we have a pre ID of 2 and a post ID of 5. What alterations have been made? Issue the command snapper status 2..5 and the output will list every change (Figure 3).

In the far left of each line, you’ll notice a + symbol which means whatever follows was added. A c would indicate change and a – would indicate a deletion.
You can also run a diff on a specific file. Suppose you notice a c for the line /etc/sysconfig/apache2 and you want to know how that file was changed. You can issue the command:
snapper diff 2..5 /etc/sysconfig/apache2
The diff command will then run on the /etc/sysconfig/apache2 file, comparing it between pre and post Apache install. You can also run snapper diff 2..5 without a file name to get a diff of every change made.
Undoing changes
With the help of diff, you’ve managed to figure out where the problem lies and need to undo that change. This is actually really simple. Let’s say, for the sake of example, the problem lies in the /etc/sysconfig/apache2 file. To roll back to the pre state, you would issue the command:
snapper -v undochange 2..5 /etc/sysconfig/apache2
The above command would revert the /etc/sysconfig/apache2 file from the post snapshot state to the pre snapshot state (in this case, before Apache was installed).
It’s really that simple. Even without making use of the YaST Snapper plugin, you’ve rolled back changes using nothing but the command line.
Pure power
With Snapper, you have pure power at your fingertips. With just a few quick commands you can take snapshots, compare snapshots, and rollback changes from one snapshot to another. Once you’ve mastered the Snapper command, make sure to take a look at the YaST Snapper plugin; you’ll find it offers the same power, in an easier to use GUI form.
To learn more about Snapper, issue the command man snapper and behold the sum total power that tool has to offer.
Want to learn more about command-line tools for Linux? Check out the Essentials of System Administration course from The Linux Foundation.


