
With the latest version of ConVirt Open Source Version 2.5, management of KVM and Xen-based virtual machines is now possible from an Amazon Web Services (AWS) account. ConVirt is available as an Amazon Machine Image (AMI) on an existing Amazon account. As a result, IT managers can add the ease and flexibility of cloud-based management to their virtualization toolset.
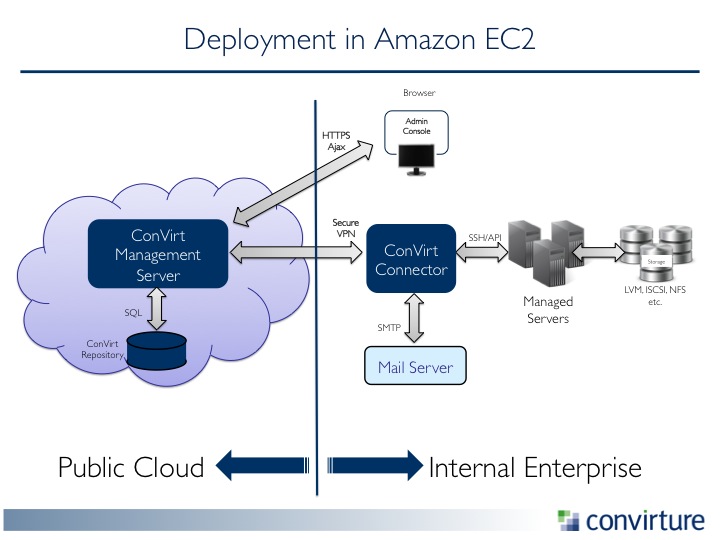
ConVirt deployed in the Amazon cloud connects to all of the instances of KVM and Xen in the data center via the “ConVirt Connector,” a secure network interface that is installed in the data center. Now, the IT manager has a sophisticated management tool for his entire virtual infrastructure that is easily accessed and simple to deploy on the Amazon cloud.
By deploying the ConVirt management layer into the cloud, IT managers can access and manage multiple virtual resources located in on-premises data centers – even if those are scattered in different geographic locations. In addition, by deploying ConVirt into the cloud, there is no need to allocate any additional computing or human resources toward setting up and configuring the management functions locally. Rather, the IT admin can spin up an instance of ConVirt in their Amazon account and start managing KVM and Xen servers immediately including monitoring, configuration management, templates-based provisioning, and live migration.
ConVirt Open Source running in Amazon also provides the ability for third-party management of virtual resources, including by managed service providers and IT outsourcers.
 ConVirt Open Source is free to use and is available immediately here. Now, let’s walk you through the set up process.
Prerequisite: Amazon Account (NOTE: You will be charged by Amazon for this usage.)
There are two basic steps:
1. Starting the ConVirt Appliance in Amazon EC2
2. Providing access to Infrastructure via the ConVirt-Connector
1. Starting ConVirt Appliance in Amazon EC2
Locate and Launch AMI
-
Log in to your Amazon account.
-
Click EC2 from AWS Console or Select EC2 from Services drop-down if you are in another console.
-
Select N. California (US-West) region by selecting drop down from top right.
-
Click AMIs under Images from the left navigator.
-
Select Public AMI from drop down and search for “ConVirt-OSS” on Amazon EC2 in N.California (US-West) region. Pick the latest release and build.
-
If required, copy the AMI to region of your choice.
-
Launch the AMI image, with following choices in the wizard.
-
Select ‘t1.micro’ instance type.
-
Select appropriate details on ‘Configure Instance Details’ page. Defaults are ok.
-
Skip ‘Add Storage’ page.
-
On the ‘Tag Instance’ page, put appropriate value for the Name tag.
-
On the ‘Security group’ page:
-
Change the name and description of newly created security group shown on the page and make sure it has the following two rules:
-
SSH (TCP port 22) from Anywhere as source
-
Custom UDP Rule, UDP port 1194 from Anywhere as source (For secure vpn connectivity to the enterprise)
-
Custom TCP Rule, TCP port 8082 from Anywhere as source (For ConVirt management web application )
-
-
-
When you press ‘Review and Launch’ button, you will be prompted to generate or use an existing key. You will need this to access the ConVirt-Appliance so don’t forget to download and save it.(e.g., ~/ec2_creds/keys/my-convirt-appliance-key.pem). We will refer to it as ConVirt-Appliance Key.
-
Go to Instances pane, and wait for the instance to initialize completely.
-
Now go to Elastic IPs option under Network and Security from the left navigator.
-
Allocate a new Elastic IP Address or select from existing list. Use the Associate button, and select the ConVirt-Appliance instance you just started.
-
Note down the Elastic IP, we will refer to it as ConVirt-Appliance IP.
Validate the ConVirt-Appliance instance
-
Use ssh (or Putty on windows) to Login to the ConVirt-Appliance
Syntax : ssh -i <Instance key> ubuntu@<ConVirt-Appliance IP> e.g. ssh -i ~/ec2_creds/keys/my-convirt-appliance-key.pem
This e-mail address is being protected from spambots. You need JavaScript enabled to view it
It will prompt you to accept the fingerprints. Say yes.
Execute the following commands:
service openvpn status (Expected result: The response should validate that openvpn is running.)
ps -ef | grep paster (Expected result: You should see a process running with name paster.)
netstat -an | grep 8082 | grep LISTEN (Expected Result: You should see one entry containing 8082.)
Logout from the ConVirt-Appliance.
If you see the expected results in all cases, your appliance is set and ready to go to the next step.
Login to ConVirt Management Server
Use a browser and point it to https://<ConVirt-Appliance IP>:8082/login . This should bring up the ConVirt application in the browser. You will be promoted for security warning, as the default ssl cerificate is self-signed. Follow your browser specific prompts to continue with the warning.
Login using ‘admin’ user and ‘admin’ password.
Change the default password
Use the ‘Change Password’ option from the top right to change the default password. (NOTE: Treat this step as mandatory for security reasons.)
2. Providing access to Infrastructure via the ConVirt-Connector
For ConVirt to manage your virtualization infrastructure from ConVirt Appliance in EC2, you need to have connectivity between the two. If you already have a VPC (Virtual Private Cloud) with secure connectivity to your enterprise infrastructure and administrators, you can skip this section. For those who do not have this setup, Convirture provides a Connector to establish secure connectivity to the ConVirt-Appliance. For those instructions, go here.
Conclusion
From this point, you need to continue with preparing managed servers as you would with an on-premises installation of ConVirt. For those steps, go here.
# # #
Jaydeep Marfatia is Executive Vice President of Engineering and Founder of Convirture. Jaydeep is responsible for all aspects of product development at Convirture. He brings a wealth of industry experience to his current role, including over 10 years in systems management. Prior to co-founding Convirture, Jaydeep held a senior engineering management position in the ASLM division at Oracle, and was one of the principal architects of the Oracle Enterprise Manager 10g product suite. He holds a degree in Computer Science from the University of Mumbai.


