
The Intel Next Unit of Computing (NUC) is a very compact computer with an Intel CPU at its heart. The NUC reviewed here has mini DisplayPort and mini HDMI ports, two memory slots, mSATA, USB 3.0, mini PCI Express, an IR receiver, and an internal SATA connector among other things.
The main thing I wanted investigate for this article was how well Fedora 20 runs on this thing. Does audio output over the mini HDMI work out of the box? Does suspend to RAM sometimes decide not to resume? And of course, what sort of performance and power usage is there relative to a traditional desktop machine or the high-end ARM machines such as the ODroid XU?
The NUCs have been around for a little while; there is an older and newer Celeron model, two models featuring Ivy Bridge Core i3 and i5 CPUs, and the latest models with Haswell Core i3 and i5 CPUs. This article looks at the Intel NUC Model D34010WYK which has an Intel Core i3-4010U Haswell CPU and two DDR3 SODIMM slots to accept up to 16 GB of RAM and sells for around $300. For somewhere in the range of $75-$100 more is the NUC with an Intel Core i5-4250U Haswell CPU which has Intel Turbo Boost Technology 2.0 so it can alter the CPU frequency and also features a more powerful Intel graphics chip. Whether you want the Core i3 or Core i5 model depends on if you need the extra CPU performance that the Turbo Boost offers.
The most recent NUC to be released is the new Celeron model which retails for around $150. There are also versions of the Haswell NUCs which have a larger case so you can fit a 2.5-inch drive inside the NUC. The newer Haswell CPUs are more power efficient than the Ivy Bridge CPUs. You should keep a close eye on which Intel Core i3 NUC model you are getting to make sure you know which CPU you are getting.
Storage can be added using the internal mSATA bay, the internal SATA port, or the external USB3 ports. Because the D34010WYK runs the Haswell generation of CPU and uses low-voltage laptop memory, it can idle at very low power consumption levels. The small form factor of the NUC and low power consumption push the NUC much closer to the realm of the 2-3 Watt little ARM machines than the 50-100 W traditional desktop machine.
Some advantages the NUC has over many small form factor machines are the speed of the processor, the ability to have up to 16 GB of RAM, four USB 3.0 ports, and both a mini HDMI and mini DisplayPort connector. Being an Intel Core i3 CPU, if some code works on a regular x86 desktop machine then it shouldn’t require any porting or recompilation for the NUC. This also extends to things such as the Adobe Flash plugin which is not available for ARM machines. Whether or not you want to run such code is another question, but with the NUC you get the choice to do so if you want.
Setting Up
Once you buy the D34010WYK NUC, you have to then add RAM and storage, and while the NUC comes with a power supply, don’t forget to also grab a C5 power cable because you’ll also need one of those to get going.

In order to use the NUC, you first have to unscrew the base plate which gives you access, as shown in the picture above. In the picture the NUC is upside down after the base plate was removed. The SODIMM RAM slots are on the right of the figure and the wifi and msata cards can be put into the slots on the left side. The CPU itself cannot be seen as it is on the other side of the board.
If you want to easily be able to use the SATA connector shown in the top middle of the picture you might like to consider the larger D34010WYKH model which has more internal room in the case. Otherwise, it seems you are going to have to do some modification of the base plate to let the SATA cable escape the smaller NUC case.
The NUC used for this article was a D34010WYK combined with a single Kingston KVR16LS11/8 8GB DDR3 1600 1.35V SODIMM. While using a single stick of RAM might restrict memory throughput it also leaves the door open for easy future upgrades. The storage was a USB 3.0 pen drive. This kept the price of the whole system at around $400.
Installing Fedora
My initial attempt to install Fedora used an external USB powered DVD drive. That setup caused the NUC not to post. Instead things froze up at the splash screen. Once the DVD was removed the NUC attempted to boot off its network card. So it seemed the hardware was OK.
Luckily the liveusb-creator program makes it very easy to convert from a bootable Fedora 20 ISO to a bootable USB stick. Once you install liveusb-creator, tell it where the ISO file is and select the USB drive from a drop down menu and after some delay writing you’ll soon have a bootable USB stick. Using liveusb-creator is also beneficial because it makes it harder to accidentally write the image to the wrong target disk. I used liveusb-creator to make a 4 GB USB stick that could boot into (and install) Fedora 20.
I wanted to install Fedora 20 onto a larger and much faster 32 GB USB 3.0 pen drive. So I plugged the 4 GB bootable USB stick into one of the front USB 3.0 ports and the 32 GB USB 3.0 stick into one of the rear USB ports. The installer offered the 32 GB disk as the location to install Fedora 20 onto and the installation proceeded.
I’m not sure if it was because the target USB stick had partitions on it already, but my first attempt to install failed during filesystem setup. So I ended up installing without using LVM. Another little trap here was that after installation finished I removed the 4 GB drive that I used to start the installation before booting up again. But the Fedora 20 boot up wanted to find “sdb” which is where the 32 GB disk was during installation. Though the 32 GB USB drive had now moved to sda because the 4 GB stick had been removed.
I assume this issue will not show up if you install to an mSATA drive as its position will not change between boots. To resolve the issue I reconnected the original 4 GB USB stick again and used the boot menu to choose to boot from the 32 GB drive. After doing that a few times I could remove the 4 GB drive and the system booted as expected.
Configuring Sound and IR
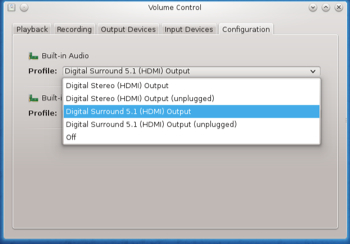
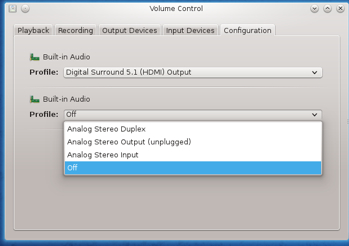
Booting into the installed Fedora, the gigabit network worked right away, but my first attempts to use sound produced nothing. Installing and running pavucontrol I altered the Configuration tab to disable the lower Built-in Audio which I assume, due to the stereo nature, was for the headphones on the front of the NUC. Then I got sound over the HDMI cable.
So, USB, network, mini HDMI at 1080, and sound were all working. Next up I chose Suspend to RAM and brought back the machine to the desktop again a dozen times. So far so good. Over ssh the pm-suspend command would also put the NUC to sleep and it could be brought back again by running the following command on another machine:
# ether-wake -i eth0 ma:ca:dd:re:ss:0
The Haswell NUC has an infrared receiver on the front of the unit. I thought getting that working would be a matter of starting lircd and probably telling it what remote I have at hand. Unfortunately there was no /dev/lirc0 device file. And my attempts to cajole a working one into existence were ineffective. I then found this post in an Intel Community Forum. I’ve repeated the commands from the above link below in case the link goes stale. The first command verifies that the IR driver didn’t load properly and the second block creates a state that allows the nuvoton-cir module to load properly. After doing that, the NUC could receive input from an IR remote control.
# dmesg | grep nuvoton-cir
[2.497482] nuvoton-cir 00:08: IR PNP Port not valid!# modprobe -r nuvoton-cir
# echo "auto" > /sys/bus/acpi/devices/NTN0530:00/physical_node/resources
# modprobe nuvoton-cir
Testing Power Usage
As for power usage, when plugged in and turned off the NUC drew 1.2 W. After boot up to a KDE 4 desktop the NUC idled at 6.6 W (with two USB sticks, and a USB keyboard and mouse attached). Turning compositing on or off (hotkey alt+shift+f12) didn’t change the power draw. A pm-suspend sleep dropped power consumption to around 1 W. During a make -j 4 compile (up to four jobs at once) of openssl power ranged up to 16 W. While running the Javascript Octane benchmark power usage ranged up to 15 W but was mostly more around 12 W. While running openssl speed power usage was around 11-12 W. Running three instances of openssl speed at once resulted in over 14 W used.
Moving to performance, the Octane 2.0 Javascript benchmark was run using the 64-bit release of Firefox 26.0. The Core i3 NUC got 7843 while an Intel 2600K desktop got 18813 overall. The NUC was running at 1.7GHz while the 2600K can range up to 3.40GHz.
Testing Graphics Performance
To test 2D graphics performance I used version 1.0.1 of the Cairo Performance Demos. The gears test runs three turning gears, the chart runs four line graphs, the fish is a simulated fish tank with many fish swimming around, gradient is a filled curved edged path what moves around the screen, and flowers renders rotating flowers that move up and down the screen. For comparison I used a desktop machine running an Intel 2600K CPU with an NVidia GTX 570 card which drives two screens, one at 2560×1440 and the other at 1080p.
NUC fps Desktop Intel 2600k with NVidia 570 card
at 1080p running two screens.
gears 126 140
chart 8 16
fish 154 188
gradient 43 117
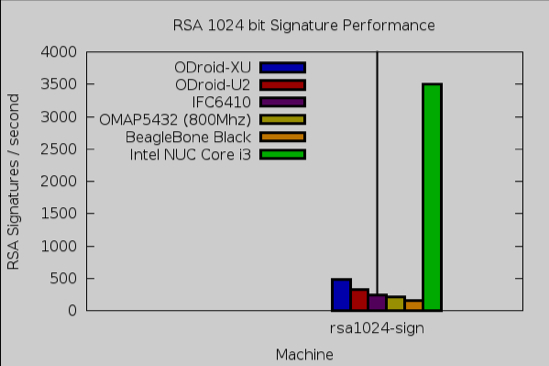
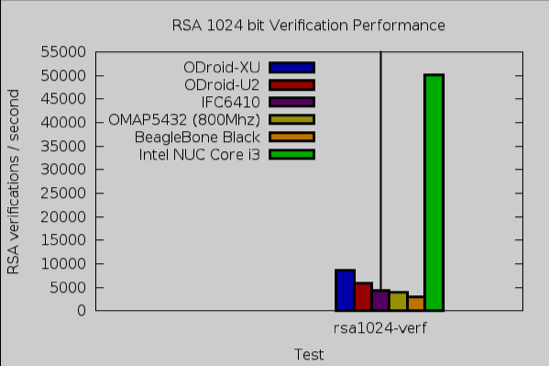
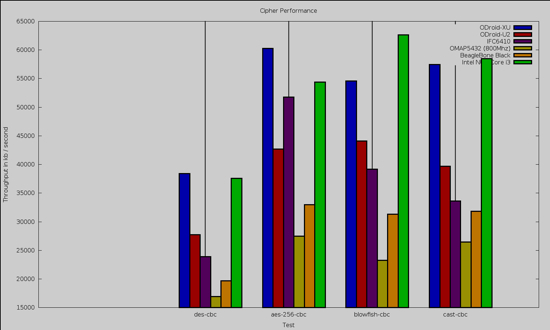
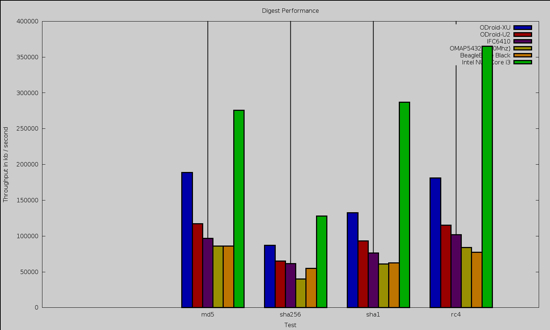
The openssl 1.0.0e “speed” benchmark results are shown below. The NUC has a large performance advantage for RSA operations. It is interesting that for bulk encryption using DES and AES that the ODroid-XU is faster in one of the four tests and around the same performance to the NUC in two of the other tests. For data digests the NUC has a noticeable advantage.
As for video playback, Big Buck Bunny at 1080 using mplayer spent most CPU time in the 20-30 percent range with occasional peaks up to around 60 percent.
I didn’t test any Wi-Fi card that you can connect to one of the internal ports. A big part of that was to keep the cost down for the overall project. It is easy to add 256 GB mSATA, 16 GB of RAM, and Wi-Fi but if you don’t need these things then you might be better off keeping the initial cost down. The wired gigabit port worked fine and didn’t contribute to an already cluttered Wi-Fi network. Remember to grab the C5 power cable if you are getting a NUC, and make sure you have a mini HDMI cable if you want to use that display connector on the NUC. Apart from needing to direct pulseaudio to use HDMI for sound, and a little tinker for the infrared input, most things on the NUC worked out of the box with Fedora 20.
Many of the ARM machines operate in the 2-3 W at idle and range up into the 10 W range under load. The NUC wants 6-7 W idle and up around 16 W under load. The NUC offered great performance and some very nice Cairo benchmarks.


