
So, you want to stuff your Linux laptop or PC full of virtual machines and perform all manner of mad experiments. And so you shall, and a fine time you will have. Come with me and learn how to do this with KVM.
KVM, kernel-based virtual machine, was originally developed by Qumranet. Red Hat bought Qumranet in 2008, re-licensed KVM to the GPL, and then it became part of the mainline kernel. KVM is a type 2 hypervisor, which means it runs on a host operating system. VirtualBox and Hyper-V are type 2 hypervisors. In contrast, type 1 hypervisors run on the bare metal and don’t need host operating systems, like Xen and VMware ESX.
“Hypervisor” is a old term from the early days of computing. It has taken various meanings over the decades; I’m satisfied with thinking of it as a virtual machine manager that has control over hardware, hardware emulation, and the virtual machines.
Prerequisites
KVM runs unmodified guest operating systems, including Linux, Unix, Max OS X, and Windows. You need a CPU with virtualization support, and while it is unlikely that your CPU does not have this, it takes just a second to check.
$ egrep -o '(vmx|svm)' /proc/cpuinfo
vmx
vmx
vmx
vmx
vmx
vmx
vmx
vmx
vmx means Intel, and svm is AMD. That is a quad-core Intel CPU with eight logical cores, and it is ready to do the virtualization rock. (Intel Core i7-4770K 3.50GHz, a most satifying little powerhouse that handles everything I throw at it, including running great thundering herds of VMs.)
Download a few Linux .isos for creating virtual machines.
Create two new directories, one to hold your .isos, and one for your storage pools. You want a lot of disk space, so put these in your home directory to make testing easier, or any directory with a few hundred gigabytes of free space. In the following examples, my directories are ~/kvm-isos and ~/kvm-pool.
Installing KVM
Remember back in the olden days, when how-tos like this were bogged down with multiple installation instructions? We had to tell how to install from source code, from dependency-resolving package managers like apt and yum, and non-dependency-resolving package managers like RPM and dpkg. If we wanted to be thorough we included pkgtool, pacman, and various graphical installers.
Happy I am to not have to do that anymore. KVM on Ubuntu and CentOS 7 consists of qemu-kvm, libvirt-bin, virt-manager, and bridge-utils. openSUSE includes patterns-openSUSE_KVM_server, which installs everything, and on Fedora install virt-manager, libvirt, libvirt-python, and python-virtinst. You probably want to review the instructions for your particular flavor of Linux in case there are quirks or special steps to follow.
After installation, add yourself to the libvirt or libvirtd group, whichever one you have, and then log out and log back in. This allows you to run commands without root privileges. Then run this virsh command to check that the installation is successful:
$ virsh -c qemu:///system list
 Id Name                 State
--------------------------------
When you see this it’s ready to go to work.
Starting the Virtual Machine Manager
Look in your applications menu for Virtual Machine Manager and open it. In Ubuntu and openSUSE it’s under System. If you can’t find it then run the virt-manager command with no options. You will see something like Figure 1.
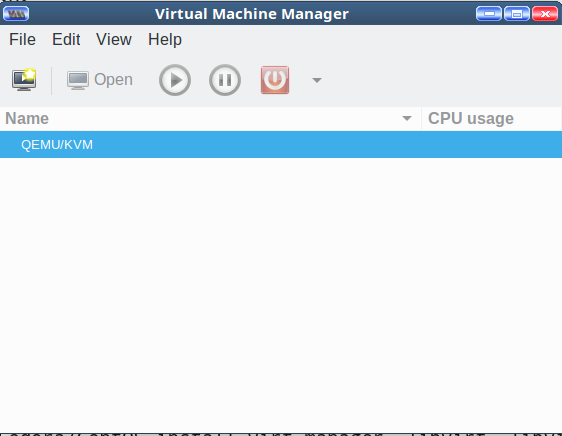
It’s not much to look at yet. Cruise through the menus, and double-click QEMU/KVM to start it, and to see the Connection Details window. Again, not much to see, just idle status monitors and various configuration tabs.
Create a Virtual Machine
Now create a new virtual machine with one of those .isos you downloaded. I’ll use Fedora 25.
Go to File > New Virtual Machine. You get a nice dialog that offers several choices for your source medium. Select Local Install Media (ISO image or CDROM), then click Forward.
On the next screen check Use ISO Image:, and click the Browse button. This opens the Choose Storage Volume screen. The default storage volume of around 24GB in /var/lib/libvirt/images is too small, so you want to use your nice new kvm-pool directory. The interface is a little confusing; first, you create your nice large kvm-pool in the left pane, and then create individual storage pools for your VMs in the right pane each time you create a new VM.
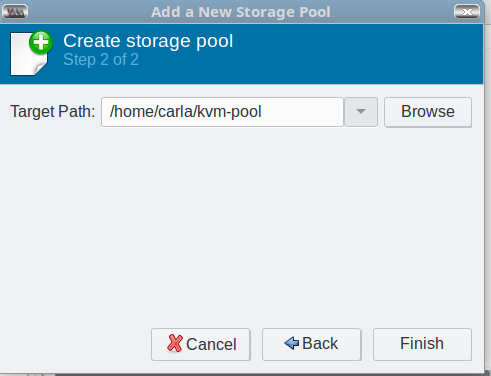
Start by clicking the green add button at the bottom left to add your new large storage pool. This opens the Add a New Storage Pool screen. Select the dir: Filesystem Directory type, type a name for your storage pool, and click Forward (Figure 2).

In the next screen, click the Browse button to browse to the pool directory you created back in the Prequisites section; this becomes the Target Path, and then click Finish (Figure 3).
Now you’re back at the Choose Storage Volume screen. You should see the default and your new storage pool in the left pane.
Click the Browse Local button at the bottom of the right pane to find the .iso you want to use. Select one and click Forward. This automatically adds your .iso directory to the left pane.
In the next screen, set your CPU and memory allocations, then click Forward. For Fedora I want two CPUs and 8096MB RAM.
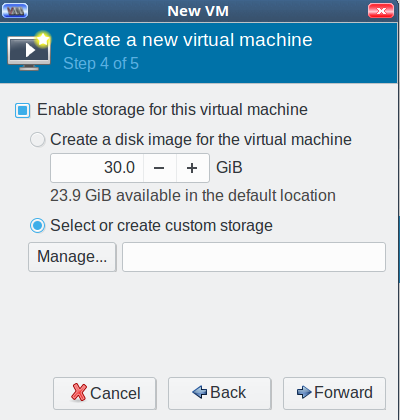
Click Forward, and enable storage for your new VM. Check Select or create custom storage, and click the Manage button (Figure 4).
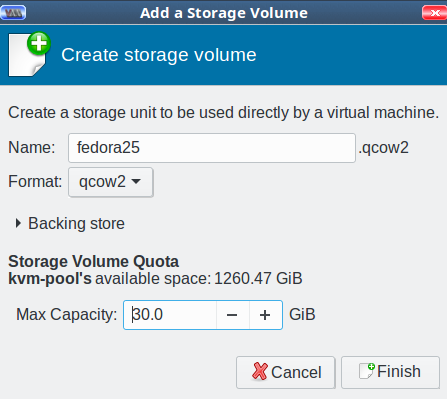
Now you’re back at the Choose Storage Volume screen. Click the green create new volume button next to Volumes in the right pane. Give your new storage volume a name and size, then click Finish (Figure 5). (We’ll get into the various format types later; for now go with qcow2.)
This brings you back to Choose Storage Volume. It should look like Figure 6.
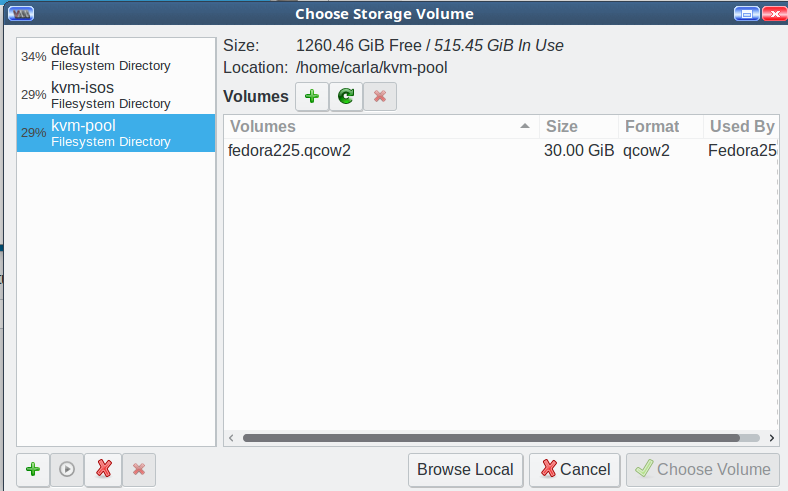
Select your new storage pool, highlight your new storage volume, and click Choose Volume. Now you’re back at Step 4 of 5, Create a new virtual machine. Click Forward. In Step 5, type the name of your new VM, then click Finish and watch your new virtual machine start. As this is an installation .iso, the final step is to go through the usual installation steps to finish creating your VM.
When you create more VMs, the process will be more streamlined because you will use the .iso and storage pools you created on the first run. Don’t worry about getting things exactly right because you can delete everything and start over as many times as you want.
Come back next week to learn about networking and configurations.
Learn more about Linux through the free “Introduction to Linux” course from The Linux Foundation and edX.


