
The Linux desktop and server enjoys a remarkable level of security. That doesn’t mean, however, you should simply rest easy. You should always consider that your data is always a quick hack away from being compromised. That being said, you might want to employ various tools for encryption, such as GnuPG, which lets you encrypt and decrypt files and much more. One problem with GnuPG is that some users don’t want to mess with the command line. If that’s the case, you can turn to a desktop file manager. Many Linux desktops include the ability to easily encrypt or decrypt files, and if that capability is not built in, it’s easy to add.
I will walk you through the process of encrypting and decrypting a file from within three popular Linux file managers:
-
Nautilus (aka GNOME Files)
-
Dolphin
-
Thunar
Installing GnuPG
Before we get into the how to of this, we have to ensure your system includes the necessary base component… GnuPG. Most distributions ship with GnuPG included. On the off chance you use a distribution that doesn’t ship with GnuPG, here’s how to install it:
-
Ubuntu-based distribution: sudo apt install gnupg
-
Fedora-based distribution: sudo yum install gnupg
-
openSUSE: sudo zypper in gnupg
-
Arch-based distribution: sudo pacman -S gnupg
Whether you’ve just now installed GnuPG or it was installed by default, you will have to create a GPG key for this to work. Each desktop uses a different GUI tool for this (or may not even include a GUI tool for the task), so let’s create that key from the command line. Open up your terminal window and issue the following command:
gpg --gen-key
You will then be asked to answer the following questions. Unless you have good reason, you can accept the defaults:
-
What kind of key do you want?
-
What key size do you want?
-
Key is valid for?
Once you’ve answered these questions, type y to indicate the answers are correct. Next you’ll need to supply the following information:
-
Real name.
-
Email address.
-
Comment.
Complete the above and then, when prompted, type O (for Okay). You will then be required to type a passphrase for the new key. Once the system has collected enough entropy (you’ll need to do some work on the desktop so this can happen), your key will have been created and you’re ready to go.
Let’s see how to encrypt/decrypt files from within the file managers.
Nautilus
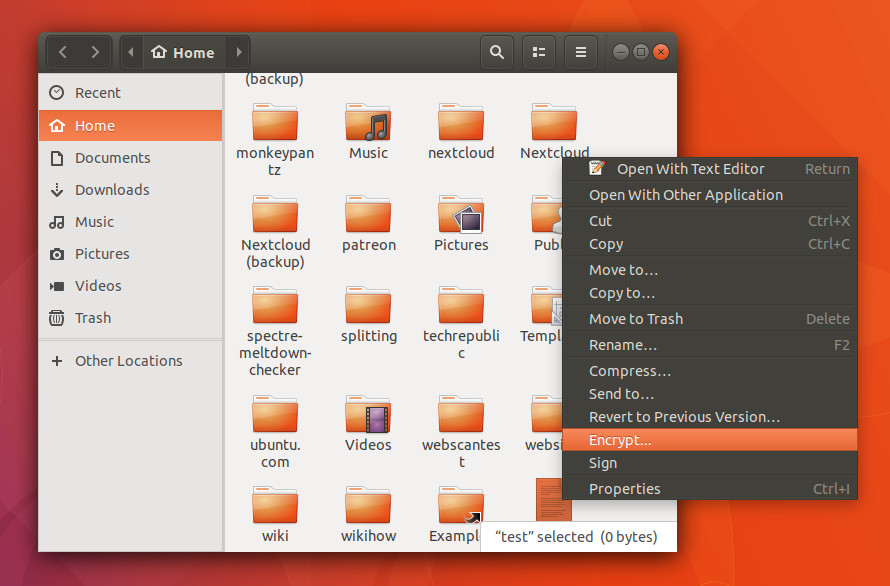
We start with the default GNOME file manager because it is the easiest. Nautilus requires no extra installation or extra work to encrypt/decrypt files from within it’s well-designed interface. Once you have your gpg key created, you can open up the file manager, navigate to the directory housing the file to be encrypted, right-click the file in question, and select Encrypt from the menu (Figure 1).
You will be asked to select a recipient (or list of recipients — Figure 2). NOTE: Recipients will be those users whose public keys you have imported. Select the necessary keys and then select your key (email address) from the Sign message as drop-down.
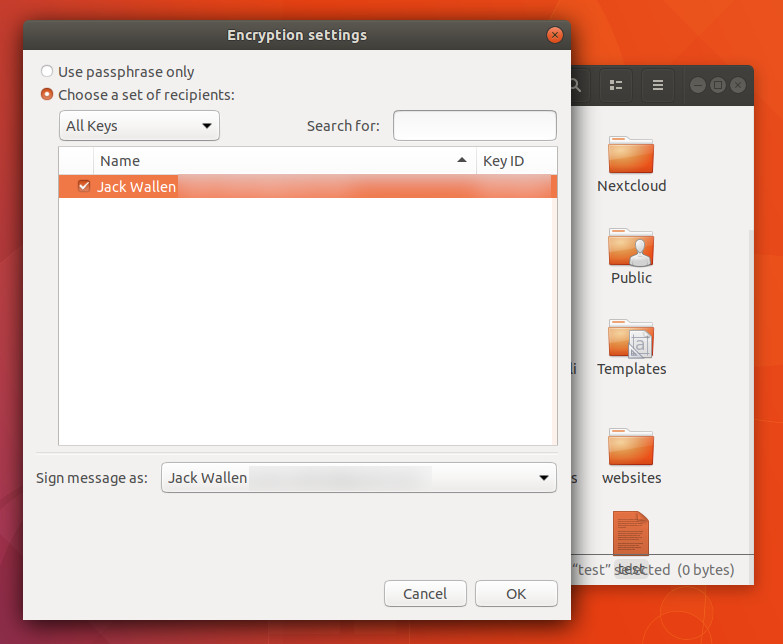
Notice you can also opt to encrypt the file with only a passphrase. This is important if the file will remain on your local machine (more on this later). Once you’ve set up the encryption, click OK and (when prompted) type the passphrase for your key. The file will be encrypted (now ending in .gpg) and saved in the working directory. You can now send that encrypted file to the recipients you selected during the encryption process.
Say someone (who has your public key) has sent you an encrypted file. Save that file, open the file manager, navigate to the directory housing that file, right-click the encrypted file, select Open With Decrypt File, give the file a new name (without the .gpg extension), and click Save. When prompted, type your gpg key passphrase and the file will be decrypted and ready to use.
Dolphin
On the KDE front, there’s a package that must be installed in order to encrypt/decrypt from with the Dolphin file manager. Log into your KDE desktop, open the terminal window, and issue the following command (I’m demonstrating with Neon. If your distribution isn’t Ubuntu-based, you’ll have to alter the command accordingly):
sudo apt install kgpg
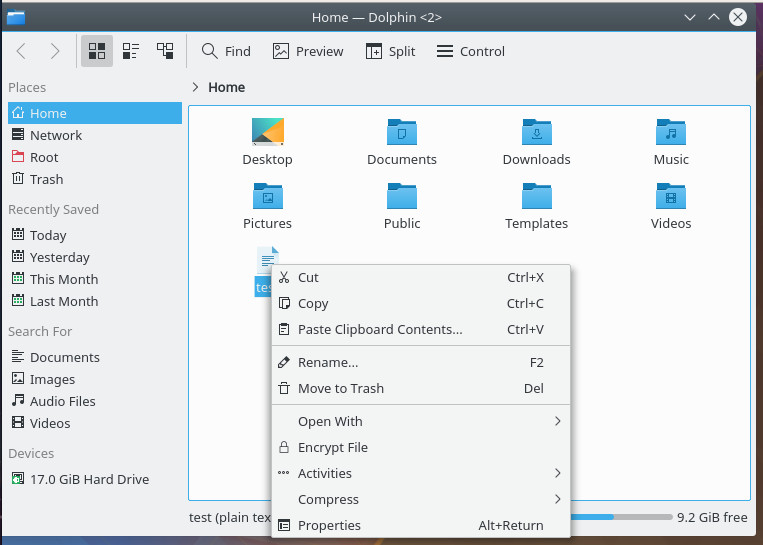
Once that installs, logout and log back into the KDE desktop. You can open up Dolphin and right-click a file to be encrypted. Since this is the first time you’ve used kgpg, you’ll have to walk through a quick setup wizard (which self-explanatory). When you’ve completed the wizard, you can go back to that file, right-click it (Figure 3), and select Encrypt File.
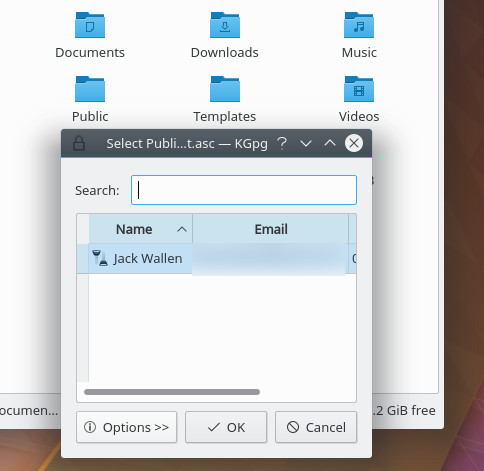
You’ll be prompted to select the key to use for encryption (Figure 4). Make your selection and click OK. The file will encrypt and you’re ready to send it to the recipient.
Note: With KDE’s Dolphin file manager, you cannot encrypt with a passphrase only.
If you receive an encrypted file from a user who has your public key (or you have a file you’ve encrypted yourself), open up Dolphin, navigate to the file in question, double-click the file, give the file a new name, type the encryption passphrase, and click OK. You can now read your newly decrypted file. If you’ve encrypted the file with your own key, you won’t be prompted to type the passphrase (as it has already been stored).
Thunar
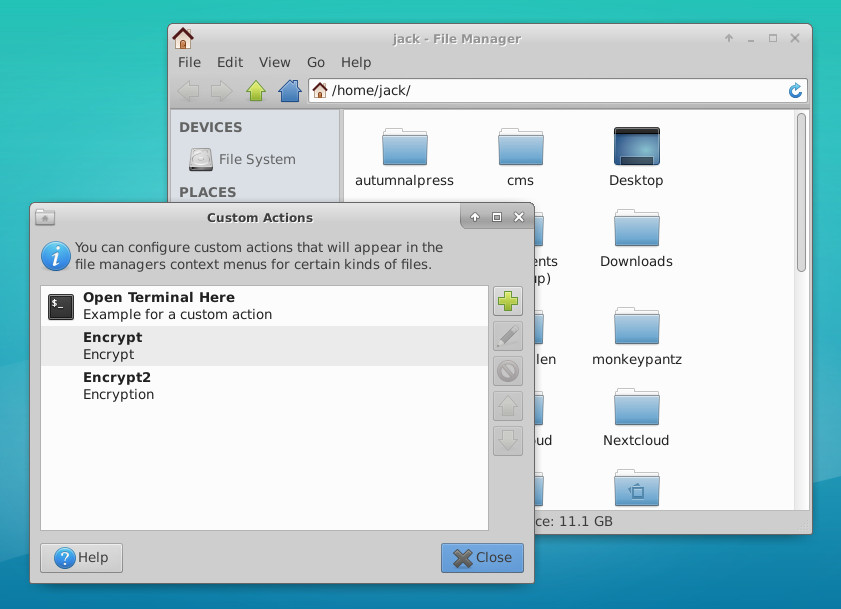
The Thunar file manager is a bit trickier. There aren’t any extra packages to install; instead, you need to create new custom action for Encrypt. Once you’ve done this, you’ll have the ability to do this from within the file manager.
To create the custom actions, open up the Thunar file manager and click Edit > Configure Custom Actions. In the resulting window, click the + button (Figure 5) and enter the following for an Encrypt action:
Name: Encrypt
Description: File Encryption
Command: gnome-terminal -x gpg –encrypt –recipient %f
Click OK to save this action.
NOTE: If gnome-terminal isn’t your default terminal, substitute the command to open your default terminal in.
You can also create an action that encrypts with a passphrase only (not a key). To do this, the details for the action would be:
Name: Encrypt Passphrase
Description: Encrypt with Passphrase only
Command: gnome-terminal -x gpg -c %f
You don’t need to create a custom action for the decryption process, as Thunar already knows what to do with an encrypted file. To decrypt a file, simply right-click it (within Thunar), select Open With Decrypt File, give the decrypted file a name, and (when/if prompted) type the encryption passphrase. Viola, your encrypted file has been decrypted and is ready to use.
One caveat
Do note: If you encrypt your own files, using your own keys, you won’t need to enter an encryption passphrase to decrypt them (because your public keys are stored). If, however, you receive files from others (who have your public key) you will be required to enter your passphrase. If you’re wanting to store your own encrypted files, instead of encrypting them with a key, encrypt them with a passphrase only. This is possible with Nautilus and Thunar (but not KDE). By opting for passphrase encryption (over key encryption), when you go to decrypt the file, it will always prompt you for the passphrase.
Other file managers
There are plenty of other file managers out there, some of them can work with encryption, some cannot. Chances are, you’re using one of these three tools, so the ability to add encryption/decryption to the contextual menu is not only possible, it’s pretty easy. Give this a try and see if it doesn’t make the process of encryption and decryption much easier.


