
Every so often I run into a Linux distribution that reminds me of the power of open source software. SharkLinux is one such distribution. With a single developer creating this project, it attempts to change things up a bit. Some of those changes will be gladly welcomed by new users, while scoffed at by the Linux faithful. In the end, however, thanks to open source software, the developer of SharkLinux has created a distribution exactly how he would want it to be. And that my friends, is one amazing aspect of open source. We get to do it our way.
But what is SharkLinux and what makes it stand out? I could make one statement about SharkLinux and end this now. The developer of SharkLinux reportedly developed the entire distribution using only an Android phone. That, alone, should have you wanting to give SharkLinux a go.
Let’s take a look at this little-known distribution and see it’s all about.
What Exactly is SharkLinux?
First off, SharkLinux is based on Ubuntu and makes use of a custom Mate/Xfce desktop. Outside of the package manager, the similarities between SharkLinux and Ubuntu are pretty much non-existent. Instead of aiming for the new or average user, the creator has his eyes set on developers and other users who need to lean heavily on virtualization. The primary feature set for SharkLinux includes:
-
KVM hypervisor
-
Full QEMU Utilities
-
Libvirt and Virtual Machine Manager
-
Vagrant (mutate and libvirt support)
-
LXD/LXC/QLc/LXDock
-
Docker/Kubernetes
-
VMDebootstrap
-
Virt-Install/Convert
-
Launch Local Cloud Images
-
Full System Containers GUI Included
-
Kimchi – WebVirtCloud – Guacamole
-
Vagrant Box Conversion
-
Many Dashboards, Admin Panels
-
LibGuestFS and other disk/filesystem tools
-
Nested Virtualization (hardware depending)
-
Alien (rpm) LinuxBrew (Mac) Nix Package Manager
-
Powershell, Upstream WINE (Win)
-
Cloud Optimized Desktop
-
Dozens of wrappers, automated install scripts, and expansion packs
-
Guake terminal
-
Kernel Options v4.4** -> v4.12*
Clearly, SharkLinux isn’t built for those who simply need a desktop, browser, and office suite. This includes tools for a specific cross section of users. Let’s dive in a bit deeper.
Post Install
As per usual, I don’t want to waste time on the installation of another Linux distribution, simply because that process has become so easy. It’s point and click, fill out a few items, and wait for 5-10 minutes for the call to reboot.
Once you’ve logged into your newly installed instance of SharkLinux, you’ll immediately notice something different. The “Welcome to SharkLinux” window is clearly geared toward users with a certain level of knowledge. Tasks such as Automatic Maintenance, the creation of swap space, sudo policy, and more are all available (Figure 1).

The first thing you should do is click the SharkLinux Expansion button. When prompted, click Yes to install this package. Without this package installed, absolutely no upstream packages are enabled for the system. Until you install the expansion, you’ll be missing out on a lot of available software. So install the SharkLinux Expansion out of the gate.
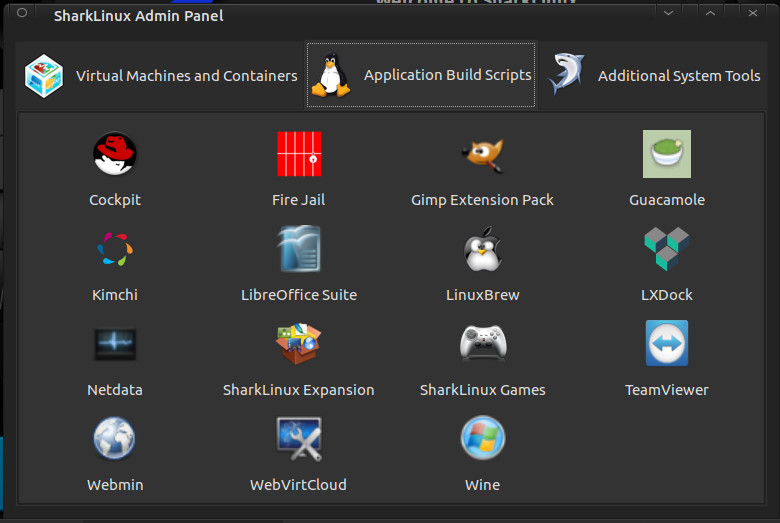
Next you’ll want to install the SharkExtras. This makes it easy to install other packages (such as Bionic, MiniKube, Portainer, Cockpit, Kimchi, Webmin, Gimp Extension Pack, Guacamole, LXDock, Mainline Kernel, Wine, and much more (Figure 2).
Sudo Policy
This is where things get a bit dicey for the Linux faithful. I will say this: I get why the developer has included this. Out of the box, SharkLinux does require a sudo password, but with the Sudo Policy editor, you can easily set up the desktop such that sudo doesn’t require a password (Figure 3).
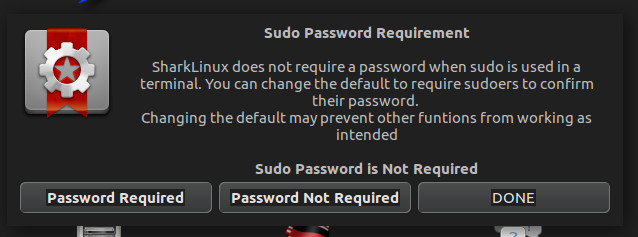
Click on the Sudo Policy button in the Welcome to SharkLinux window and then either click Password Required or Password Not Required. Use this option with great caution, as you’d reduce the security of the desktop by disabling the need for a sudo password.
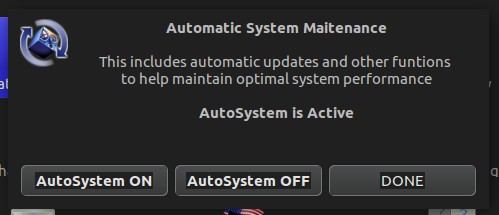
Automatic Maintenance
Another interesting feature, found in the Welcome to SharkLinux window is Automatic Maintenance. If you turn this feature on (Figure 4), functions like system updates will occur automatically (without user interaction). For those that often forget to regularly update their system, this might be a good idea. If you’re like me, and prefer to run updates on a daily basis manually, you’ll probably opt to skip this feature.
After taking care of everything you need in the Welcome to SharkLinux window, close it out and you’ll find yourself on the desktop (Figure 5).
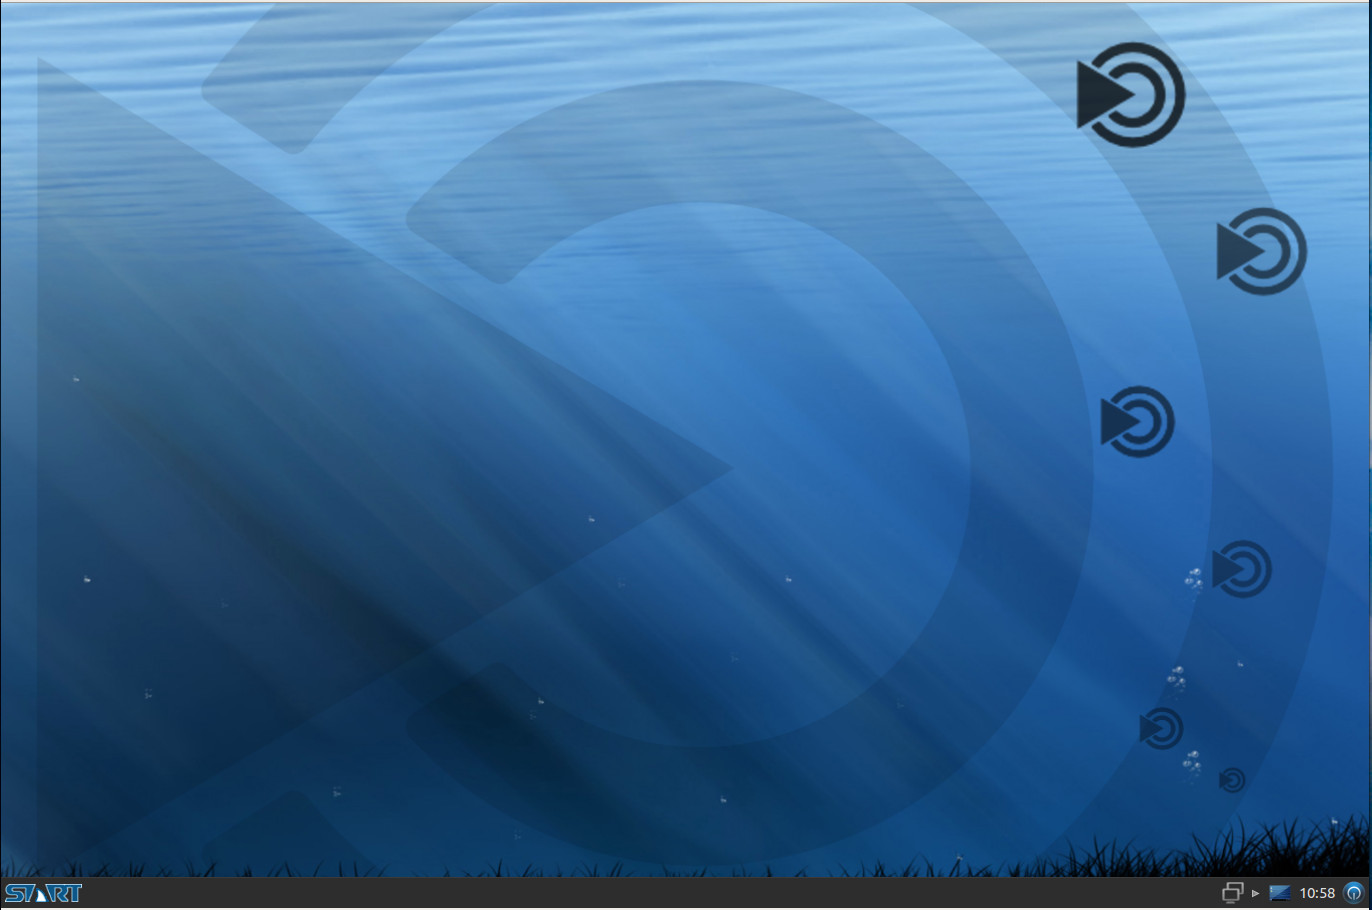
At this point, you can start using SharkLinux as you would any desktop distribution, the difference being you’ll have quite a bit more tools for virtualization and development at your disposal. One tiny word of warning: You will notice, by default, the desktop wallpaper is set to randomly change. In that mix of wallpapers, the developer has added one particular wallpaper that may not be quite suitable for a work environment (it’s nothing too drastic, just a woman posing seductively). You can remove that photo from the Appearance Preferences window (should you choose to do so). Beyond that, SharkLinux works as well as any desktop Linux distribution you can find.
One Quirky Distribution
Of all the Linux distributions I have used over the years (and I have used PLENTY), SharkLinux might well be one of the more quirky releases. That doesn’t mean it’s one to avoid. Quite the opposite. I highly recommend everyone interested in seeing what a single developer can do with the Linux platform give SharkLinux a try. I promise you, you’ll be glad you gave it a go. SharkLinux is fun, of that there is no doubt. It’s also a flavor of desktop Linux that shows you what is possible, thanks to open source.
Learn more about Linux through the free “Introduction to Linux” course from The Linux Foundation and edX.


