Linux is a superior audio production platform, and one of its shining stars is the Hydrogen Drum Machine. Hydrogen is an advanced software drum synthesizer that is easy to learn, and yet packed full of great features.
Installation
Naturally you must first install Hydrogen, which should be easy because it is included in most Linux distributions. If you enjoy life on the edge you can install the latest development snapshots from Subversion. Ubuntu and Mint users can get the latest development snapshots from PPA (personal package archives), so they are installed via package manager rather than built from source code. See downloads and installation instructions for more details.
Start Playing
For instant gratification, go to Project -> Open Demo and pick a demo to play. This will tell you right away if Hydrogen is finding the correct audio drivers, and if your sound system is working. The playback controls are near the top left, in the row under the menu bar. I’m running version 9.5 on Debian Testing, which is a development version, and not all the demos work. So try several if you don’t hear anything.
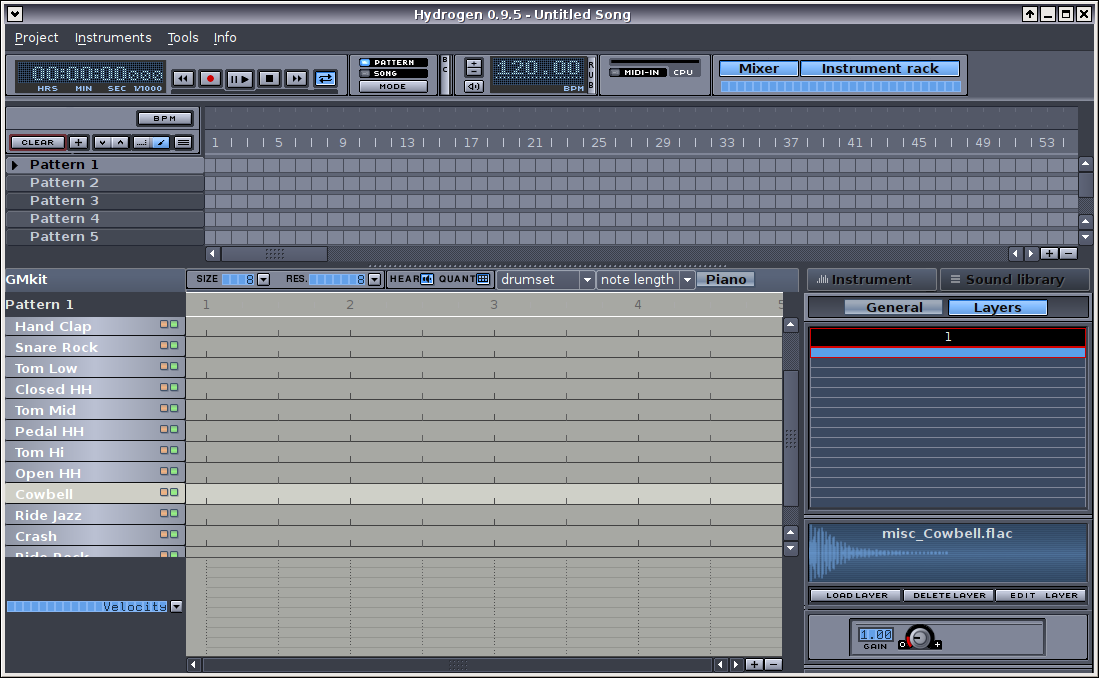
Figure 1 shows Hydrogen in a new, unnamed session (Project -> New). Let’s take a quick tour. On the left you see a stack of rows labeled Pattern 1, Pattern 2, and so on, up to however many there are. This is the Song Editor. Underneath the Song Editor is the Pattern Editor, where the individual instruments are programmed. Click on any of the instrument names (my favorite is the Cowbell) to hear them play.
The Instrument Rack sits to the right of the Pattern Editor. Click the Instrument and Layers buttons to get the same view as Figure 1. This is pretty slick, as it shows you the filename of the instrument sound sample, and you can adjust the gain. It has a circular gain knob, but don’t try a circular motion with your cursor because it won’t work. The cursor changes to a double arrow which you move vertically, up or down, to adjust the gain.
Now click the Sound library button to see all of the available system drumkits. Mine came with a big batch: Boss, EasternHop, HipHip, Millo-Drums, Roland, TR808, and several more. Right-click on the one you want to use, then left-click Load.
Note also, at the end of the system drumkit list, an option for User Drumkits. You can download more drumkits in Instruments -> Import library, and more are available on the Libraries page. You can even create your own.
Composing
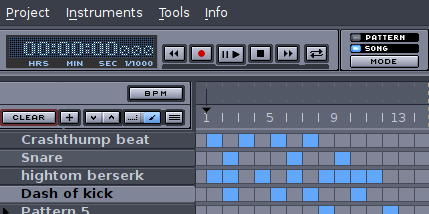
Click Pattern 1 in the Song Editor, then drop down to the Pattern Editor to compose Pattern 1. How do you compose? Just click in the grid where you want the beats to play. When Pattern 1 is finished compose Pattern 2, and so on. In Figure 1 I am using the Yamama Vintage Kit. Look to the right of the playback control bar to see the Song and Pattern mode controls– to preview your pattern, put it in Pattern mode and click the play button. To hear your whole song, put it in Song mode. If you play in Song mode you won’t hear anything yet, because you still have to incorporate your patterns into a song. To do this go up to the Song Editor and click in the grid squares. The squares that turn blue indicate where each pattern will play in the song’s timeline. Each blue square is one measure. Figure 2 shows how it looks with several completed patterns in the song.
As you can see, composing in Hydrogen is super-easy, and it takes longer to explain than to do. Change the pattern names in the Song editor with right-click -> Properties. In the Pattern Editor there are two little buttons for each instrument, a red button and a green button. Click the green button to for solo play, and click the red button to mute individual instruments.
You can save time in the Pattern editor with auto-fills– just right-click on an instrument, and use Fill Notes. This menu also has a “Randomize velocity” option, which enlivens the sound so it doesn’t sound so mechanical. You can adjust the velocity manually by changing the heights of the vertical velocity bars at the bottom of the Pattern Editor.
The Velocity option is on a drop-down menu that includes Pan, Lead and Lag, and Notekey. Pan controls the stereo imaging by making the sound centered, or stronger to the left or right. Lead and Lag controls whether the notes play exactly on the beat, or in front or behind it.
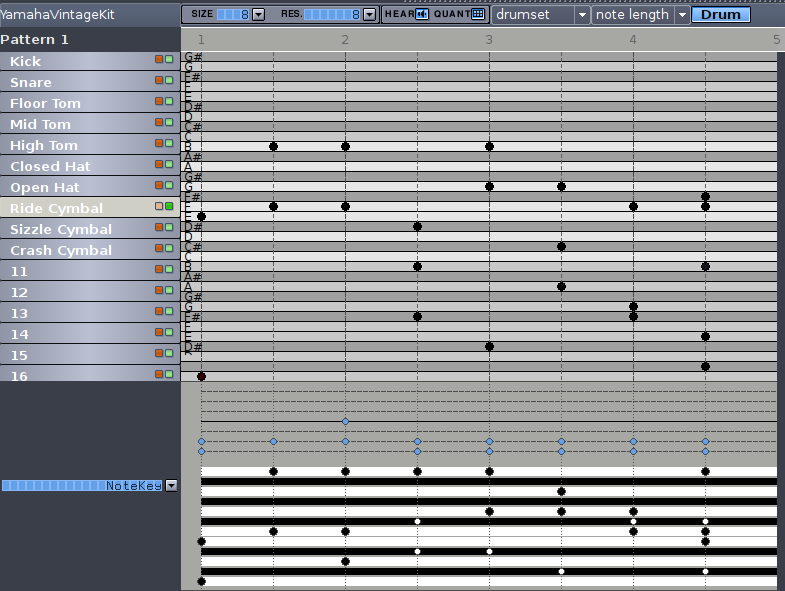
Notekey is a terrific effect that adds tones to the instruments. To get the hang of using Notekey set up a simple four-beat pattern. Get the playback going, then move the blue and black dots by clicking on the grid. Moving them down creates lower tones, and moving blue and black dots towards each other creates interesting unpredictable chords. Try clicking the Piano button to change the view to Figure 3. Now you have a whole piano keyboard to compose on.
Over in the Instrument Rack click the General button to adjust the properties of each instrument, such as attack, decay, and resonance. Switch to the Layers view to edit the sound samples.
Building Your Own Sample Library
The Internet is full of audio samples to download and use (don’t forget to check licensing on anything you want to perform or distribute), and of course you can record and create your own. Many of Hydrogen’s audio samples are in FLAC format, which is a good choice because you get the high quality of WAV in a lossless compressed format. If you don’t care about saving disk space then WAV works too.
Hydrogen has MIDI support, both input and output, so you can hook up a MIDI controller and play or compose in Hydrogen, and export MIDI files.
Mixer
The Mixer should open by default in a separate window. It displays the instruments in the drumkit you are using. The arrow buttons for each instrument trigger a single note so you can quickly check volume levels. The little blue LED to the right of arrow buttons blinks whenever something triggers the instruments, whether it’s a Hydrogen song or a MIDI controller. The blue LED stays lit when there is no playback, to show which instrument is selected in the Pattern Editor. Below these are the Mute and Solo buttons, and then the Pan knob.
Next are the four FX buttons, which route instruments through the FX rack, which is to the right of the instrument sliders. Zero means no special effects are applied. Each knob corresponds to one FX plugin, in this order:
1 2
3 4
The FX rack controls up to four LADSPA special effects. These are software special effects, and LADSPA should be familiar to anyone doing audio production on Linux. Your distro should include LADSPA bundles, and there are tons of them all over the Internet. First download and install some LADSPA effects, and then select the ones you want to use by clicking the Edit buttons in the FX rack.
Next to the FX rack is Master slider, and next to this are the Humanize, Timing, and Swing knobs. Synthetic drumming oftens sound synthetic. Use these knobs to randomize velocity and timing, to make it sound more like a person is playing.
Well here we are at the end already. Please consult the excellent documentation for more information, and consider dropping a few bucks in the Hydrogen team’s beer fund.


