
The NVIDIA Jetson TX1 offers enormous GPU processing in a tiny computer that only consumes 5-20 watts of power. Aside from the GPU, the CPU is certainly not slow with four 64-bit A57 ARM cores. And, you have 4GB of RAM and 16GB of eMMC storage, so you should be able to load your application onto the on-board storage and throw around big chunks of data in RAM. The SATA interface gave great performance when paired to an SSD, and the two antenna 802.11ac gave speeds up to gigabit Ethernet over the air.
The small size, low power, and great GPU processing of the Jetson TX1 screams for robotics applications where the machine is on the move and needs to process streams of images and sensor data in real time. Stepping away from robotics specifically, the Jetson TX1 is a very interesting machine when you want to take performance with you. Whether the Jetson TX1 is driving a screen in a car seat or performing image recognition at a remote location with limited bandwidth — it’s a smarter choice to perform processing on site. You might not care about the 4k video streams at a job site, but you want to know if an unknown person is detected in any image at 2am.
The heart of the Jetson is on a computer on a module (COM). This includes the NVIDIA Maxwell GPU, CPUs, RAM, storage, WiFi handling, etc. The COM contains all these and physically sits below the aluminum heat sink in the picture. To help you use all these features, a base board with a mini-ITX form factor is part of the developer kit, and it gives you one USB3 port, a microUSB port for setup, 19-volt DC input for power, HDMI 2.0, SATA, full-sized SD card slot, camera and display connections, two antenna connectors, and access to low-level hardware interaction such as SPI, GPIO, and TWI connections.
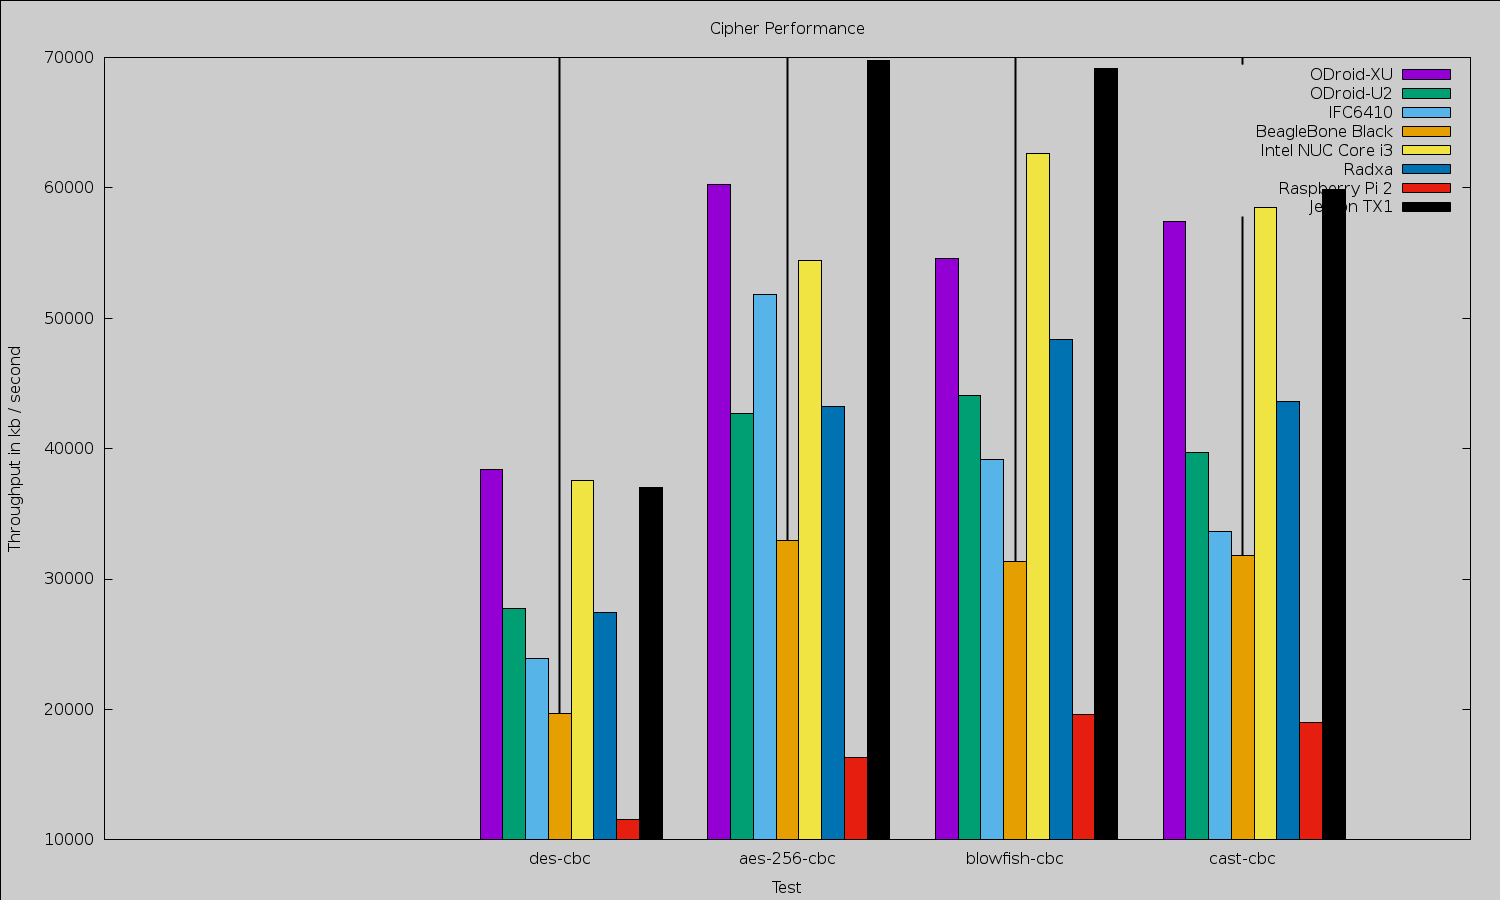
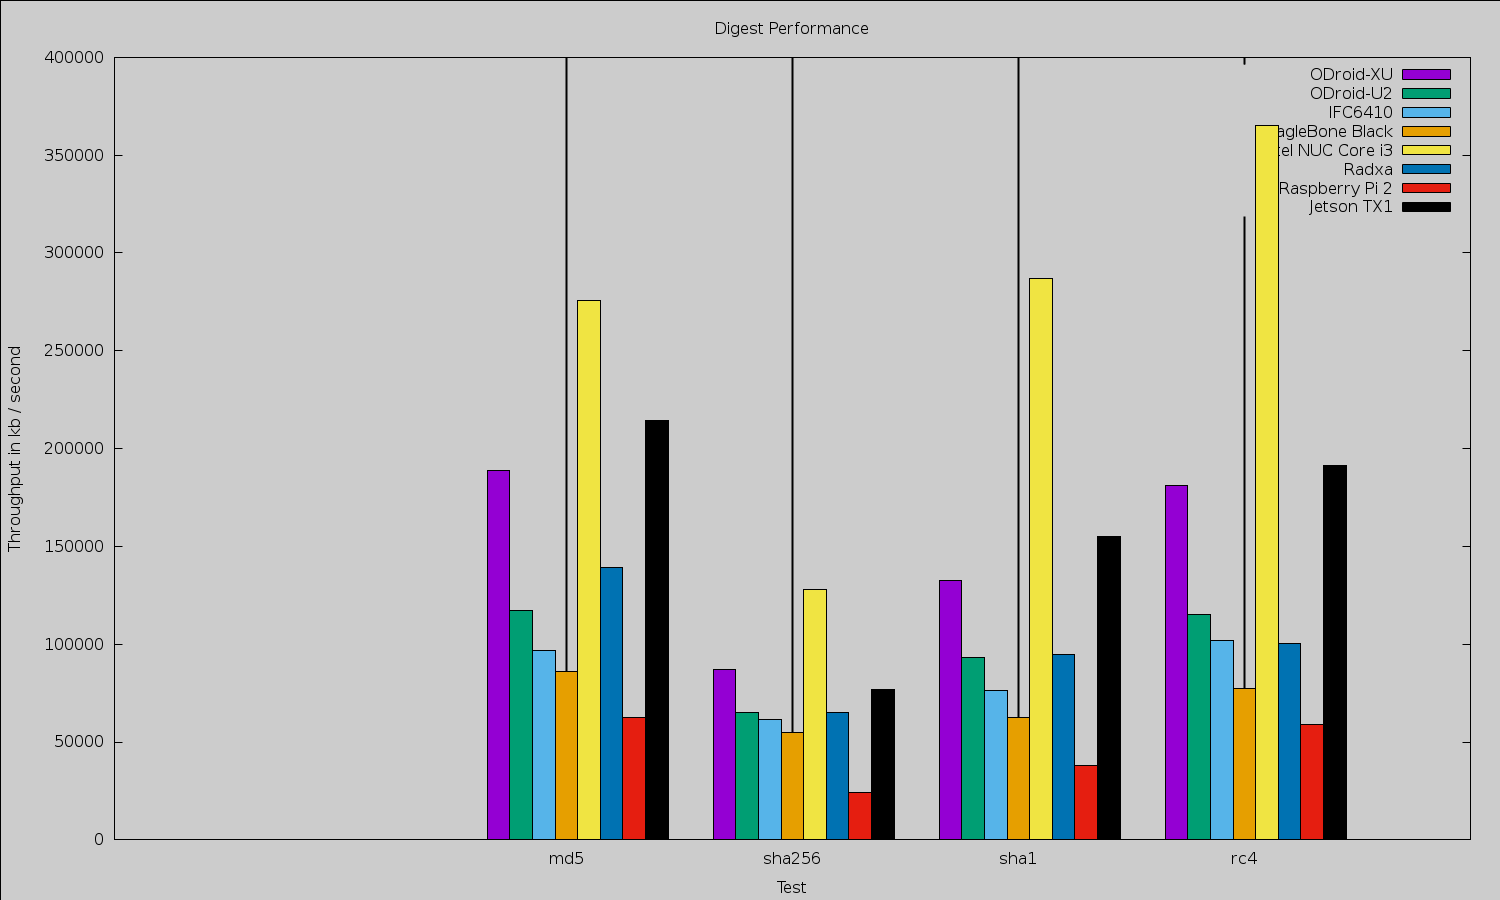
Because of the small size of the Jetson TX1, it is tempting to compare it with other small machines like the various Raspberry Pis, BeagleBone Black, and ODroid offerings (Figures 1 and 2). Any such comparison will quickly lead to moving away from benchmarks that target the CPU only to considering the performance advantage offered by the NVIDIA Maxwell GPU on the Jetson board that is covered later in the article. The GPU can perform many general-purpose tasks as well as much of the image manipulation and mathematics used in high-end robotics. When comparing the Jetson TX1 with desktop and server hardware, however, although the latter can have powerful GPU hardware, the Jetson will likely draw significantly less power.
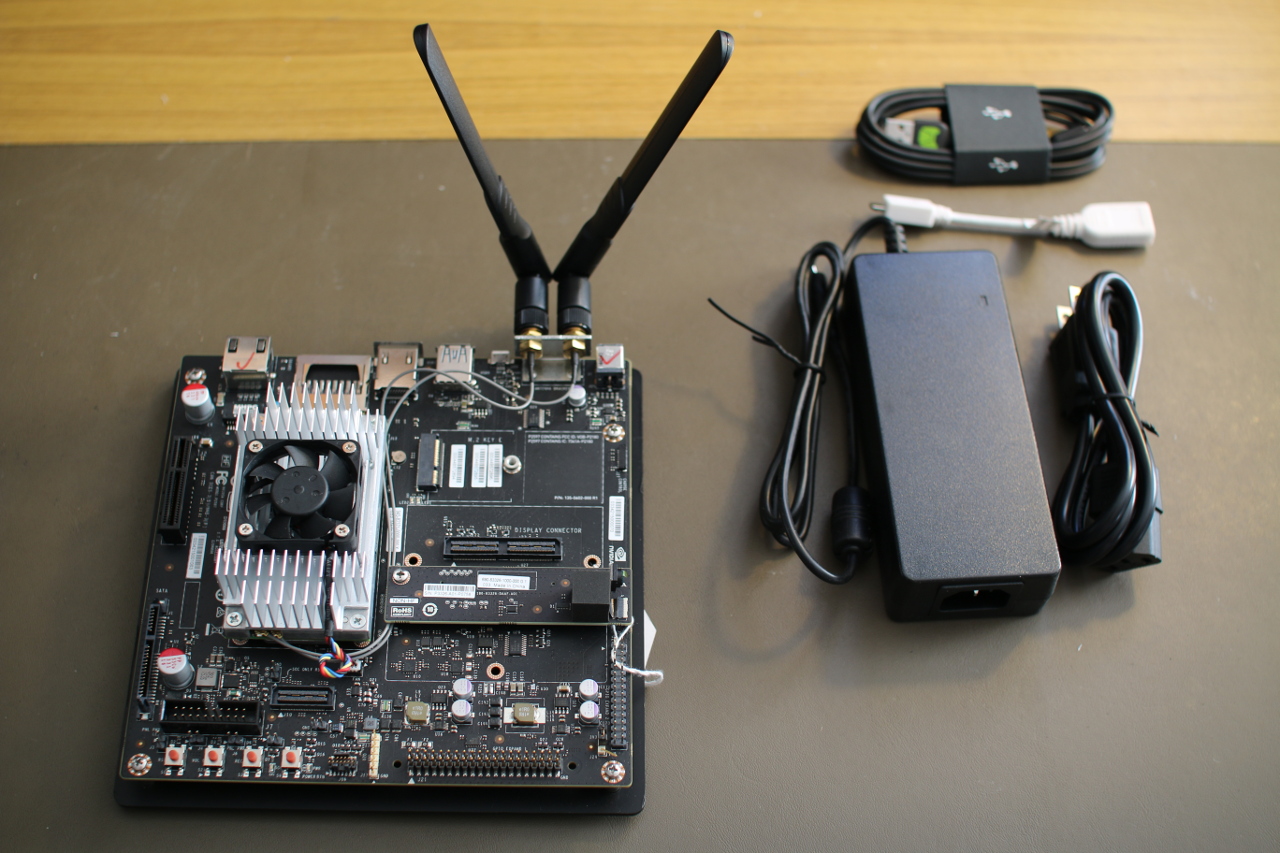
The base board has a M.2 Key E slot on it. Most M.2 SSD drives need a Key B and/or Key M instead. So, you should make sure that an SSD is going to be compatible with Key E if you are hoping to expand the storage on the Jetson TX1 using the M.2 slot. You’ll also find regular SATA and SATA power connectors on the Jetson TX1, which might be a more hassle-free route to an SSD. You will have to order cables for these SATA and power ports, because the ones on the Jetson are the opposite gender to those on a regular motherboard. I was tempted to try to connect a SATA SSD directly to the base board (the connectors themselves would allow this), but there is a large capacitor in the way blocking such maneuvers.
Unlike many other small Linux machines, the Jetson TX1 wants you to have a desktop machine with 64-bit Ubuntu 14.04 running on it in order to get started. In some ways, this approach makes things simpler, because you can follow the prompts provided by the Jetpack for L4T installer software. If you have your Jetson TX1 connected via USB to the Ubuntu desktop and the network cable plugged into the Jetson TX1 with access to the Internet without needing a proxy server, then everything installs fairly easily. The instructions are shown on screen when you need to put the Jetson TX1 into recovery mode to flash the software, and everything runs smoothly.
When I first started up the Jetson, I tried to find demos in the menu. Opening a file manager shows many graphical and general-purpose GPU programming examples to be explored. There is also GStreamer support for taking advantage of the hardware and a version of OpenCV optimized to run on the GPU. The more standard libraries and tools that can be optimized to take advantage of running on the GPU, the easier it will become to fully take advantage of the Jetson TX1. Imagine if std::sort could offload the mergesort to your GPU, and all of a sudden a large sort was 15 times faster.
The WIFI came up without any issue or manual intervention. When connecting the Jetson to a D-Link DSL-2900AL router, iwconfig reported a bitrate of 866.5 Mb/s. I used the following command to initiate the connection to my access point.
nmcli dev wifi con ACCESSPOINTNAME password PASSWORDHERE name ACCESSPOINTNAME
Performance
Looking at general purpose computing speed, in the advanced section of the CUDA examples, there are mergesort implementations for both the CPU and the GPU. This was a golden chance for me to test performance on a common task not only on the Tegra CPU and GPU but also to throw in numbers for Intel CPUs to compare with. I noticed that compiling for the CPU, there was a huge difference in performance between just compiling and using -O3, leading me to think perhaps the NEON Single Instruction, Multiple Data (SIMD) instructions might be getting used by gcc at higher optimization levels.
On the Jetson TX1 board, running the gcc -O3 code on the GPU took 8.3 seconds, while the GPU test could complete in 370ms or less. I say “or less” because I hacked the source to include the time taken to copy buffers from CPU to GPU and back so the 370ms is a complete round trip. About half the 370ms were spent copying data to and from the GPU memory. In contrast, an Intel 2600K took 4 seconds and a Core M-5Y71 took about 4.5 seconds. It is impressive that the CPU-only test was so fast on the Jetson relative to the Intel CPUs. Obviously, if you can do your sorting on the GPU, then you are much better off.
For testing web browsing performance, I used the Octane Javascript benchmark. For reference, using the 64-bit version 32.0.3 of Firefox, an Intel 2600K gives an overall figure of about 21,300, whereas the Intel J1900 chip comes in at about 5,500 overall. Using Iceweasel version 31.4.0esr-1, the Raspberry Pi 2 got 1,316 on Octane. The Jetson TX1 got 5995 using Firefox.
OpenSSL 1.0.1e took about 2 minutes to compile on the Jetson TX1. Although the OpenSSL test is only operating on the A57 core and not taking any advantage of the GPU, it does show that the CPU on the Jetson is very capable. Three of the top scores are taken by the Jetson for plain encryption.
Media
The Jetson has support for both hardware encode and decode of various common image and video formats. This is conveniently exposed through GStreamer so you can take advantage of the speed fairly easily. I grabbed the grill-mjpeg.mov file from the Cinelerra test clips page for testing JPEG image support. The first command below uses the CPU to decode and then re-encode each JPEG frame of the motion jpeg file. The slight modification in the second command causes the dedicated hardware on the Jetson to kick in. The first command took 4.6 seconds to complete, and the second ran in 1.7 seconds.
gst-launch-1.0 filesrc location=grill-mjpeg.mov !
 qtdemux ! jpegdec ! jpegenc !
 filesink location=/tmp/test_out.jpg -v -e

gst-launch-1.0 filesrc location=grill-mjpeg.mov !
 qtdemux ! nvjpegdec ! nvjpegenc !
 filesink location=/tmp/test_out.jpg -v -e
The Jetson comes with a CSI camera attached to the base board. It has been mentioned on the forums that in the future that camera will be exposed through /dev/video. The camera can be accessed already through JetPack install. I tested it using the following command.
gst-launch-1.0 nvcamerasrc fpsRange="30.0 30.0" !
 'video/x-raw(memory:NVMM), width=(int)1920, height=(int)1080, format=(string)I420, framerate=(fraction)30/1' !
 nvtee ! nvvidconv flip-method=2 ! 'video/x-raw(memory:NVMM), format=(string)I420' !
 nvoverlaysink -e
The Jetson can decode and encode H.264 video in hardware. The first command generates a test pattern video and encodes it to H.264 using hardware. The second command generates random “snow” video and encodes it at a much higher bitrate to try to preserve the random patterns of the snow video. Both of these commands caused one CPU core of the Jetson to sit at 100 percent usage.
gst-launch-1.0 videotestsrc !
 'video/x-raw, format=(string)I420, width=(int)1920, height=(int)1080' !
 omxh264enc ! matroskamux ! filesink location=test -e

gst-launch-1.0 videotestsrc  pattern="snow" !
 'video/x-raw, format=(string)I420, width=(int)1920, height=(int)1080, framerate=30/1, pattern=15' !
 omxh264enc profile=8 bitrate=100000000 ! matroskamux !
 filesink location=test -e
Viewing these H.264 files with the following command resulted in each CPU core being used at about 10-15 percent.
gst-launch-1.0 filesrc location=test ! decodebin ! nvoverlaysink
In an attempt to work out how much of the CPU usage in the above encode example was due to buffer handling and source video generation, I encoded data right from the onboard CSI camera with the following command. This resulted in all CPU cores at around 10-15 percent with peaks up to 20 percent. Increasing the encode parameters to use profile=8 bitrate=100000000 and with very large and swift changes on the camera increased the CPU to 100 percent at times.
gst-launch-1.0 nvcamerasrc fpsRange="30.0 30.0" !
 'video/x-raw(memory:NVMM), width=(int)1920, height=(int)1080, format=(string)I420, framerate=(fraction)30/1' !
 nvtee ! nvvidconv flip-method=2 ! 'video/x-raw(memory:NVMM), format=(string)I420' !
 omxh264enc ! matroskamux ! filesink location=test -e
Unfortunately, the version of GStreamer that comes with the current software release for Jetson has a matroskamux that does not support the H.265 format. The Jetson is also capable of handling the H.265 in hardware.
OpenCV
The Jetson comes with a specialized build of OpenCV 2.4.12.3 that is modified to offload calculations onto the GPU. By linking with that OpenCV (which is also the only one installed by default), you should automatically leverage the GPU on the Jetson. I had some fun figuring out how to test this. OpenCV comes with some performance tools if you enable them at build time, but those tools were not packaged by NVIDIA.
I ended up doing my own compilation of OpenCV on the Jetson to get the tools and then replacing OpenCV libraries that were built with the ones supplied with the Jetson. This way I got the performance measuring tools from OpenCV, which were also using the modified OpenCV that takes advantage of the GPU. I also used the script mentioned on the forum, which increases the clock governor limits to their maximum. The script also brings the main fan on for safety. I hadn’t seen much of the fan until this point.
I also compiled the same version of OpenCV on an Intel 2600K desktop machine. Looking at the imgproc results, the BilateralFilter family ranged from the Jetson being about twice as quick as the 2600K through to around 2.5 times slower. The CLAHE::Sz_ClipLimit tests are clearly optimized with the Jetson coming in at needing around 75 percent of the time the 2600K consumed. There are also cases like Filter2d::TestFilter2d::(1920×1080, 3, BORDER_CONSTANT) where the Jetson is 11 times slower than the 2600K. Some of the colorspace conversions are clearly optimized on the Jetson with cvtColor8u::Size_CvtMode::(1920×1080, CV_RGB2YCrCb) needing only 18 percent of the time that the 2600K took, a result that was repeated again with cvtColorYUV420::Size_CvtMode2 only wanting 11 percent of the time that the 2600K took.
This is not to say that the major share of the imgproc results showed the 2600K being 1.5, 2, 3, or 4 times faster than the Jetson. These are general purpose tests, some of which are operating on small data sets that may not lend themselves to being treated on the GPU. Again, these results were on general purpose OpenCV code, just using the optimized OpenCV implementation that comes with the Jetson. No code changes were made to try to coerce GPU usage.
The features2d results are a mixed bag, the Jetson needing 17 percent the time of the 2600K to calculate batchDistance_Dest_32S::Norm_CrossCheck::(NORM_HAMMING, false) through to the Jetson being 5 times slower for the extract::orb tests and 8 times slower on batchDistance_8U::Norm_Destination_CrossCheck::(NORM_L1, 32SC1, true). OpenCV video tests ranged from almost even through to the Jetson being 4 times slower than the 2600K.
The interested reader can find the results for calib3d, core, features2d, imgproc, nonfree, objdetect, ocl, photo, stitching, and video in detail.
SATA
I connected a 120Gb SanDisk Extreme SSD to test SATA performance. For sequential IO, Bonnie++ could write about 194 Mb/s and read 288 Mb/s and rewrite blocks at about 96 Mb/s. Overall, 3588 seeks/s were able to be done. Many small boards have SATA ports that are not able to reach the potential transfer capabilities of an SSD. Given that this is a slightly older SSD, the Jetson might allow higher transfer speeds when paired with newer SSD hardware. For comparison, this is the same SSD I used when reviewing the CubieBoard, Cubox, and the TI OMAP5432 EVM. The results are tabulated below.
|
Board |
Read |
Write |
Rewrite |
|
Jetson TX1 |
288 |
194 |
96 |
|
CuBox i4 Pro |
150 |
120 |
50 |
|
TI OMAP5432 EVM |
131 |
66 |
41 |
|
CubieBoard |
104 |
41 |
20 |
Power
During boot the Jetson wanted up to about 10 watts. At an idle desktop around 6-7 watts were used. Running make -j 8 on the openSSL source code jumped to around 11.5 watts. Running four instances of “openssl speed” wanted around 12 watts. This led me to think that CPU-only tasks might range up to around 12 watts.
Moving to stressing out the GPU, the GameWorks ParticleSampling demo wanted 16.5 watts. The ComputeParticles demo ranged up to 20.5 watts. Hacking the GPU-based merge sort benchmark to iterate the GPU sort 50 times, resulted in 15 watts consumed during sorting. Reading from the camera and hardware encoding to an H264 file resulted in around 8 watts consumed.
Final Words
The Jetson TX1 is a powerful computer in a great tiny-sized module. The small module gives more determined makers the option of building a custom base board to mount the Jetson into a small robot or quadcopter for autonomous navigation. If you don’t want to go to that extreme, small base boards are already available, such as the Astro Carrier, to help mount the TX1 on a compact footprint.
You have to be willing to make sure your most time-intensive processes are running on the GPU instead of the CPU, but when you do the performance available at such a low power draw is extremely impressive.
The Jetson TX1 currently retails for $599. There is also a $299 version for educational institutions in the USA and Canada. I would like to thank NVIDIA for providing the Jetson TX1 used in this article.


