
Have you ever wanted a combination of Arch Linux and KDE but always seemed to get stumped at the Arch Linux portion of the combination? If that’s you, your days of being left out in the Arch Linux/KDE cold are over. Why? Bluestar Linux.
This new(ish) kid on the block allows you to enjoy Arch Linux without having to jump through all the usual hoops of setting the distribution up manually, plus it offers a rather unique take on KDE, one that had me instantly nodding my head in agreement with their layout. In fact, what Bluestar did with KDE makes so much sense, it has me wondering why this isn’t the default layout of the “K” Desktop Environment (more on this in a bit).
The necessary specs
If you plan on running Bluestar Linux, the only specs you really need to be concerned about are the following:
-
Minimum of 6.5GB free hard space
-
Minimum of 1GB of working RAM
The RAM requirements seem a bit high, but this is really a KDE recommendation. If you glance at the KDE system requirements, you see the Bluestar minimum makes sense.
-
Processor: Minimum 1 GHz (x86) Recommended Better than 1 GHz (x86)
-
Memory: Minimum 512 MB Recommended 1 GB
-
Hard drive capacity Minimum 4 GB Recommended 10 GB
NOTE: After a failed install on VirtualBox, having given 8GB to the hard drive and 2GB of RAM, I upped the system to 16GB of space and 3GB of RAM, and the installation succeeded. So these aren’t your grandfather’s Linux requirements.
First look
When you first boot up the live Bluestar image, what will immediately strike you is the layout of the KDE desktop (Figure 1).
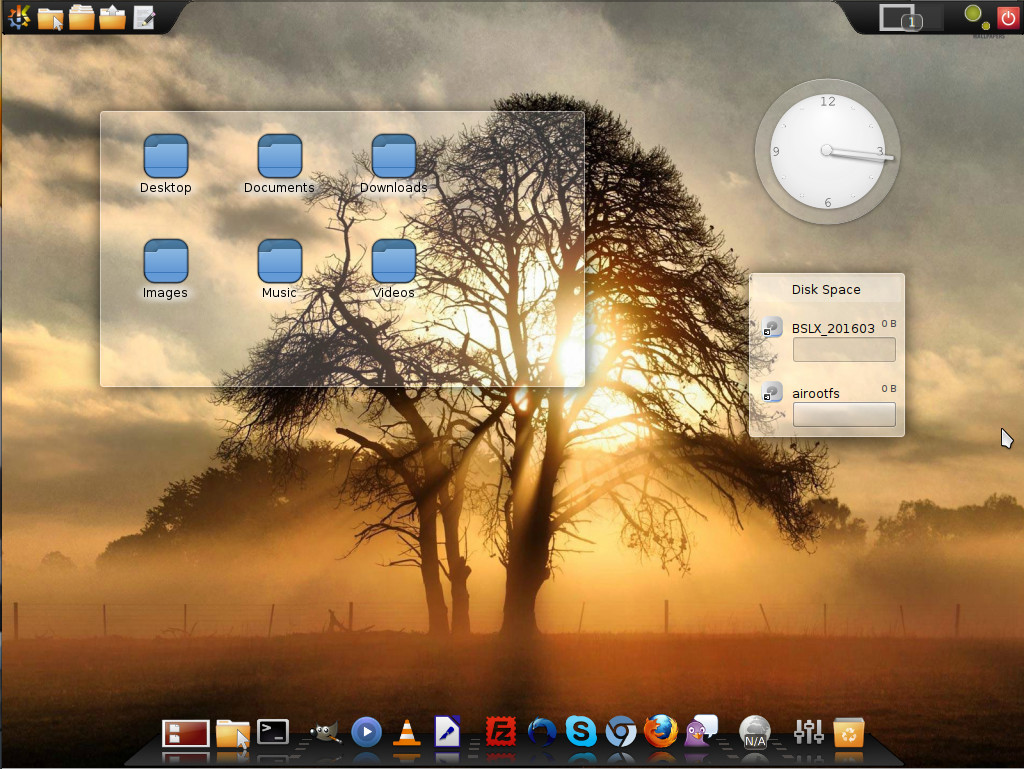
Instead of the usual bottom panel, the Bluestar desktop opts for a dock at the bottom of the screen and an upper panel. The dock is fairly a straightforward implementation of Cairo dock. The upper panel is a very nicely designed take on the standard KDE panel that is split into three parts. The first section of the panel resides in the upper left corner of the desktop, where you’ll find the applications menu, three different folder shortcuts (one for ~/, one for shortcuts, and one for stack…where you can drag and drop items for quick access).
The second section of the panel resides in the center of the top edge of your screen and is set to autohide. Hover your cursor over this area to reveal the hidden section that contains a few handy widgets and the system tray/notification area (Figure 2).

The items in the autohide section of the panel include (from left to right):
-
Clock
-
Virtual keyboard widget
-
Calculator widget
-
System load widget
-
Language selector
-
Clipboard
-
Networking widget
-
Notification area
Finally, the third section of the upper panel is dedicated to the pager, another system load widget, and the logout/shutdown button.
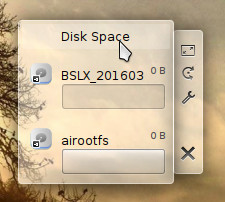
On the desktop proper, you’ll find three default widgets: A folder widget, a clock widget, and a disk space widget. These widgets are locked but can be removed by right-clicking one of them and selecting Default Desktop Options > Unlock Widgets. Once you’ve unlocked the widgets, you can then hover your mouse over one of the widgets to reveal the hidden bar that allows you to move, resize, customize, and delete each (Figure 3).
Finally, click on the Applications menu to reveal everything installed on your desktop. You’ll be surprised at how much is included. This isn’t your bare-bones distribution. Within Bluestar, you’ll find all the productivity tools you need (including KOrganizer, LibreOffice, Okular, Sieve Editor), Development tools (including GHex, KAppTemplate, KUIViewer, Qt Assistant, QT Designer), Graphics apps (including GIMP, Gwenview, and KolourPaint), more Internet tools than you thought you might need (including Akregator, Avahi SSH Server Browser, Blogilo, Chromium, Cloud Storage Manager, Dropbox, FileZilla, Firefox, KGet, MEGASync, Pidgin, and QTransmission), multimedia tools to please just about anyone (including AMZ Downloader, Amarok, Dragon Player, GNOME Alsa Mixer, JuK, Kdenlive, KsCD, SMPlayer, SMTube, VLC), and a very large collection of utilities (such as Ark, Caffeine, ClipIt, Disks, Filelight, Galculator, Jovie, KGpg, Kate, SuperKaramba, and Sweeper).
Another nice touch found in Bluestar is all the codecs you’ll need to play your favorite media formats. As well, streaming sites (such as Youtube and Netflix) work out of the box.
Installation
The first thing you must do is download the Bluestar ISO. Once you boot up the live disk, click on the Application menu and then select Bluestar Linux Graphical Installer (Figure 4). This will walk you through the fairly easy installation wizard.

The installation of Bluestar Linux is a breath of fresh air for those who have wanted to give Arch Linux a try but had no desire to struggle through the challenge of setting up the system manually. Installing Bluestar is about as standard as installing any modern Linux distribution.
Post install
Once you’ve installed Bluestar Linux, you’ll be dealing with the pacman package management system. This means you’ll need to get up to speed with a few basics. First off, because this is a rolling release distribution, you’ll want to make sure your package databases are in sync. Do this by opening up Konsole (from Applications > System) and issuing the command sudo pacman -Sy. Type your sudo password, hit Enter, and your databases will sync.
Next, I recommend optimizing your pacman databases. Do this with the command sudo pacman-optimize && sync.
Finally, we’ll update the installed packages with the command sudo pacman -Su.
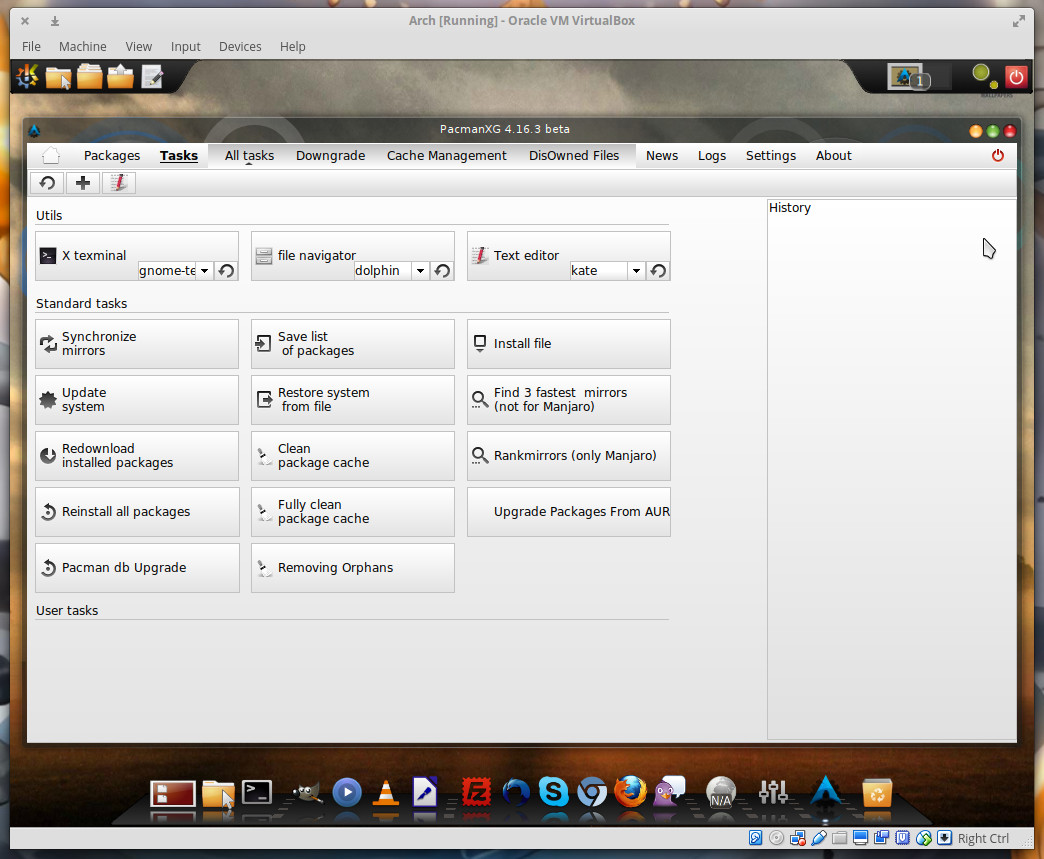
If you’re not a fan of the command line (which you should be if you’re running Arch Linux), you can always opt for the GUI front-end for pacman, PacmanXG. This is an incredibly powerful graphical tool that allows you to take on all the tasks associated with pacman (Figure 5).
Once all your packages are updated, you are ready to start playing around with Bluestar’s take on the KDE desktop and enjoying your Arch Linux-powered distribution.
Arch Linux the way it should be
I’ve played around with Arch Linux enough to recognize that Bluestar Linux has done something quite wonderful…made Arch accessible to anyone. This isn’t a distribution of Linux that you will struggle to get up to speed with. Bluestar is as user-friendly a take on Arch Linux as you will find. If you’ve been wanting to dive into the Arch waters, now is the time and Bluestar is your best bet.
Advance your career in system administration! Check out the Essentials of System Administration course from The Linux Foundation.


