
If you’re a Linux administrator, there will be times when you have to work with the command line… many times. There’s a reason for that. With the command line comes great power and flexibility. For that very reason, you need to know the command line and know it well.
One area that you need a rock-solid understanding of is how to use the command line to work with network configurations. This is especially true when you have deployed headless (or GUI-less) servers that only offer a bash prompt for an interface. You’ll need to know how to manipulate those network configurations without the aid of a GUI.
Let’s take a look at some of the commands you have at your disposal and find out how they work. Some of these commands require admin privileges. This means you will either make use of sudo or have to first su to the root user before issuing the commands.
ip
The ifconfig command has been deprecated. In its place is ip, which can do everything ifconfig could. This is one of the first commands you’ll want to learn as a Linux administrator (as far as commands to manage network configurations are concerned). Let’s look at some of the more useful things you can do with this command.
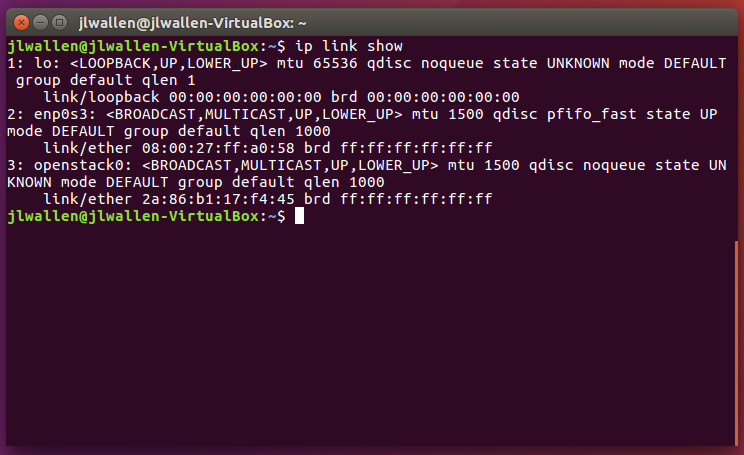
First and foremost, you must use the ip command to view a listing of your network devices. To view all available network devices, issue the command:
ip link show
Figure 1 illustrates the output of the ip link show command.
Now that you know the device name you want to work with, you can assign a static IP address to that device with ip like so:
sudo ip addr add 192.168.1.100 dev DEVNAME
where DEVNAME is the actual name of the device.
You can then enable that device by using ip in this way:
sudo ip link set DEVNAME up
where DEVNAME is the actual name of the device.
Take the device down with the command:
sudo ip link set DEVNAME down
If you need to add a default gateway to a machine, ip is ready to serve. Say your default GW is 192.168.1.254. To set that on the machine, use:
sudo ip route add default via 192.168.1.254
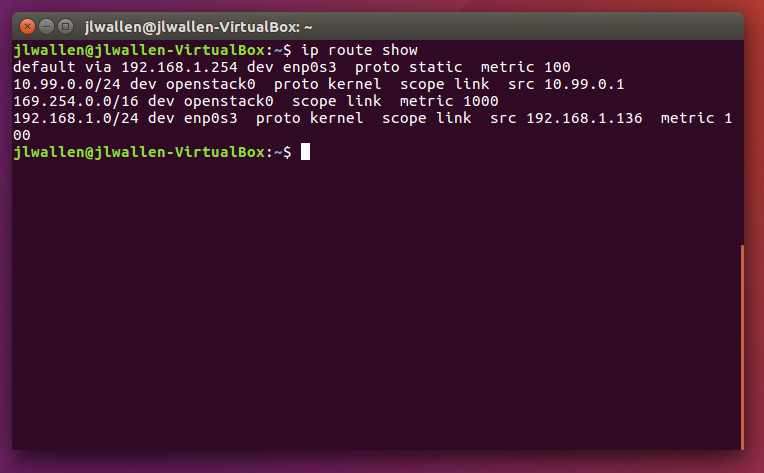
The ip command can also show/control the routing table on your machine. Use sudo ip route show to see the routing information (Figure 2).
You can also add a static route to the machine. Say you have a 10.10.10.x address scheme as well as a 192.168.1.x scheme and you want the 10.10.10.x addresses to bypass the default gateway of the network, via 192.168.1.101. This can be achieved with the help of the ip command like so:
sudo ip route add 10.10.10.0/24 via 192.168.1.101 dev DEVNAME
where DEVNAME is the actual name of the device.
For more information on the ip command, issue man ip and read the entire man page to garner as much knowledge as you can.
route
The route command is there to show and manipulate the IP routing table. With this command, there are a number of tasks you can undertake. Let’s walk through a few examples.
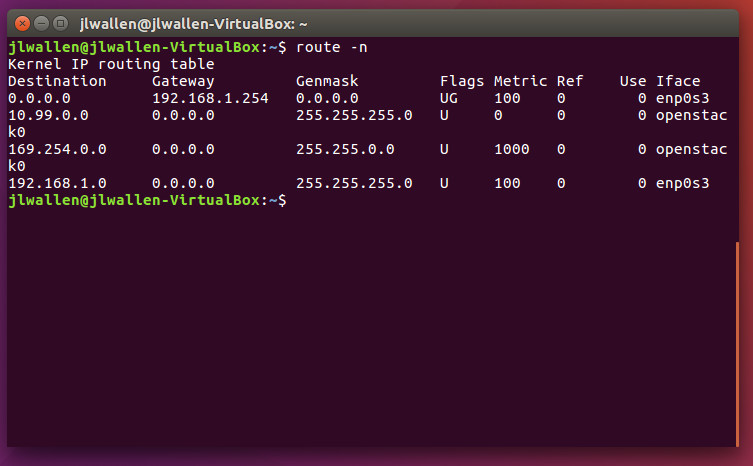
The first thing you’ll want to do is display the IP routing table. To do that, issue the command route -n. This will list out destination, gateway, genmask, flats, metric, and more. The output of this command will look similar to that found in Figure 3.
To add and remove a 10.10.10.x network with a gateway of 192.168.1.1 using route, the commands would look like:
-
sudo route add -net 10.10.10.0/24 gw 192.168.1.1
-
sudo route del -net 10.10.10.0/24 gw 192.168.1.1
If you only need to add or remove a default gateway of 192.168.1.254, the route commands would resemble:
-
sudo route add default gw 192.168.1.254
-
sudo route del default gw 192.168.1.254
What if you want to add a route to a specific host of 192.168.1.101 on your network with a gateway of 192.168.1.254? That is also possible with a command similar to this:
route add -host 192.168.1.101 gw 192.168.1.254 eth0
Now let’s say you have two LANs, one with a 10.10.10.x network scheme and the other with a 192.168.1.x scheme. There’s a firewall between each LAN that contains two Ethernet cards: eth0 (attached to the 10.10.10.x network) and eth1 (attached to the 192.168.1.x network). Your firewall needs to be able to route packets from the 10.10.10.x network through the 192.168.1.x network (which will forward packets to the external internet).
To manage this, you would set up the firewall with two IP addresses. For our example, we’ll use 10.10.10.50 on eth1 and 192.168.1.50 on eth0. The gateway to the external internet on 192.168.1.x network is 192.168.1.254. On the firewall machine, you would use the route command like so:
-
sudo route add -net 192.168.1.0 netmask 255.255.255.0 dev eth1
-
sudo route add default gw 192.168.1.254
-
sudo route add -net 10.10.10.0 netmask 255.0.0.0 dev eth0
On all computers in the 10.10.10.x network, you would issue the route command like this:
-
sudo route add -net 10.10.10.0 netmask 255.0.0.0 dev eth0
-
sudo route add default gw 10.10.10.50
The above commands instruct each computer that the default gateway is 10.10.10.50 (your firewall/router).
On all computers in the 192.168.1.x network, you have to add a specific routing statement to each machine so the routing packets do not get lost (as they are unaware of the 10.10.10.x network). On those machines (on the 192.168.1.x network), issue the command:
route add -net 10.10.10.0 netmask 255.0.0.0 gw 192.168.10.50
The above command instructs the kernel to route all packets destined for the 10.10.10.0 network to 192.168.1.50, which has been defined as a gateway to the 192.168.1.x network.
By using the route command in this way, the following things will happen:
-
All packets to 192.168.1.0 are handled without a gateway
-
All packets to 10.10.10.0 are routed to the defined gateway 192.168.1.50.
-
All other packets are routed to the default gateway, 192.168.1.254.
The above is really just an example of how to make use of the route command. Considering there are many variables involved in mapping out your network routing, you will want to make sure to issue man route and learn as much as you can about this helpful command.
arp
The arp (Address Resolution Protocol) command is quite helpful in that it manipulates or displays the kernel’s IPv4 network neighbour cache. With the help of arp, you can add/delete entries to the table, view the current content, or map an IP network address to a corresponding hardware MAC address. It is that last task which is most helpful.
You can view your local arp table by issuing the command:
arp -a
This will list all addresses (hostname, IP, and MAC) for all associated ethernet devices on the machine.
Say you want to map IP address 10.10.10.100 to MAC address 80:1b:68:30:e9:74. To do that, the arp command would be:
sudo arp -s 10.10.10.100 80:1b:68:30:e9:74
That command will tell arp that the host with the IP address 10.10.10.100 has a MAC address of 80:1b:68:30:e9:74.
You can then delete the arp entry with the command:
sudo arp -d 10.10.10.100
Make sure to read the arp man page to find out more.
hostname
The hostname of a machine is used to identify said machine on a network. If you issue the command hostname with no arguments, the hostname of the machine will be displayed. You can change the hostname of the machine by issuing the command:
hostname NAME
where NAME is the new hostname to be used.
The only caveat to using this command to change the hostname, is that the machine will revert back to the permanent name set by /etc/hostname and /etc/hosts. To avoid the hostname reverting, you will have to manually edit those files and change the name there. Once changed, the hostname will remain, even upon rebooting.
Stop/start/restart the network
At some point, you’re going to need to stop, start, or restart your network. How this is done will depend upon your distribution. For example, on a Ubuntu-based system, the network can be stopped, started, restarted with the commands:
-
sudo service networking stop
-
sudo service networking start
-
sudo service networking restart
On CentOS/RHEL/Fedora/openSUSE, those commands are:
-
service network stop
-
service network start
-
service network restart
That’s it…you can now stop, start, or restart your network.
RTFM
You now have a basic understanding of some of the more important commands for network configuration on your Linux machines. This is, by no means, an exhaustive list. As I’ve said numerous times, you will want to make sure to read the man pages for every command you use, in order to get a full understanding of each tool.
Advance your career in Linux System Administration. Check out the Essentials of System Administration course from The Linux Foundation.


