
Author: Federico Kereki
If you need to set up a secure, easily configurable Web server in as short a time as possible, then Abyss Web Server might just be the product for you. In development since 2002, its current version (2.5) runs on Linux, BSD, Windows, and Mac OS X. Its simple installation and setup (no obscure text configuration files) allows you to code your site with PHP, Perl, Python, Ruby, and even ASP.Net, if you’re using the Windows version.
Licensing is somewhat peculiar. Abyss isn’t open source software, but it provides two versions: X1, which is free, and X2, which costs about $60. The X1 version is almost as fully featured as the X2 one, and it has no restrictions, nag screens, time limits, or any similar behaviors. When you purchase the X2 version, you get a year’s worth of free updates and support. After a year you can opt to extend your license (for an additional payment of $25, or $40 for two years’ worth) or just keep the latest version.
Installation
You’ll likely want to try out the free edition before committing to the paid one, so go to the Abyss download site, get the Linux version, and untar it in its own directory (a good choice might be $HOME/bin).
You can run Abyss either directly from the console (and shut it down with Ctrl-C) or as a daemon, by adding the -d parameter. In any case, you must run it as a common user; if you try to run it as root, Abyss will complain and not run. (Running any Web server as root is usually not a good idea, so this behavior makes sense.)
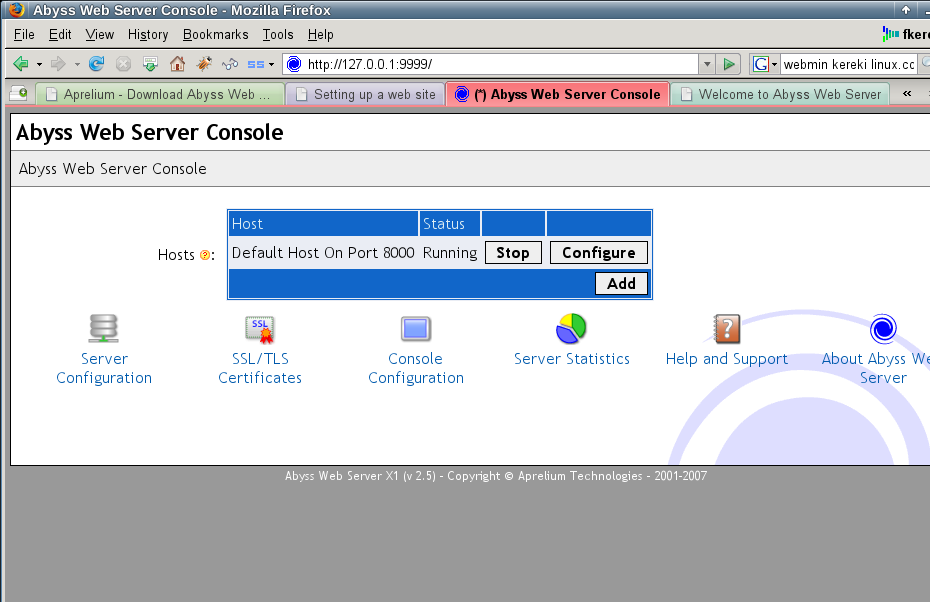
After you complete the installation, start the software with the command ./abyssws. The server will confirm that it’s running on port 8000, and let you know you can configure it at port 9999.
Navigate to http://127.0.0.1:9999 and select the default language. (According to the online documentation, you should be able to choose from among English, French, Arabian, German, Chinese, and more, but only the first three were available when I ran it.) On the next screen, create an Abyss administrator username and password. You must then immediately enter them to get to the configuration form. If everything goes right, you’ll see the Abyss Web Server Console, and Abyss will be up and running; navigate to http://127.0.0.1:8000 to check it out.
You’ll probably want to change the port Abyss uses to the standard 80; click on Configure (next to “Default host on port 8000”) to change that. Here’s a brief look at the configuration options you might be interested in:
- General: Allows you to choose which protocols to admit (HTTP, HTTPS, or both), the standard port (you’ll probably want 80 or maybe 8080), and the document path for your HTML files. By default, the path is set as htdocs, a subdirectory of abyssws, but you could set it to a more standard /var/www/html or, for openSUSE users, /srv/www/htdocs.
- Index files: Lets you specify the default pages that will be served (usually index.html or index.htm).
- 404 files: Lets you define standard error pages.
- Directory Listing: Lets you disable listings; if you don’t, a user might get a look at a list of your files.
- Aliases: Lets you specify simpler paths. For example, you can set /pictures to point to /home/fkereki/images/photos, and if a browser asks for yourSite/pictures/something.jpg, Abyss will map that URL to /home/fkereki/images/photos/something.jpg transparently.
- Access Control: Provides password-controlled access.
- IP Address Control: Lets you allow or disallow access based on the originating IP address.
- Scripting Parameters: Required for programming. If you want to use PHP, Perl, or Python, you must have php-cgi installed; if you don’t, you’ll get “Internal Server Error 500” messages whenever you try to access a Web page. (Go ahead, ask me how I know!) Check Enable Scripts Execution, specify the FastCGI (Local Pipes) interface, enter the path to the php-cgi program, and associate the
.phpextension with it. After saving the changes, you will have to restart Abyss, but you can do it directly from the form by clicking on the RESTART button that appears. - Logging and Statistics: These are pretty self-explanatory.
- Anti-leeching: Helps prevent cross-site linking — that is, pages not from your host that link to pages in your Web site.
After finishing the setup, simply post the Web pages in the Web directory and start running Abyss. You have a fully configured site in just a few minutes.
Why would you choose Abyss over Apache?
There is no absolute reason to prefer Abyss over Apache, but then again, there also isn’t one to prefer Apache over Abyss! If you need a complicated setup, Apache might be the only solution, but this isn’t the case for most sites. One factor working against Abyss is that it isn’t open source software, but for many users, that won’t matter.
The high performance and low memory requirements of Abyss are an advantage, unless you have seriously potent hardware. Some administrators prefer a Web configuration utility, but that’s a matter of taste. The anti-crash architecture, which allows for a fast restart in case of a crash, is an Abyss-only characteristic, but similar workarounds exist for other servers. Abyss handles security-related aspects more easily than Apache, such as the automatic rejection of suspicious URLs, users and groups management, password protection for certain paths, URL rewriting, and Secure Sockets Layer (SSL). If you’re not too experienced, your first setup with Abyss will probably be safer than one with other products.
If you move over to the X2 version, you’ll get bandwidth control, virtual hosts, and a few more things. You could argue that you get all of these features with Apache, but they won’t matter if you don’t require them. Even if you have to pay for this version, the cost is low.
Abyss is an interesting product that deserves more than a glance. It can provide a full Web server with no cost, on older hardware, and with high-performance results.
Category:
- Internet & WWW


