
Author: Joe 'Zonker' Brockmeier
BasKet 0.5.0 is available in several distributions, but the 0.6.0 release has not made it to distros just yet. The new release is enough of an improvement that I’d recommend building from source. To get started, grab the source tarball, then run ./configure. If you’re missing libraries, the configure script will let you know. I compiled BasKet on Ubuntu (Dapper and Edgy), and I needed to grab the devel packages for GnuPG Made Easy (gpgme-dev) and Kontact (kdepim-dev) to enable encryption and Kontact integration, respectively.
Once you can run the configure script without any errors, run make and make install (or use checkinstall instead of make install to create an installable package). Once that’s finished, you can start using BasKet by running basket at the command line or from the Utilities menu under KDE.
Before you get started creating new notes in BasKet, you might want to import your notes from other applications first. BasKet will import notes from Tomboy, KNotes, KJots, KnowIt, TuxCards, and Sticky Notes. You don’t have to go through any major conversion process to move from one of those apps to BasKet, and you won’t lose the history you’ve already built up in any of them.
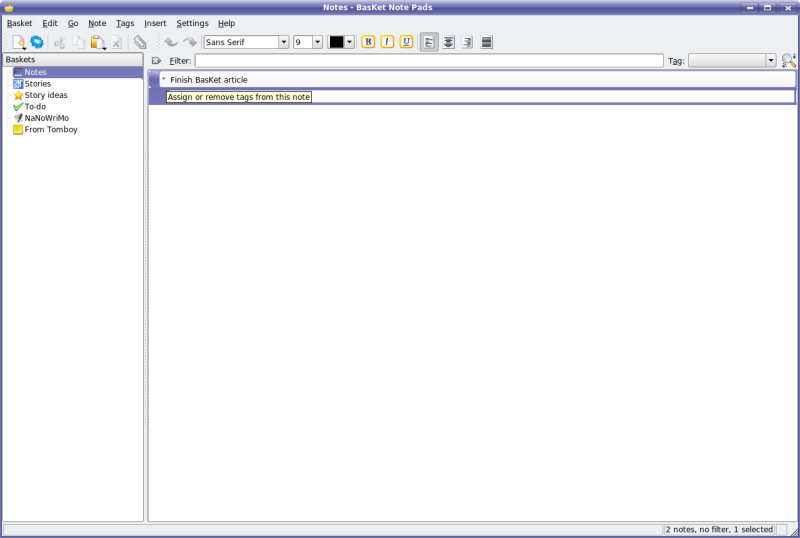
|
Figure 1 – click to view full |
I’ve been using Tomboy for a while, so the first thing I tried out was importing notes from Tomboy into BasKet. BasKet didn’t even require me to point at my Tomboy profile. The software just detected the Tomboy documents and slurped them right into their own basket. BasKet even retained the formatting I used within Tomboy, or pretty close to it.
I also had a few documents stored in KNotes, and I was able to pull them into BasKet with just few clicks as well.
Weave your basket
BasKet has a two-pane interface with baskets on the left side and notes residing in each basket displayed on the right. You’ll have a starter basket the first time you open BasKet, but if you’re like me you’ll probably want to create several baskets in which to file different types of information. You can create a new basket with Ctrl-n, or by going to File -> New -> New Basket, or by right-clicking in the Baskets pane and selecting New Basket.
The baskets are arranged in a tree view, and you can have top-level baskets and sub-baskets underneath those. You can create a sub-basket by going to the File -> New menu, or by using Ctrl-Shift-n. All of the keyboard shortcuts can be configured under Settings -> Configure Global Shortcuts.
To start a new note, click on any empty space in the right-hand pane. You can type or paste text into the note here. When you’re finished, if you hover your mouse over the left side of the note as shown in Figure 1, you’ll see a small arrow. Select that, and you can choose a tag for the note. Tags, otherwise known as categories before the world went all Web 2.0, can also be selected by using keyboard shortcuts, as we’ll see in just a bit.
You might notice that BasKet lacks a Save menu item. This isn’t an oversight — BasKet saves your notes as soon as they’re created.
Working with tags
BasKet comes with several predefined tags, and you can create your own as well. Tags not only allow you to sort your notes, when tags are assigned to a note they can provide visual clues by including an icon and different font styles to notes, as shown in Figure 2.
If none of the available tags suits your fancy, select the Assign New Tags menu item from the drop-down menu, which will bring up the Customize Tags window. To create a new tag, enter a name, and optionally set a font style and icon to go with the tag. You can also assign a keyboard shortcut for the tag, so you don’t need to fiddle with the mouse each time you want to apply a tag to a note.
|
Figure 2 |
Tags can also have a “state.” For instance, BasKet has predefined To Do and Progress tags with several states. If you assign a note the To Do tag, it shows an empty check box and a default text style. Click the icon or use the shortcut for that tag again, and the To Do icon changes to a checkbox with a check in it, and a strikethrough font to indicate that it is finished. A tag can have more than one state, though if the visual styles of the tags’ text conflict, it’s hard to say what style will win out.
All of this can be defined in the Customize Tags dialog, as shown in Figure 3. Create a new tag, and then click the New State button. You can assign each state the properties that you wish to use and then start tagging notes with the new states right away. However, I have noticed that new tags do not propagate to the sort menu right away, so you may have to restart BasKet if you want to sort by a tag that you’ve just created.
At the top right side of the BasKet interface there’s a drop-down menu with all of the tags available in BasKet. You can sort notes by tagged/not tagged, or select a specific tag to see only the notes with that tag.
Just as you can have several styles of tags, you can also have different types of notes. A note’s content is not limited to plain text — you can insert URLs as a link note, save images as a note, and even grab a section of the screen as a note. Just go to the Insert menu and choose the proper type.
|
Figure 3 – click to view full |
I particularly like the screen grab feature. Just go to Insert -> Grab Screen Zone and you’ll see a selection cursor. Place the cursor at the area on the screen where you’d like to start the screen grab and select the area that you want to save. BasKet will then paste the image into a note. You can save the image to a file in PNG format or open the file in another application to edit it; BasKet does not have image editing features. The only thing that I don’t like about this feature is that BasKet automatically minimizes itself when you choose Grab Screen Zone, so I couldn’t use the feature to take screenshots of BasKet!
Even if BasKet isn’t in the foreground, you can select text and put it into a note by selecting text and choosing Ctrl-Shift-s. You’ll see an indicator near the system tray noting that the selection has been pasted into a note. You can also create a note from the Clipboard’s contents, even if the text is no longer selected, by using Ctrl-Shift-v. Again, you don’t need to have BasKet in the foreground for this to work — it can be minimized as a tray icon and never get in your way.
Kontact integration
With the 0.6.0 release, BasKet can be integrated into KDE’s personal information manager, Kontact, which is pretty useful if you already use Kontact with KMail, KAddressBook, KOrganizer, Akregator, and all the other apps that bundle into Kontact.
To include BasKet in Kontact, you need to make sure Kontact is not running right after you’ve installed BasKet — and you may need to restart KDE altogether. Then, start up Kontact and go to Settings -> Configure Kontact. On the left side of this dialog you’ll see a button marked Select Components. Click on that, and check the box next to BasKet. You should see the BasKet icon pop up in the list of Kontact applications.
At the moment, BasKet isn’t terribly well-integrated into Kontact. It can be embedded into the Kontact application, but you can’t do things like drag a to-do list entry into a BasKet or vice versa. This is a shame, because it’d be nice if the objects in one Kontact application could be moved into other Kontact apps. For instance, I’d really like to be able to drag an article from an RSS feed in Akregator into a note in BasKet.
Also, if you use BasKet embedded in Kontact, you’ll find that the shortcuts for tags won’t necessarily work or produce the desired result. For example, Ctrl-5 should give a note the highlight tag, but it takes you to the To-Do list in Kontact.
BasKet lets you export your notes as HTML to share them with others or to paste on a Web site. BasKet will export an entire basket to HTML, including images if you have any in your notes. It doesn’t support exporting a single note at this time.
You can also password-protect baskets. Just go to Basket -> Password and set up a password for any basket that you’d like to lock. Then you can opt to lock the basket manually or configure BasKet to lock after a certain number of minutes. To set that, go to Settings -> Configure BasKet Note Pads and select the BasKets icon on the left. At the bottom of that dialog is the option for password protection. Just decide how many minutes to leave baskets open and click Apply. The default is 0 minutes, which means that they will not automatically lock.
There’s more to BasKet, but it’s best discovered by installing it and giving it a try yourself. If you’ve been looking for a way to be more organized and keep information in a single spot, you should give BasKet 0.6.0 a try.


