Author: Ben Martin
Everyone knows and loves rsync, the command that lets you clone a directory tree to another disk or system with the ability to keep the clone fresh in an incremental and bandwidth-efficient manner. Sometimes, however, you want to sync in the reverse direction. With bidirectional filesystem syncing tools, there is no primary filesystem — you just tell the tool to make sure both target directories, or clones, are identical. Here’s a hands-on look at two tools designed to accomplish that task: DirSync Pro and Unison.
An up-front disclaimer: I use Unison for personal data syncing, but I will avoid any bias toward it in this article.
Both of these tools allow you to set up a configuration targeting two directories and have the contents of those directories recursively synchronized. For a simple test of how the programs handle files that have been edited on both clones, I created a conflict-test directory that contains dir1 and dir2 as directories to sync. I created a df1.txt file that contains today’s date and used it to see how the syncing software handles the case when the modification time of a file on both clones has changed but the file contents are identical. I also created testfile.txt, a four-line file which I edited on each clone to see how the syncing software handles conflicts. To start, I first made sure that dir1 and dir2 were exact copies of each other and fully synced.
To see how well the tools work with some of the different types of files that are available on a Linux machine, I created a linux-fs-test directory tree which initially contains an empty dir2 and a dir1 with the following contents. has-hardlink2.txt is a hardlink to the has-hardlink.txt file. myfifo is a FIFO file, which allows two processes to communicate with each other by both opening a particular file and reading and writing to it. Although the FIFO file exists in the filesystem, the file is not stored to disk like a regular file but exists only for communication purposes. Although FIFO files might not come up that often, it is nice to see how the syncing application handles them in case you decide to sync your entire home directory and some application has a FIFO file in there somewhere.
$ ls -lhF dir1
-rw-rw-r-- 1 ben ben 29 2008-11-19 11:19 df1.txt
lrwxrwxrwx 1 ben ben  7 2008-11-19 11:19 df2.txt -> df1.txt
-rw-rw-r-- 2 ben ben 29 2008-11-19 11:21 has-hardlink2.txt
-rw-rw-r-- 2 ben ben 29 2008-11-19 11:21 has-hardlink.txt
prw-rw-r-- 1 ben ben  0 2008-11-19 11:22 myfifo|
DirSync Pro
DirSync Pro is a Java application that allows for unidirectional and bidirectional directory syncing. You can quickly set up multiple syncs and run one or more of them from a GUI. DirSync Pro does not include support for network transfers or encryption. It is targeted at syncing directories on a single machine. To sync over the network with DirSync Pro you must use NFS or the SSH Filesystem.
DirSync Pro is not in the Ubuntu Intrepid, Fedora 9, or openSUSE 11 repositories. I’ll use version 1.0 Final through the DirSyncPro-1.0-Linux.zip download on a 64-bit Fedora 9 machine. As the zip file contains compiled Java class files, installation consists of putting DirSyncPro somewhere and creating a small script to start it:
$ cd
$ unzip /FromWeb/DirSyncPro-1.0-Linux.zip
$ mkdir -p bin
$ ln -s ln -s ~/DirSyncPro-1.0-Linux/dirsyncpro.sh  ~/bin/DirSyncPro
$ chmod +x ~/bin/DirSyncPro
$ vi ~/bin/DirSyncPro
...
# get dirsync home
#DIRSYNC_HOME="$(dirname $0)"
DIRSYNC_HOME="$(echo ~/DirSyncPro-1.0-Linux/)"
...

$ ~/bin/DirSyncProx
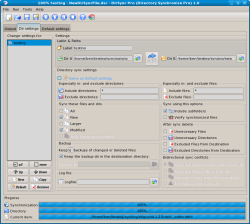
The program’s GUI is divided into three main tabs. One shows the output of your syncs, one lets you create and configure all your syncs, and one lets you set global preferences for syncing. In the screenshot below I have set up a single testing sync using the orig and new directories under my home directory. The “Same as default settings” checkbox deactivates the whole section below it and uses the settings you have defined in the “Default settings” tab for the sync. The button between the two directory paths is important; in the screenshot, only the arrow pointing from left to right is blue, meaning that the sync is a unidirectional one from the orig directory to the new directory. Clicking on the button cycles through the three options of unidirectional sync in either direction and bidirectional sync.
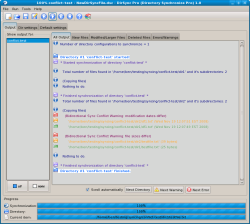
To perform a sync, select it in the Dir settings tab and press the play button in the toolbar. Starting a sync automatically changes the current tab to the Output tab showing you the details as the sync is progressing. The Output tab is shown in the screenshot below.
Next I set up a sync for the conflict-test scenario. I ran an initial sync to make sure DirSync Pro was aware of the contents of both dir1 and dir2. You set how conflicts are handled in the Default settings tab; you can choose between copy the latest modified file (the default), copy the larger file, rename and copy both files to both clones, and do nothing but produce a warning message. I selected the last option of a warning only. The output of performing a sync after touching df1.txt and editing testfile.txt on both clones is shown below. It seems that once DirSync Pro detects different modification times for a file on each clone it doesn’t perform any byte-by-byte comparison to see if the file contents have actually changed too.
You can also run a sync from the command line by supplying a few command-line options and the name of a configuration file. You create the configuration file by using the GUI and selecting File -> Save As from the menu. The command ~/bin/DirSyncPro -sync -nogui ~/NewDirSyncFile.dsc will run all the active syncs in the NewDirSyncFile configuration.
You may have noticed in the screenshot showing the Dir settings tab of DirSync Pro that each sync in the list has a little tickbox next to it. This lets you select many syncs that should all be run for a given configuration. Any syncs that are ticked in the NewDirSyncFile configuration will be run by that command.
I made the linux-fs-test sync bidirectional right from the start. You have a choice in the Default settings tab of how DirSync Pro handles symbolic links, between skipping and copying as files. I left the default choice of copy as files because I didn’t want to ignore them.
After the initial sync, dir2 contained four files; the FIFO was silently ignored. The hardlinks were not preserved in the dir2 clone, and as per the settings the softlink was turned into a file in dir2.
I thought it would be interesting to see what happens if you update one of the files that was created from the has-hardlink files and synced again. The modification is shown below. After a sync, both of the has-hardlink* files were set to the new timestamp value in dir1 because they are hardlinks to the same file. The dir2 directory was unchanged. Because the has-hardlink* files are hardlinks in dir1 but not in dir2, running a sync again updated the has-hardlink1.txt file in dir2.
dir2$ date > has-hardlink2.txt
dir2$ cat has-hardlink*
Wed Nov 19 11:34:00 EST 2008
Wed Nov 19 11:21:24 EST 2008
As you can see from the above linux-fs-test, with DirSync Pro you have to pay special attention if your directories contain any soft or hard links. That said, DirSync Pro makes defining a bidirectional sync as simple as picking two directories and changing the sync type to include an active arrow in both directions.
Unison
Unison, which is written in OCaml, allows unidirectional and bidirectional directory syncing. It includes a GTK graphical interface and can also be run from the terminal.
Unison is packaged for Ubuntu Intrepid, for openSUSE 11 as a 1-Click, in the Fedora 9 repositories as unison227, and for recent Maemo devices. I used the unison227 package on a 64-bit Fedora 9 machine.
When you first run unison it brings up a Root selection window asking you for the first (local) directory that you want to synchronize. Entering a directory and clicking OK brings up a second dialog asking you for the second directory to synchronize. The second dialog includes options for specifying a local, SSH, RSH, or Socket destination. The two most interesting selections are for a local directory or an SSH path. This second dialog window is shown below.
Once those two dialogs have been filled in, the main window appears along with a large warning dialog telling you that no archive files were found for this sync. You can ignore this ominous dialog if you have not run the sync before. Otherwise, it means that some of the metadata that Unison uses to keep track of the sync is missing. In that case, it is best to remove all the metadata for the sync, make a backup, and do a sync again. The metadata for a sync is stored in ~/.unison in files with names like ar2d40b01e31463631ab1c34274eb8ccde. If you are syncing to another machine, make sure to delete these files from the ~/.unison directory on both machines.
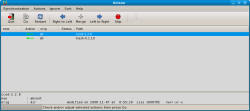
Unison’s main GUI is shown below. The list in the body of the window shows which files have changed, been created, or been deleted between the two clones. For the screenshot, the directory names of the clones were new and orig, which is why the first and third column are named that way. The Action column between them tells you what will happen during the sync; in this case the directory new is empty, so Unison will copy the ccod and trash directory across to the new directory to make them identical.
To sync the two clones just click the Go button. The Status column shows how far through syncing each line Unison is, which can be handy if you are running a sync over the Internet. Once Unison is done, it should show a green tick for the status of each row and a message at the bottom of the window telling you it is done. If you click Restart in the toolbar, Unison will quickly tell you that everything is up to date and there will be nothing in the list.
The buttons in the toolbar let you override what Unison is planning on doing during the sync. For example, if a file that existed in both clones had been modified in the orig directory, by default Unison would offer to copy the newly modified file across to the new clone. If you wanted to revert the change instead, you could pick that file in the list and click on Left to Right to move it from the new clone (on the left) to the orig clone (on the right).
The Actions menu lets you resolve all conflicts by choosing files from a nominated clone or to always use the most recently modified version. The Ignore menu lets you always ignore files below a directory, with a given extension, or any files with a given file name in any directory.
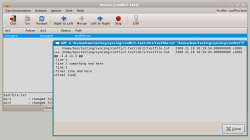
For a second test I ran the conflict-test described at the top of the article. Unison ignored the change of modification time only for the df1.txt files. The testfile.txt, which was modified on both clones, was shown as being changed on both with a question mark as the Action. The below figure shows the window that the Diff button brings up for the testfile.txt row. To resolve the issue, highlight the testfile.txt row and pick to use the left or right version, skip, or merge the file. Clicking on Merge puts a large M as the Action. Using the merge functionality requires you to set up merge preferences to tell Unison how to perform the action.
For automated syncing, you can also run Unison without generating a user interface. For the above test I created a conflict-test sync profile in Unison. The command unison -batch -ui text conflict-test will sync non-conflicting files in the conflict-test profile. If you omit the -batch option, Unison will prompt you for what to do as it goes along.
For the linux-fs-test sync, Unison showed that it was not going to sync the myfifo file, but that all the other files would be copied. The myfifo file is always detected on one clone but not the other, so you might like to tell Unison to ignore it by selecting it in the list and using Ignore -> Permanently ignore this path from the menu.
The myfifo file was not copied, but the softlink was preserved during the copy. The hard link was quietly broken in the dir2 clone, creating two identical individual files has-hardlink2.txt and has-hardlink.txt which were not hardlinks to each other. The Unison manual states that it does not understand hard links so there is no way to preserve them.
Final words
You can mount a great many remote things through the Linux kernel as filesystems and use DirSync Pro or Unison on them. Syncing over SSH to a remote filesystem is such a useful option that the fact that Unison includes explicit support for it is a big advantage. If you need to preserve symbolic links, Unison is currently the better choice. If you have a mobile device that includes a Java runtime and can mount remote things through the kernel, then DirSync Pro should get you up and running quickly. If you want to tell your syncing software how to perform merges for you automatically, Unison is the tool for you.
Categories:
- Reviews
- Tools & Utilities
- Desktop Software


