
Author: Joe 'Zonker' Brockmeier
The ScribeFire extension, formerly known as Performancing for Firefox, allows you to compose and publish entries for your blog directly from Firefox without using the blogging platform’s publishing tools. This can be really convenient when you’re browsing your favorite sites and want to create a quick post without having to browse to your blog’s management back end and juggle two or more Firefox windows.
Getting ScribeFire
ScribeFire supports Firefox 1.5 through 2.0, and it’s multiplatform, so you should be able to run it on Firefox in Linux, Windows, Mac OS X, or any other platform that supports Firefox. I’ve been running it for months, since prior to the ScribeFire name change, and haven’t noticed any conflicts with other Firefox extensions such as Google Notebook, Fullerscreen, or Adblocker Plus.
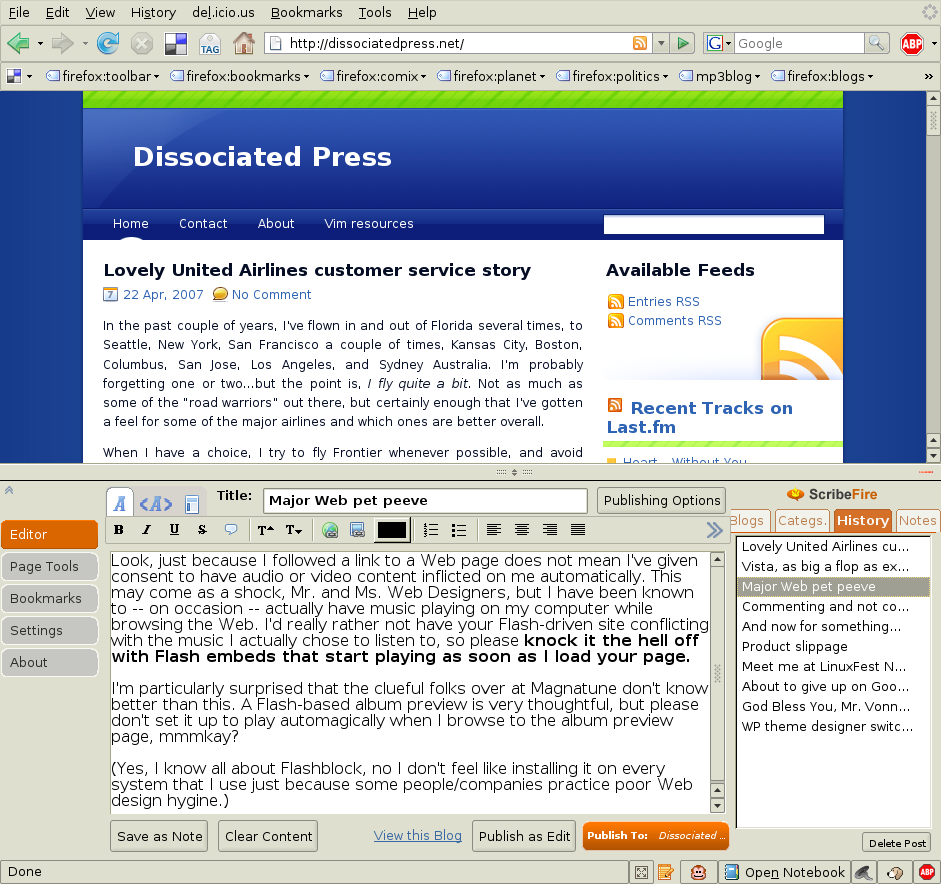
|
Figure 1: ScribeFire window – click to view |
ScribeFire is available from the Firefox Add-ons Web site. Click on the Install Now button and Firefox will walk you through the installation. Restart Firefox, and you should see an orange notepad icon in Firefox’s status bar. Click that to open ScribeFire. By default, ScribeFire will open to about half of Firefox’s window height from the bottom of the browser window, as in Figure 1.
Blogs supported
When you open the ScribeFire panel, you should see a set of self-explanatory options on the right side of the window labeled Blogs, Categs., History, and Notes. If you don’t see them, look for an arrow icon as shown in Figure 2. Click that to open (or close) the options dialog.
To add your blog, click Add and walk through the Performancing Account Wizard. (As you can see, they still haven’t completely finished scrubbing the old application name.) ScribeFire supports WordPress, Blogger, Drupal, TypePad, LiveJournal, Windows Live Spaces, and a number of other blogging systems that support the MetaWeblog API.
I’ve tested WordPress, Blogger, and LiveJournal. LiveJournal support is listed as experimental. ScribeFire seems to post OK to LiveJournal, but it doesn’t import the history correctly — every post in my history has “Untitled” as its title, though the actual posts had real titles.
ScribeFire also lets you manage multiple blogs, so you can easily juggle posts between two, three, or more blogs. Just be careful you check which blog you’re posting to before you commit a post about this weekend’s wild party, meant for your private LiveJournal account, to your work blog for your boss and customers to see. It’s very easy to post content to the wrong blog.
Using ScribeFire
ScribeFire’s editor window will be familiar if you’ve ever used a word processor or text editor. ScribeFire offers some simple formatting — bold, italic, underlined, strikethrough, and blockquote — lists, color selection for text, and text alignment. As far as formatting goes, that’s about it.
ScribeFire offers the choice of editing in “what you see is what you get” (WYSIWYG) mode, or plain HTML. The HTML produced by ScribeFire is pretty clean, so I’ve found myself using the WYSIWYG mode more often than plain HTML, but if you want more control over your formatting, or want to insert HTML not supported by ScribeFire’s editor (such as tables), then the option is there.
|
Figure 2: ScribeFire options arrow (highlighted) – click to view |
The first time you set up your blog, ScribeFire will pull down your categories from your blog so you can tag your posts with the appropriate categories under the Categories tab. I think the developers could have made this a little more visible than it is by default — I tend to forget to tag my posts with categories until I’ve looked at them on my site, because the Categories tab is out of the line of sight.
The only major complaint that I have regarding ScribeFire’s editor versus composing posts in WordPress itself is that ScribeFire is a bit clumsy when it comes to including images in posts. You can add images by clicking on the image icon in the editor toolbar, then providing a URL to link to or an image from the local system to upload. But I don’t see any way to create thumbnails as you can in WordPress — where uploading an image automatically creates a thumbnail that you can link to the original image.
However, this isn’t really a huge issue for me, as I don’t post many images to my blog, and those that I do use often come from Flickr, which provides the code snippet for linking to a thumbnail anyway. If you do post a ton of images, ScribeFire may not be the best option, or you might want to use ScribeFire to create posts and then publish them to your blog as drafts, and then fill in the images.
ScribeFire adds a few entries to Firefox’s context menu. If you’re on a Web page and see something you want to quote on your blog, highlight it and right-click. From the context menu, select “Blog this Page,” and ScribeFire will open up the editor window with the highlighted text pasted in and a link to the site.
Beyond posting
If you want to scribble a few items down for later reference, you can use ScribeFire to take notes as well as create blog posts. Just pop open ScribeFire and compose the note as you normally would compose a blog entry, and then click Save as Note instead of the Publish to: button. You can find your notes under the Notes tab on the right side. I think Google Notebook is a far better option for working with notes, but if you just want to jot down some ideas for later to slap on the blog, a ScribeFire note would work fine.
On the left side of ScribeFire’s window you’ll see five buttons — Editor, Page Tools, Bookmarks, Settings, and About. Editor is the default, which we’ve already covered, and the About button should be self-explanatory. Page Tools is an interface with Technorati, which will show Technorati’s information about the page you’re viewing in Firefox. If you want to know how many pages link to a site, or what people are saying about a particular page, this is one way to find out.
On the Settings page, you can configure a number of ScribeFire’s options. For instance, if you prefer to display ScribeFire at the top of the window instead of the bottom, you can change the default. If your language flows from right to left instead of left to right, you can change that setting in ScribeFire. You can also turn off the annoying “Powered by ScribeFire” link that appears at the bottom of posts after you first set up ScribeFire.
You’ll also see a Publishing Options button. ScribeFire’s publishing options dialog allows you to save a post as a draft on your blog instead of posting it for public view — just click the Post as Draft checkbox under publishing options. You can also add tags that will show up on Technorati, mark your post for bookmarking under your del.icio.us account, and add TrackBack URLs for your post.
Finally, on the bookmarks page, you can manage del.icio.us bookmarks if you have a del.icio.us account that you use.
ScribeFire is a basic tool, but it makes it much easier to get into blogging mode at a whim instead of having to fuss with various blogging platforms’ Web-based editing tools. If you’re looking to post to your blog more frequently, this is a great tool to start you on your way.
Every week we hope to highlight a different extension, plugin, or add-on. Write an article of less than 1,000 words telling us about one that you use and how it makes your work easier, along with tips for getting the most out of it. If we publish it, we’ll pay you $100. (Send us a query first to be sure we haven’t already published a story on your chosen topic recently or have one in hand.)


