If you are considering migrating from Windows to Linux you are probably concerned that dealing with network hardware is going to be a nightmare. You will be happy to know that setting up and controlling network devices is much easier in Linux than it is in Windows. Modern Linux distributions benefit from two very important improvements:
- Improvements in hardware support
- Improvements in graphical configuration tools
The improvements in hardware support will be immediately obvious. During installation you will find a much wider range of hardware supported by the operating system. The support for hardware has improved so much there is often no need for post-install configuration (especially when your network is configured for DHCP). In those instances that your network has special requirements (such as a static IP address or proxy configuration) you will find the graphical tools to be superior than tools used for the same task in other operating systems.
Depending upon your distribution, your network configuration tools will differ. From Fedora, to Ubuntu, to Mandriva, to SuSE all of the major distributions rely on different tools. In this article you will see how simple it is to configure networking in the Fedora Linux distribution. The distribution being used for the purposes of this article will be Fedora 10. You will see how both GNOME and KDE 4 handle the process of network configuration.
The Foundations
Before we actually dig into the GUI, it might be wise to at least know what the GUI tools are configuring. The GUI network tools work with the following files and directories:
- /etc/sysconfig/networking/devices: This directory contains the configuration files for your network hardware devices. You will most likely see the following files:
- ifcfg-eth0 – This is your wired networking device.
- ifcfg-pan0 – This is your bluetooth device (if available.)
- ifcfg-wlan0 – This is your wireless adapter (if available.)
- keys-wlan0 – If your wireless uses WEP, this is where your key will be stored.
- /etc/hosts: This file maps hostnames to IP addresses.
- /etc/resolve.conf: This file contains your DNS information.
- /etc/netconfig: This file is a database describing all networks on a given machine.
Thanks to the GUI tools in modern Linux distributions, it is no longer necessary to edit flat text files to configure your network. But it is good to know what files are being edited.
And now let’s get on with the GUI.
GNOME
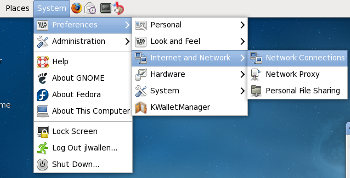
From the default Fedora GNOME installation the fastest way to get to the network configuration tool (system-config-network) is to navigate through the following menu path:
System menu | Preferences | Internet and Network
and selecting the Network Connections entry (see Figure 1).
From this window you can take care of all of your network device configuration needs:
- Wired ethernet
- Wireless networking
- Mobile broadband
- VPN
- DSL
Each type of networking has its own tab. Depending upon which tab you are on, the Add button will have a different action. As you can see, in Figure 2, there is already a wired connection created.
 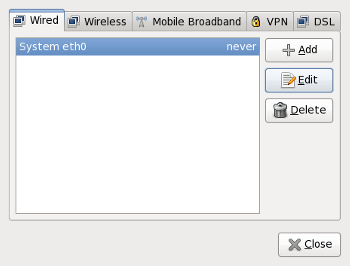
The eth0 connection shown above is configured with DHCP. To illustrate how to create a connection we will change this configuration from DHCP to manual (static IP). To do this select the eth0 entry and click the Edit button. A new window will open (see Figure 3) that contains three tabs. The first tab contains the MAC address and the MTU settings of the hardware. The second tab is dedicated to 802.1x authentication. The third tab contains the IPv4 settings (or IPv6 depending upon your hardware and network). This third tab is where you will configure your network settings.
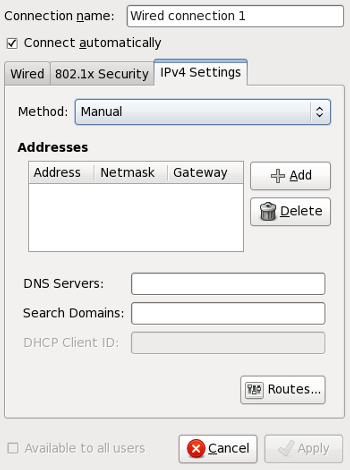
The first thing you need to do is to select Manual from the Method drop down. This will reveal the sections you can configure. Now click the Add button and you will see the Addresses window change so you can add the required information (see Figure 4).
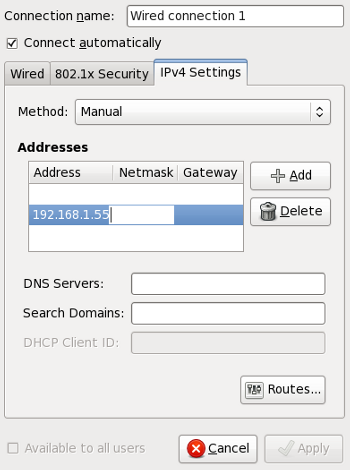
Once you have finished with the addresses you will need to enter the DNS Servers (Primary and secondary separated by a comma) and the Search Domain. Once you have entered the Search Domain the Apply button will become available. Click Apply and your connection is setup.
Starting Your New Connection
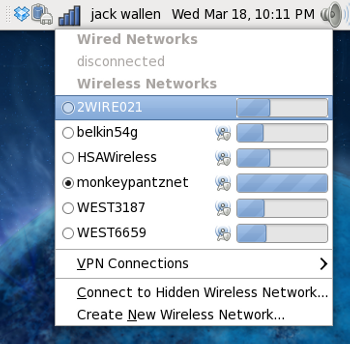
Starting the new connection in GNOME is simple. On the top Panel you will see the Networking Applet. If you left click that applet a list of all available connections will appear (see Figure 5). All you have to do is select your newly configured network to connect. This is also handy if you have more than one network configured. You could configure a network for work a network for home, etc. All you then have to do is select the network you want to connect to from this drop down.
That’s all there is to creating (or editing a network connection in the GNOME desktop of Fedora Linux. Now let’s take a look at the same process under KDE 4.
KDE
Although the default desktop environment in Fedora 10 is KDE, there are those that prefer the KDE environment. In the current iteration of KDE (as of this writing, 4.2.1) there is a pretty nasty bug that prevents the configuring of network devices from within the Control panel. The good news is that the Network Manager Applet that is used in GNOME works in the KDE Panel. In fact, it should be in your panel by default (see Figure 6).

If you right-click the applet (fourth from the right) you will see a menu that includes an entry titled “Edit Connections.. If you click this entry, it will open up the same configuration window you used in GNOME (refer to Figure 2).
Once that window is open, the steps are the same as they are in GNOME.
Final Thoughts
As you can see, configuring networking in Fedora 10 is simple. And switching between network configurations is as easy as selecting from a menu. Linux has come a long, long way from the early days when bash scripting was required to get networking up and running. The days of total point-and-click Linux are here. Happy networking!


