Author: Dmitri Popov
So you’ve written a nifty OpenOffice.org macro and want to share it with the world. You can, of course, publish the code on your Web site, but a better way to go is to pack it as an easy-to-install OpenOffice.org extension.
An extension is just a plain zip archive containing, besides the macro itself, a few XML-based files that OpenOffice.org needs to properly install the package. Theoretically, it’s possible to create the required XML files in a text editor, but it would be as effective as digging a garden using a teaspoon. Fortunately, there is a tool that you can use to create an extension in a point-and-click fashion.
The name of this wonder tool is BasicAddonBuilder (BAB). Once installed, it adds a new toolbar with a single button on it that launches the extension builder wizard. However, before you push the button, you should do some preparatory work. First of all, it’s a good idea to move the macro (or macros) you want to add to the extension into a separate library; that way BAB won’t interfere with other macros in your system. To move the macro into a separate library, choose Tools -> Macros -> Organize Macros -> OpenOffice.org Basic and press the Organizer button. You can then add a new library and move the macro into it.
If you want to add icons to the menu items, you should also have graphics files ready. To find quality icons for your extension, try the IconLet icon search engine. You will need at least one 16×16-pixel icon in PNG format for each macro that you want to include as a menu item. Since OpenOffice.org supports small (16×16) and large (26×26) toolbar icons, you might want to prepare large icons as well.
When you have all the bits ready, you can start building the extension. Press the BasicAddonBuilder button in the toolbar to open a wizard that guides you through the entire process of creating the extension. Start with choosing the library containing the macro you want to add to the extension. Next, you have to decide how to integrate the extension into OpenOffice.org. You have several options here. As a rule of thumb, a separate toolbar and a top-level menu are perfect for extensions containing multiple macros (and thus several menu items), while the Tools -> Add-on or Help menu works best for extensions with one or two macros.
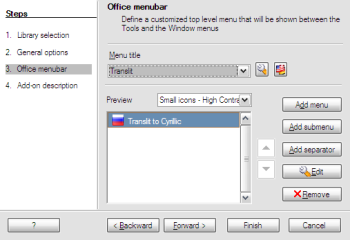
As an example, let’s create a top-level menu. Tick Add top level menu, and press the Forward button to move to the next window, where you build the menu structure of the extension. The first thing you have to do here is create a top-level menu. Press the Edit button next to the Menu title field. In the dialog window that appears, enter a menu title in the Item label field. You also have to specify so-called Office context, or OpenOffice.org applications where the top-level menu should be visible. For example, if you have an extension that works only with Writer documents, tick the Writer check box, and the top-level menu will appear only in the specified application.
The next step is to specify the menu items. To do this, press the Add menu button. This opens a dialog window similar to the previous one, but it has a few more options you need to specify. Besides the menu item label, you must link the item to a particular macro. Press on the button next to the Command field, select the appropriate library from the drop-down list, choose the desired module in the left pane, then pick the macro you want in the right pane.
In the Icons section, you can add icons to the menu item by clicking in the empty icon square and selecting the desired icon of the right size. Repeat this step for other icon sizes, if necessary. Specify the applications you want in the Office context section and press OK. In a similar manner, you can add other menu items. You can also add menu separators to logically group the menu items.
When you are satisfied with the result, press the Forward button, add an optional description to your extension, and press Finish to generate the oxt package. That’s it — your extension is ready to go.
You can install and distribute the created extension as it is, but there is one more thing you might want to add to it — a description.xml file that contains additional info about your extension, including its current version, the required version of OpenOffice.org, and licensing information. To do this, create a text file and paste the following code into it:
<?xml version="1.0" encoding="UTF-8"?>

<description xmlns="http://openoffice.org/extensions/description/2006"

xmlns:d="http://openoffice.org/extensions/description/2006"

xmlns:xlink="http://www.w3.org/1999/xlink">

<identifier value="Extension Name" />

<version value="0.0.1" />

<dependencies>

<OpenOffice.org-minimal-version value="2.1" d:name="OpenOffice.org 2.1"/>

</dependencies>

</description>
Replace the default values such as identifier, version, and OpenOffice.org-minimal-version with the correct values, save the file as description.xml, and add it to the .oxt package. If you’d like to add a mandatory license agreement that is displayed when the user installs the extension, add the following code to the description.xml file right before the closing </description> tag (this works only with OpenOffice.org 2.3 or higher):
<registration>

<simple-license accept-by="user" default-license-id="en-US" suppress-on-update="true" >

<license-text xlink:href="GPL.txt" lang="en-US" license-id="en-US" />

</simple-license>

</registration>
Make sure that the license-text xlink:href=”GPL.txt” points to the correct file (in this case, GPL.txt), and add the specified license file to the .oxt package.
Category:
- Office Software


