
Author: Dmitri Popov
I’m assuming that you are familiar with the concept of page, paragraph, and character styles and you have a general idea how to define and use them.
Creating a chapter template
Let’s start with creating a chapter sub-document template to use as the main building block of the book. Of course, the specific settings of the chapter template will vary, but at the very least you have to define the Default page style as well as a paragraph style for a chapter title. Create a blank Writer document, right-click in the Stylist windows, click on the Paragraph Styles button, and choose New from the context menu. (If you don’t see the Stylist, press F11 or choose Format -> Styles and Formatting.) In the Organizer tab, enter “Chapter title” in the Name field and select Text body from the Next Style drop-down list. Click on the Font tab and define the style’s font properties. Use other tabs to define other style settings.
To adjust the Default page style, click on the Page Styles button, select Default, right-click on it, choose Modify, and adjust the page settings. The Default page style in the chapter template is used solely to control the text flow and the overall layout of the chapter. This means that you might want to set the page size and the margins while leaving the rest of the settings as they are.
Defining the outline numbering for the chapter template
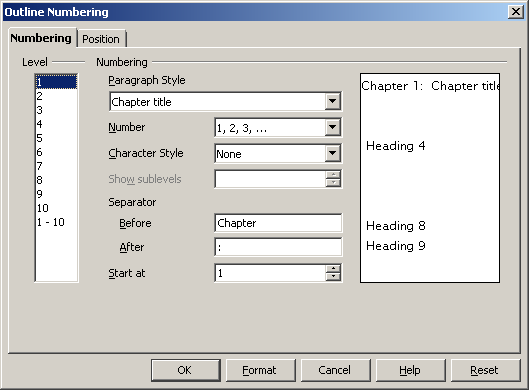
| Click to enlarge |
In a nutshell, outline numbering allows you to specify a hierarchy of different paragraph styles. In the chapter template, you must set the Chapter title to Level 1. To do this, choose Tools -> Outline Numbering, select 1 from the Level list, select Chapter title from the Paragraph Style list, and define the Separator as shown in Figure 1.
Note: You must manually adjust the “Start at” option for each chapter. For example, the “Start at” option for the second chapter must be set to 2, the same option for the third chapter will be 3, and so on. This will require some manual work if you want to rearrange the chapters, but so far I haven’t been able to come up with a better solution.
Creating front matter sub-documents and appendices
One way to manage the front matter is to create separate sub-documents for the copyright and preface pages. Create a new Writer document, then create a new paragraph style called Copyright title, which you use for a copyright page title. Write the copyright text and save the document as, for example, Copyright.odt. In a similar way, create a Preface document, add a new paragraph style for the preface title, write the preface, and save the document as Preface.odt.
If your book includes appendices, you have to create a template for them as well. The appendix template is similar to the chapter template in every respect except the outline numbering. Since you’ve already defined the Chapter title as a Level 1 heading in the Outline Numbering, you must choose another level for the Appendix title style. I usually choose Level 5, which gives me up to three (Level 2, 3, and 4) “empty” levels in case I have to add additional styles to the outline numbering later. This can come in handy if the chapters contain not only the chapter title, but also different sub-headings.
Usually, appendices have a different ordering form than chapters. If you want your appendices to be ordered as Appendix A, Appendix B, Appendix C, and so forth, you must select the proper numbering type from the Number drop-down list (Figure 2).
Creating a master document
Once you are done with the chapters, copyright page, preface pages, and appendices, you can start working on the master document, which you use to put all the pieces together. First of all, you should outline the master’s overall structure, which may look something like this:
Page styles
- Title page: No numbering, no footer/header
- Copyright page: No page numbering, no footer/header
- Table of Contents (ToC): Page numbering starts with i, no header, book title and page number in the footer
- Preface: Page numbering continues from ToC, no header, page number in the footer
- Chapters: Page numbering starts with 1, book title in the header, page number and chapter’s title in the footer
- Appendices: Page numbering continues from the last chapter, book title in the header, page number and appendix number in the footer
- Alphabetical index: Two column page, page numbering continues from the last appendix, no header/footer
Paragraph styles
- Book title: Will be used for the book’s title on the title page. It must be created in the master.
- Copyright title: Imported automatically from the Copyright.odt sub-document. Requires further adjustments.
- Preface title: Imported automatically from the Preface.odt sub-document. Requires further adjustments.
- Chapter title: Imported automatically from the chapter sub-documents. Requires further adjustments.
- Appendix title: Imported automatically from the appendix sub-documents. Requires further adjustments.
- Text body: Overrides properties defined in the sub-documents, thus it must be adjusted in the master
- Header and footer: Must be created in the master
- Index: Must be created in the master
With this information at hand, create a new Writer document to be the master.
Defining page styles in the master
| Click to enlarge |
When working with page styles, you should keep in mind that the pages in the book template must be either left or right and they must mirror each other. Another important thing is that in most cases each sub-document starts with a new right page. This means that you have to create several sets of pages. In this case, you will need at least four page style sets:
- Front matter first page, front matter left page, front matter right page
- Chapter first page, chapter left page, chapter right page
- Appendix first page, appendix left page, appendix right page
- Index first page, index left page, index right page
As an example, let’s start with creating the Chapter page style set. In the Stylist window, click on the Page Styles button, right-click somewhere in the window, and select New.
In the Organizer section, give the page style a name (for example, Chapter first page). Leave the Next Style drop-down list as it is for now, and click on the Page tab. Specify the page size and margin settings, and select Only right from the Page layout list. Use the Header and Footer sections to activate and specify the header and footer settings. Click OK when done.
Create a new page style called Chapter left page and select Only left from the Page layout list in the Page section. Note that the right margin of the left page must mirror the left margin of the first page. Click OK when done. Finally, create the third page style called Chapter right page with exactly the same settings as the Chapter first page style.
Now you have to link all three page styles:
- Right-click on the Chapter first page style, choose Modify, and select Chapter left page from the Next Style list. Click OK.
- Right-click on the Chapter left page style, choose Modify, and select Chapter right page from the Next Style list. Click OK.
- Right-click on the Chapter right page style, choose Modify, and select Chapter left page from the Next Style list. Click OK, and you are done.
Don’t forget that left and right pages mirror each other. This means that things like page numbers, headers, and footers must also be mirrored. In other words, if the header and footer on the left page are aligned left, then they must be aligned right on the right page.
Now that you know how to create a page style set for chapters, you can create other page style sets. Once you’ve done that, you can add chapters to the master document. To add a chapter, press and hold down the Insert button in the Navigator, select File, and select the chapter you want to insert.
Working with paragraph styles in the master
Although you’ve inserted the chapters into the master, they still use the Default page style. To force the chapters to use the page styles defined in the master, you can use a clever trick based on the Text Flow option. Using it, you can make each chapter start with the Chapter first page style, which then “flows” into the Chapter left page and Chapter right page styles.
To do this, click on the Paragraph Style button in the Stylist, right-click on the Chapter title style (it was imported when you inserted a chapter into the master), and click on the Text Flow tab. In the Breaks section, tick the Insert check box, select Page from the Type list, select Before from the Position list. Tick the With Page Style check box and select Chapter first page from list. Make sure that Page Number is set to 0. The break property of the Chapter title style ensures that every chapter starts with the Chapter first page style. And since all three chapter page styles are linked together, the master will use them until it encounters the next chapter title.
Using a similar technique, you can specify page breaks for the copyright title, preface title, and appendix title paragraph styles. When you have done that, you can insert the rest of the sub-documents (copyright, preface, and appendices) into the master.
Once all the sub-documents have been inserted into the master, you must specify the outline numbering, where the chapter title is set to be at Level 1 with the numbering option 1, 2, 3…, and the appendix title set to Level 5 with the numbering option A, B, C….
Adding a table of contents and alphabetical index
Using the defined outline numbering, adding a table of contents (ToC) to the master is rather easy. Let’s say you want to insert the ToC between the copyright and the preface. In the Navigator, select the Preface.odt item, press and hold down the Insert button, and select Index. Select Table of Contents from the Type list, make sure that the Outline check box in the Create from section is ticked, and press OK. To force the ToC to start from a new (right) page, use the previously described trick: In the Stylist, right-click on the Contents Heading paragraph style, choose Modify, and click on the Text Flow tab. In the Breaks section, tick the Insert check box, select Page from the Type list, select Before from the Position list. Tick the With Page Style check box and select Front matter first page from list. Click OK when done.
Adding the alphabetical index is equally simple. In the Navigator select the very last item from the list of sub-documents, press and hold down the Insert button, and select Index. Select Alphabetical Index from the Type list, and press OK. Note that Writer inserts the index before the last item. To move it to the end of the book, drag it down using the mouse.
Dmitri Popov is a freelance writer whose articles have appeared in Russian, British, and Danish computer magazines.


