
Author: Varol Okan
The DVD format
The DVD format was pushed hard by the entertainment industry because it included features to thwart illegal copying. The DVD format also included additional features popular with consumers, since “copy protection” was not an incentive for the average user, but unfortunately the additional features and the inability to agree on a single format left the DVD as a very complex standard. We’ll talk about some of the standard here, but the entire standard is far beyond the scope of this article.
A Video DVD can have up to eight audio tracks, and eight simultaneous video tracks, and supports up to 32 subtitle tracks. The standard is very specific on the supported video resolutions and only supports MPEG1 and MPEG2 video streams.
For NTSC, used in North America, Japan, South Korea, and elsewhere, the supported resolutions are 720×480, 704×480, 352×480, and 352×240. The refresh rate is 29.97Hz, or 23.97Hz and the supported aspect ratios are 4:3 and 16:9.
For PAL on the other hand, the standard defines resolutions at 720×576, 704×576, 352×576, and 352×288. The refresh rate is set to 25Hz and the supported aspect ratios are 4:3 or 16:9. Pal is used widely in Europe and Asia.
The audio codecs which are most commonly used on a DVD are PCM, MP2, and AC3 with a sample rate of 48kHz. It is noteworthy that the standard does not require NTSC DVD Players to support MP2, though most do. PAL DVD players, on the other hand, are required to support the MP2 codec.
Again all the finer details on which settings go together would surpass the scope of this article and I recommend looking at this link or searching the Web for further details.
‘Q’ DVD-Author
Any decent DVD authoring GUI should shield you from the complexity of the format, offer most features available for creating DVDs, and handle next to any input audio, video, and images. Only a few good GUI-based tools are available for Linux and only one is capable of supporting more than the most basic features.
Since its beginning in 2004, ‘Q’ DVD-Author has matured from a basic front end for the underlying command-line Linux DVD-burning tools into a full-blown DVD authoring suite. It can now create a DVD with multiple menus, multiple audio tracks, and multiple subtitles. It offers an easy-to-use templating system, built-in transcoding, and a simple module to create slideshows from still pictures.
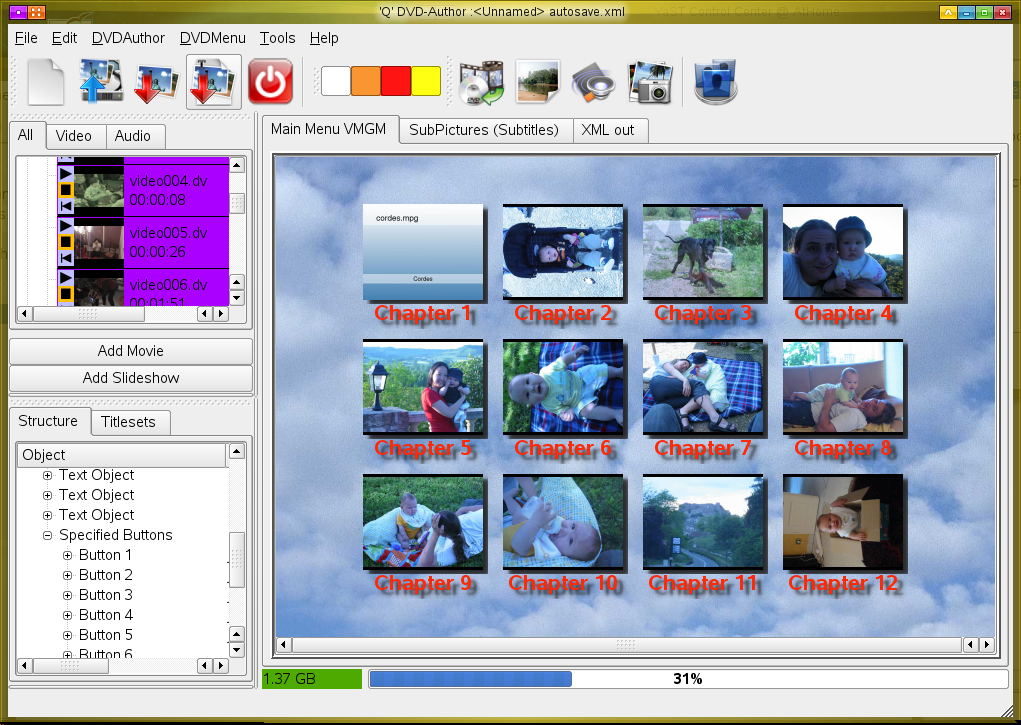
|
Q DVD-Author main window – click to view |
To create a simple DVD you should start by adding a background to the basic menu that is set up by default. If you have not already set up temp path and DVD output directories, you can create the directories using a wizard.
Once you have completed this setup, you can add a background image. If the image does not correspond to either NTSC or PAL resolution the ResizeDialog will open where you have to choose your settings for the menu.
The next step is usually to add the video files to the project using the Add Movie button in the video sources tab on the left side of the window. You can either add one file at a time or multiple files all at once. It is usually best to add videos that logically belong together as a group of multiple files.
After you have selected your videos and they show up in the video sources tab, you can drag and drop them from one location to another to arrange them in the sequence you prefer.
If you have added videos from your digital video camera, as I did in this example, they will not be in DVD complient NTSC or PAL MPEG format, so you will see two additional things happen. First, the video is automatically marked for transcoding, indicated by the purple background color. Second, a subtitle is automatically created for you, displaying the meta information (usually the timestamp).
By default, the first frame of the movie will be displayed as its thumbnail image. If you want to change the thumbnail you can open the MovieDialog through the context menu of the video (Edit …) in the video sources section of the window.
The MovieDialog is a central dialog for all videos. Here you can add subtitles and additional audio tracks, define chapters, crop the video, or change the thumbnail. Use the left slider to find a position in the movie where there is a good image for a thumbnail. Change the thumbnail in the video tab by clicking the Thumbnail button. After you have finished selecting the thumbnail, close the MovieDialog window.
Now you can finally drag the video onto the DVD menu and place it where you like. Once you see the thumbnail and text on your menu, you can move the objects around and rotate and scale them as you please.
You can also create additional objects, such as text, frames, images, movies, or objects from the integrated library, and add them to your design. This is the point where you may wish to play with the available options to design your menu.
Adding a chapter menu
‘Q’ DVD-Author supports several additional features you can include on your DVD to give it a professional touch. For instance, you can add a chapter menu to the project. One of the basic features of a DVD is the ability to jump to a specific point within a movie. These chapter points can be the beginning of each input video, a manually created chapter within a video, or a combination of both.
You must set the points at which chapters start before you create a chapter menu. To create multiple chapers in a video go to the MovieDialog — right-click on the movie in the video sources panel, and choose Properties — then switch to the Chapters tab, where you can create chapters in one of three ways:
- You can play the video and press the Add Chapter button at the right point in time.
- You can manually edit the time stamps and use Add Chapter to add them one at a time.
- You can automatically create a chapter every set number of seconds.
After you create all of your chapters, close the MovieDialog. In the main menu, go to DVDAuthor -> Add menu to add a new menu, the chapter menu, and add a background and audio to the new menu.
The next step is to create the chapters in the chapter menu. Bring up the context menu of the video in the video tab. You will see a new menu item called Thumbnails … which will open the ThumbnailDialog and give you options regarding distance, size, frames, and so on.
You can select all chapters and drag them into the new DVD menu to create one button for each chapter. You have to guess the buttons’ positions at first, but once you create them you can move them to exactly where you want them.
Only two things are now missing to complete your chapter menu. You need to have a button on the main menu to go to the submenu, and you need a button to go back to the main menu from the chapter menu.
First, create a button on the chapter menu to get back to the main menu. For convenience we will choose an image object from the library. Right-click into the DVD menu and choose Add From library. After you chose an image object, close the dialog, then move your selected image to its final position.
Next, right-click on the newly created image object and select Define as Button from its context menu to open the ButtonDialog. Keep all the default values to create a button that returns to the main menu.
Change back to the main menu and repeat the steps to create an image object. Once you are in the ButtonDialog, change the ComboBox entry from “vmgm” to “SubMenu_1,” which is the chapter menu.
Now you have created both buttons to enable viewers to change from one menu to the other.
Adding a slideshow
If you want to create a DVD from a special occasion like vacation, birthday, wedding, or other event, you have most likely not only video material but also images you want to add to the DVD.
|
Filter Dialog with Image Selection in the background – click to view |
Since a DVD cannot display still images you will need to create an MPEG2 video stream from your images. ‘Q’ DVD-Author offers a simple interface to the DVD-slideshow command-line tool to do this. You can either use it from within ‘Q’ DVD-Author or you can use the standalone application qslideshow.
The interface offers a limited set of features. After selecting all images for your slideshow you can click on the Continue button to make some further adjustments in the FilterDialog. You can add sound tracks, rotate images, and add subtitles to individual images.
Choose the transcoding tool
You can add any type of input video to your project that’s supported by MEncoder. ‘Q’ DVD-Author will automatically check whether the input is a proper Video Objects (VOB) video stream and mark it for transcoding if it’s not. If the input file is an MPEG2 stream without VOB packets it will only be re-multiplexed.
‘Q’ DVD-Author uses one of three tools to convert the input video: video-to-DVD, a script from the videotrans project; transcode; and MEncoder. To set your preferences for these tools, or any other command line tool, you have to open the CommandQueueDialog through DVDAuthor -> Create DVD. This dialog is the command center for all commands to be executed.
Each command appears in a ComboBox, and most commands have multiple options available. If the default command is not working on your system, you can click the edit button to the right of it and modify the command. You can also choose another available option for this command and press the default button to mark this option as your default from now on.
Once you are familiar with the way this dialog works you can tweak each command and set the combination of commands that work best for your setup. For example, if you prefer to have MEncoder set as your default transcoding tool, you should select MEncoder, then press the ‘d’ button to the right of it.
One nice feature in ‘Q’ DVD-Author is its ability to convert a whole project from one video format to the other with only a few mouse clicks. After you have created a DVD in NTSC format, say for your own use, you can convert it to PAL format and send it to your relatives in Europe.
Choose File -> Convert Project to open a the dialog that will not only allow you to convert the DVD from one format into the other, but also create a multiformat DVD that holds both NTSC and PAL versions. This is useful when you want to create one DVD you can show anywhere in the world.
Burning your DVD
To burn your project to a DVD blank, first create the menus, then generate the raw DVD structure, and finally turn the structure into a DVD image and burn it to the DVD blank. Let’s look at how that’s done.
To start the process, click on the create DVD button in the main section of ‘Q’ DVD-Author’s window. This will open the CommandQueueDialog put you into the create and burn section of ‘Q’ DVD-Author.
The first two steps, Main Menu MVGM and DVDauthor, will already be selected (checked). Click on the OK button at the bottom to begin the generation process.
A new window will appear and show the progress of the generation process. This window will close 15 seconds after it finishes building the DVD structure unless you check the box at the bottom marked keep open. When it is finished, you may wish to check the raw structure that’s generated in your DVD output directory. You should also test the correct functioning of the menus, chapters, etc through either the play button in this dialog or manually invoke xine to play it with a command like xine dvd://path/to/DVD/VIDEO_TS/, where path/to/DVD is your DVD output directory.
If your DVD plays as it should, you’re ready to burn your DVD structure to a disk. The easiest way is to use ‘Q’ DVD-Author’s built-in burning facility. Begin by clicking on the same icon as before to bring up the burning commands. However, this time, uncheck the boxes for the Main Menu MVGM and DVDauthor steps — they are already completed.
Find the box called Don’t Execute Burn DVD and change it to Burn DVD. Insert a blank DVD disc into the burner drive and close its door. Click the OK button in the window, and watch the progress of your DVD burn.
If you prefer to use an external DVD burning tool, such as K3b, add the created directories in the DVD output directory — VIDEO_TS and AUDIO_TS — to the root of the media.
The DVD specification allows additional files and folders in a DVD — for instance, to add some of the source material to the final DVD. You will only be able to view these additional files on a PC, and not on a standalone player.
Conclusion
‘Q’ DVD-Author is a mature DVD authoring suite with more features than most DVD authoring GUIs for Linux — it has more than 50 dialogs that offer a wide range of functionality. The software has been translated into German, Italian, French, Spanish, Polish, and Esperanto. It comes with a built-in library of about 200 objects such as buttons and frames, and sports 22 templates.
The application’s greatest flaw is its partial implementation of the undo function, which renders that feature useless. Another area which could be improved is the number of available templates, but it is easy to create and submit a template, so there may be more user contributed templates over time.
You can find a handful of screencasts and other user guides on the project’s Web site, along with a progress page progress page that describes the latest changes and improvements.


