
 Linux Containers (LXC) have been around for a long time, and nowadays we have different options available to manage them. Docker is one of the trending solutions being adopted by companies and individuals to make the most of Linux Containers to run isolated applications with specific setup and restrictions in terms of resources, network, and access to the filesystem.
In this article, we will talk about a recent feature that landed on Docker: logging drivers. We all know that logging is important for any running application, even more so if this is part of a production environment where you need to register certain events or unexpected behaviors, like errors and exceptions.
Getting an application to write log messages is trivial, and there many ways to accomplish that, such as writing to the standard interfaces (stdout/stderr) or appending data to a file. Common applications that run in production tend to use services like Syslog or Syslog-NG, but when deploying applications with modern technologies like Docker, there are better approaches.
If you imagine a real-world scenario where you have multiple applications (or many instances of the same), centralized logging is a must, and that can be challenging, especially if you want to perform analysis. Hopefully, Docker v1.8 provides the perfect native integration to solve this problem through the Fluentd logging driver.
Fluentd
As described in a previous article, Fluentd is a high-performance data collector that allows you to implement an unified logging layer. It tries to structure data as JSON as much as possible, which allows you to unify all facets of processing log data: collecting, filtering, buffering, and outputting data logs across multiple sources and destinations.
 Fluentd is the perfect tool to solve the container logging needs, and Docker v1.8 comes with a native Fluentd logging driver, which allows you to centralize all your container messages. From a Docker perspective, a containerized application only needs to write messages to the standard output (stdout) or standard error (stderr) interfaces. Then, for the logging driver, each message will be interpreted as an individual entity:
 Once the messages are generated, the driver will package and append some extra information from the container, then it will deliver each application message to a central Fluentd service.
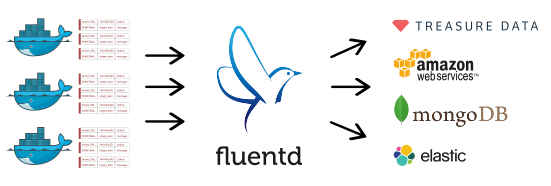 When the messages are inside Fluentd, they go through a workflow of filtering and buffering, and are dispatched to a defined output, which can be a cloud service, database, or filesystem.
Fluentd developers support more than 300 extensions between input and output plugins.
Message Format
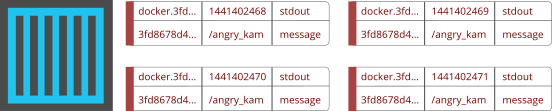
Every message generated by the application is packaged by the logging driver, and it appends some additional information that helps to determine when, who, and why it was generated:
 Each field has it own purpose, described below:
-
tag: human readable identification, a tag is specified by the user who launches the Docker container.
-
time: a Unix timestamp of when the message was generated.
-
source: original stream who generated the message: stdout or stderr.
-
container_id: unique Docker container ID (64 characters).
-
container_name: container name generated when it was created.
-
log: the application message.
To improve performance and optimize the bandwidth, all messages are packaged with MessagePack, which is an efficient binary serialization format.
Getting Started
To get started, I will provide a brief explanation of Fluentd, the native driver for Docker and how containerized applications can use this technology. First, make sure you have all basic requirements in place:
-
Linux system
-
Docker (Installation guide)
-
Fluentd (Installation guide)
Before configuring the demo, verify that you have the latest ubuntu docker image. To do this, just run the following command from your terminal:
$ docker pull ubuntu
After a few minutes, you should get the ubuntu base image; you can verify it with:
$ docker images
The expected output is similar to this:
$ docker images
REPOSITORY        TAG           IMAGE ID          CREATED         VIRTUAL SIZE
ubuntu            latest        91e54dfb1179      2 weeks ago     188.3 MB
Now you are ready to start testing your unified logging layer.
Step 1: Create the Fluentd Configuration File
The first step is to prepare Fluentd to listen for the messages that will receive from the Docker containers. Just for demonstration purposes, we will instruct Fluentd to write the received messages to the standard output. Please create a simple file called in_docker.conf with the following content:
<source>
  type forward
  port 24224
  bind 0.0.0.0
</source>

<match docker.*>
  type stdout
</match>
The configuration file says that it will listen for incoming messages through the TCP port 24224 (on all interfaces) and will use the forward mechanism. Then, for every message received with a tag that starts with docker., it will be matched and processed by the stdout handler.
For more specific information about the configuration options, please refer to the official documentation.
Step 2: Start Fluentd
With this simple command, you can start an instance of Fluentd:
$ fluentd -c in_docker.conf
If the service started, you should see an output like this:
$ fluentd -c in_docker.conf
2015-09-04 22:26:51 -0600 [info]: reading config file path="in_docker.conf"
2015-09-04 22:26:51 -0600 [info]: starting fluentd-0.12.15
2015-09-04 22:26:51 -0600 [info]: gem 'fluentd' version '0.12.15'
2015-09-04 22:26:51 -0600 [info]: adding match pattern="docker.*" type="stdout"
2015-09-04 22:26:51 -0600 [info]: adding source type="forward"
2015-09-04 22:26:51 -0600 [info]: using configuration file: <ROOT>
  <source>
    type forward
    port 24224
    bind 0.0.0.0
  </source>
  <match docker.*>
    type stdout
  </match>
</ROOT>
2015-09-04 22:26:51 -0600 [info]: listening fluent socket on 0.0.0.0:24224
Step 3: Start the Container
When starting the Docker container, we will specify that it must use the Fluentd logging driver. For demonstration purposes, we will start a container that runs an echo command with the message Hello! Docker loves Fluentd!:
$ docker run -t -i --log-driver=fluentd ubuntu echo "Hello! Docker loves Fluentd!"
Hello! Docker loves Fluentd!
Note that, by default, the driver will try to reach a Fluentd instance at 127.0.0.1:24224. If for some reason the Fluentd service is not reachable, the container will not be started.
Step 4: Confirm
If you look at the terminal where Fluentd is running, on the output, you will see the incoming message from the container:
2015-09-04 22:34:25 -0600 docker.53dae513dea5: {"container_id":"53dae513dea5c51843981bf177d7c1239c0db3ae3574bb709688c303a49f9885", "container_name":"/jolly_ritchie","source":"stdout","log":"Hello! Docker loves Fluentd!"}
As you can see, the incoming message contains a timestamp, tag, container_id, container_name, source stream, and the proper message.
Logging Driver Setup
The Fluentd logging driver offers some additional configuration options that allow you to override the defaults. The two options available are:
-
fluentd-address
-
fluentd-tag
Both variables can be set through the –log-opt Docker option.
fluentd-address
This allows you to specify an optional address to reach the Fluentd service; it sets the host and TCP port, for example:
$ docker run --log-driver=fluentd --log-opt fluentd-address=192.168.2.4:24225 ubuntu echo "..."
Here, we have specified that our Fluentd service is located on the IP address 192.168.2.4 on the TCP port 24225.
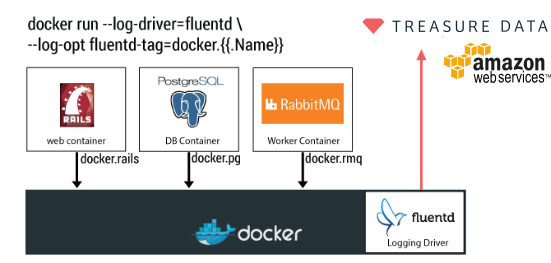
fluentd-tag
Tags are a major requirement on Fluentd; they allow you to identify the incoming data and take routing decisions. By default, the logging driver uses the container_id as a tag, you can change its value with the fluentd-tag option as follows:
$ docker run --log-driver=fluentd --log-opt fluentd-tag=docker.my_new_tag ubuntu echo "..."
Additionally, this option allow you to specify and refer some internal variables: {{.ID}}, {{.FullID}} or {{.Name}}. For example:
$ docker run --log-driver=fluentd --log-opt fluentd-tag=docker.{{.ID}} ubuntu echo "..."
A customized Tag is the key to identifying and routing the message streams properly. It’s suggested that anyone who manages an orchestration system on top of Docker should set this variable for full control of the data.
What’s Next?
Once the data is collected on the Fluentd service, it can be delivered to any cloud service, database, or filesystem as mentioned earlier. The options are many, and we encourage you to explore the plugins available, as well our extended list of recipes.
Final Comments
Docker is an amazing technology that is being adopted widely and doing logging right is a must for any production environment. At Treasure Data, we open-sourced Fluentd in 2011, and it’s a critical part of our software stack. In our Big Data cloud service, we collect around 800k events per second; without Fluentd, it would be almost impossible.
 Eduardo Silva is a principal Open Source developer at Treasure Data Inc. It currently leads the efforts to make logging ecosystem more friendly between Embedded and Cloud Services. He also directs the Monkey Project organization which is behind the Open Source projects Monkey HTTP Server and Duda I/O.
![]()


