Author: Razvan T. Coloja
Several extensions can help you work with photographic images on your Joomla! content management system. Here are some of the best.

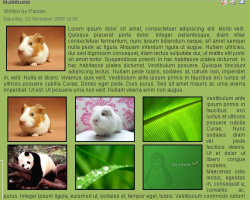
Multithumb is the Swiss Army knife of image manipulation. If you’re not picky, it might be the only such extension you’ll need. It can automatically generate thumbnails and eye-catching image galleries. Its options are highly customizable, and it’s one of the easiest plugins to work with.
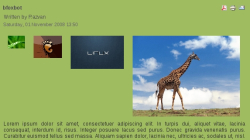
Download the package for your Joomla! version, install it, and publish the mambot/plugin. You can start using Multithumb right away by inserting a picture in a content item and publishing the article. There’s no need to resize the image — just drop it in the location you’d like the thumbnail to appear. By default, the generated thumbnail is 150 pixels wide by 100 pixels high, but you can change these settings from the plugin’s parameters section.
Multithumb has seven image display options for thumbnails. It can generate simple, unclickable thumbnails, or ones that, once clicked, enlarge to fill the screen. The latter mode can display the result in a simple popup window or with more eye-pleasing methods: Slimbox, Greybox, Lightbox and Thickbox. There’s also a thumbnail expansion option that resizes the thumbnail on the same page to a predefined size.
The generated thumbnails can get a border of any colour, thickness, or style, or can be stylized to a more pleasing aspect of your choice with the help of custom images. From the back end you can define the number of images per row when displaying galleries, the maximum size of the full image, and specify the use of captions and watermarks for your copyrighted images.
By default, Multithumb is applied automatically to all content categories, but you can change that. For example, if you want Multithumb to be active in only certain articles, you can insert a {multithumb} function somewhere in the text, then insert the images you want to appear. They will act according to the settings specified in the plugin back end. If you use Multithumb sitewide and would like to exclude an article from using it, insert {nomultithumb} in the text instead.
You can create galleries easily by uploading the images in a subfolder of the Joomla! path’s /images/stories directory and inserting just one of them in the content item. Then select the picture and replace its alt tag field with mt_gallery:My Image gallery. Once published, the article will display all the images in the gallery that obey the settings defined in the back end.
If you want customized thumbnails, create a separate image of what you’d like your thumbnails to look like and drop it in the original image’s folder. Give it the same size and filename as the original image, but append .thumb at the end — for instance, you could have two images in a folder, one named image.jpg and the other image.thumb.jpg. When published, the article that holds the original image will display the customized thumbnail instead of the default one.
Perhaps the best part of Multithumb is that you can manually override its settings for each article. For example, say you want to create a different-looking gallery that uses the Thickbox mode instead of Slimbox and displays smaller thumbnails in seven columns. Use the following code somewhere in the text:
{multithumb
 popup_type=thickbox
 thumb_width=70
 thumb_height=40
 num_cols=7
}
If you don’t want to resize the images and reduce JPEG compression, you could try
{multithumb
 resize=0
 quality=40
}
Multithumb’s developer even provides an online tool that can generate such settings, so you don’t have to read the manual and figure out which option is which.
Multithumb is great for specifying default image sizes, but what if you want to manually resize images in the page editor and make them appear in the content? For that, use fboxbot. Install the mambot, activate it, and be sure to deactivate any other automatic thumbnail generator you might have (such as Multithumb). Then you can insert images in content items and resize them with your mouse. They’ll remain the same size in the article once it is published. Plugin parameters let you specify default JPEG quality and the insertion of a PNG watermark file for every image.
A simpler plugin that combines the basic things Multithumb and fboxbot can do is mavik Thumbnails. If active, the mambot generates automatic thumbnails using either a Slimbox effect or an animated Joomla! Modal effect. Insert a large image, resize it manually to a smaller width, and the result is a thumbnail that leads to the original image.
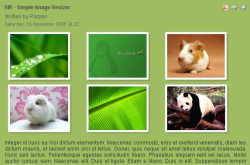
Another simple way to display image galleries is with the Simple Image Gallery plugin. Install it, publish it, then create a directory in /images/stories and fill it with pictures. Open the article you wish to display the gallery in and specify the folder name with {gallery}folder_name{/gallery}. Thumbnails will be displayed with a slight shadow effect and will use the Lightbox mode for the larger pictures. Sadly, besides the thumbnail size and quality, there’s not much else you can configure.
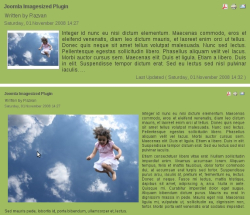
News portal owners will find the Imagesized plugin useful. The logic behind this mambot is simple: images contained in news articles should be converted to thumbnails when on the front page and to a larger size when the full article is accessed. You can configure thumbnail width and height, as well as the full image size, in the plugin parameters section. The best part about Imagesized is that you can specify the exact position of the thumbnail on the front page, as well as the amount of text that surrounds it.
If you want to create a panorama, use the free Panorado-Viewer plugin. Once installed and published, specify the image to be used as a panorama with {panorado img="image.jpg"}, where image.jpg is a file located in /images/stories. This syntax works for versions of Joomla! smaller than 1.2. For Joomla! 1.5 use {panorado angle="120" speed="4"}image.jpg{/panorado}. Here you can manually set the starting angle for the image and the speed of the panorama show. Other options are width="value", height="value" (for the image sizes), and projection="type", where type is either fast, flat, or spherical. You can also hide the navigation buttons with nav="hidden".
How about you give your site a totally new look with Ulti Reflection? This little plugin lets you set a reflection for the images you choose. Just insert {reflect}stories/image.jpg{/reflect} in a content item and a beautiful translucent and gradually fading reflection will appear below the full-size image. It gives your portal a professional aspect when you use it for download buttons.
Simple Image Rotator is another way to visually enrich your site. This module can display a set of images, one after the other, using a pleasant fade-out effect. You can define a URL separately for every image so that when someone clicks on each they will be taken to a page of your choice. It’s great for displaying banners, or as a front page announcer of the latest interesting articles you have to offer. A similar but more customizable module is Shape 5’s Image and Content Fader. It can also display images in a fade-out mode, direct visitors to different pages with each image, and lets you display individualized text at the bottom. All options are configurable, from the size of the module to the color of the text and opacity of the background it rests on.
There are many more image modules and plugins available for Joomla! Among the GPL and freeware ones you can also investigate Phatfusion Slideshow, Ozio Gallery, MorfeoShow and Ulti Polaroid. Visit the Joomla! Extensions Directory for other ideas.
Every Monday we highlight a different extension, plugin, or add-on. Let us know if you have one to suggest.
Categories:
- Internet & WWW
- Graphics & Multimedia

