Author: Joe Barr
Etoys is one of the most interesting activities included on the OLPC XO laptops distributed during the Give One Get One program late last year, which gave North Americans a first look at the controversial laptop. The XO’s unique vocabulary — Etoys as an activity instead of application — underscores the fact that the XO is designed as an educational tool for the classroom.
Etoys is a Smalltalk-based learning application that provides OLPC users with the ability to play games and learn, and also write their own games. The good news is that you don’t have to have an XO in order to join in the fun. On your own computer you can play and learn from existing projects, write your own, and perhaps even contribute software to a future release of the XO.
The first step toward trying the OLPC version of Etoys is to install a Squeak virtual machine on your system. Squeak is an open implementation of Smalltalk-80. Most modern Linux distributions include Squeak, so the first place to look for it is your distribution’s repository. On Ubuntu 7.10, I found and installed the packages for squeak, squeak-sources, squeak-image, and squeak-vm. If you can’t find distribution-specific packages for your system, you can download and install Squeak yourself.
The OLPC’s Etoys implementation requires you to download its own image file. Create a subdirectory for the software in your home directory, then move the downloaded zip file to it, and unzip the contents. From within that subdirectory, run Squeak and specify the Etoys image you’ve just unzipped, with the command squeak etoys.image. After a brief pause, the same screen appears that OLPC XO users see when they start the Etoys activity.

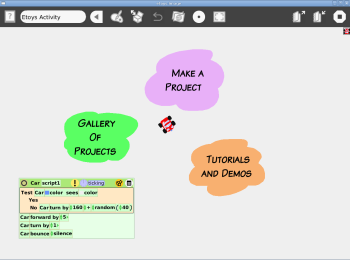
The OLPC Etoys opening screen displays three colored clouds and an automobile that travels around the window, bouncing off the clouds and the edges of the screen. The script that controls the car’s movement is also visible on the screen. Click on the Gallery of Projects — the green cloud — and you’ll see more than 20 projects in several categories: curriculum, animations, tutorials, simulations and games, complex displays, and more. Click on any category to explore its contents.
In Games and Simulations, for example, you’ll find an aquarium stocked with plankton-eating fish, a lunar lander that allows you to control its flight with a software joystick, and a computer design project that allows you to design your own logical circuits. Elsewhere in the Gallery you’ll find a project for modeling the ideal gas tank, and another that illustrates how diseases spread. Some projects are sophisticated, some simple, but all are created in Etoys. A friend reports his three-year-old daughter enjoys other games and activities on the XO, but finds Etoys a little too advanced, but the activity is suitable for children from kindergarten to grade 12, and up.
If you’re interested in writing your own projects, start by examining the scripts of the finished projects. That’s a great way to pick up tips and examples of how to do similar things in your own projects.
Creating a new project
I kept the goals simple for my first project. I used the project displayed on the opening Etoys screen — the one with the car bouncing off of the edges of the screen — as a model. I decided to use a bouncing ball instead of a car, and to enclose it in a box insted of letting it roam the entire screen. Then I set out to see what I could make that ball do.
To create a new project, click on the purple cloud (Make a Project). Etoys will display a blank window with the same menu bar as the opening window. Click the paint palette icon on the menu bar, and a paint menu will appear.
The paint palette allows you to do all the normal drawing and coloring activity that you expect from a simple paint program. I used several of the tools to drag an ellipse from the Treasure Chest and create a ball of a certain size and color on the screen.
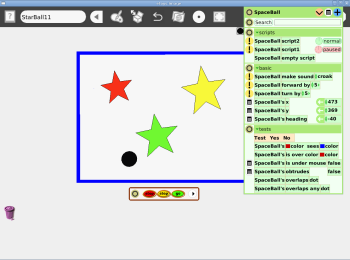
You can right-click on an object to expose its property settings. One of the properties is the object’s name. I changed the generic name from “Ellipse” to “SpaceBall” by clicking on the name and typing in a new one. The Viewer is a more interesting property. Clicking on the Viewer icon opens a script editor, shown the figure at left, which allows you to create a script for an object to make it behave the way you want it to. You can change its motion, appearance, or behavior from the script, and more.
To script an object, drag an action from the script editor and drop it on the project window. For example, to provide for the starting movement of the SpaceBall, you could drag a “SpaceBall forward” action from the script editor — note that the script and its actions have taken the name SpaceBall because I changed the default name for the object — from the editor to the window. The “SpaceBall forward” script action is set by default to move a distance of 5. You can change that value with the up or down arrows immediately in front of the value. Probably the toughest thing to get the hang of is where to drop an action when you add one to the script. Hold the action you have dragged from the script editor over the action in the object’s script you wish it to follow for a second or two, and you’ll see an empty container-like area appear above or below the existing action. When the container is where you want the action to be, drop it.
Etoys scripting is simple enough for children to do, but it can frustrating learning how to do what you want to do. Looking at other scripts can be helpful if they do exactly what you want to do. You can also ask for help on the Squeak Newbie mailing list. But the best approach may be to explore the scripting menu on the screen.
For instance, I saw the random function used in a script, but when I tried to enter “random” as the value in a script command, I was told that “random” is not a valid number. I posed the question on the mailing list, and immediately learned that if I opened the Treasure Chest on the menu bar, and looked in the scripting category, I would find Random. I dragged that to my project area, and then to the place where I wanted to execute it. It’s easy once you know where to look, but frustrating until you do.
Other functions, such as making a ball disappear or cloning a new ball, I’m still looking for inside the scripting menu. Not all actions show up by default, but you can remove categories and add others to the display. You can also search for an action using the search feature in the menu. In the end, I got my little SpaceBall to behave differently depending on which object it runs into. In every case, it makes a unique sound and course change depending on which object it hits. When the SpaceBall hits the border, for example, it emits a croaking sound and alters its direction by 170 degrees. When it hits the yellow star, it makes a scratching sound and turns 120 degrees. Very simple, but it served as a good introduction to Etoys scripting.
Conclusion
Etoys is a fascinating activity for both children and adults. Not only does it provide endless hours of fun and education in the included projects, it also allows students to learn object-oriented programming by doing, and not by attempting to parse the mysteries of inheritance, polymorphism, and encapsulation. An object is a ball, or a star, or a box, or a car. Lesson learned in time for recess.
For educational value, especially to children, Smalltalk, Squeak, and Etoys may never have a better vehicle than the OLPC XO. The rest of us can experience the current state of the Etoys on our own PCs just by installing a few packages. If you’re interested in learning what object-oriented programming is all about, or in learning what educational Etoys might have for your own children, on in writing educational software, or simply in seeing for yourself some of the magic that the OLPC XO has to offer, it’s worth your time to do so.
Categories:
- Reviews
- Education & Training
- Desktop Software


