
FreeNX is based on the Italian company NoMachine‘s NX technology, which is designed to be fast enough to be usable over even the slowest of network connections. The NX protocol is general enough that you can use it to efficiently tunnel and accelerate Windows Remote Desktop Protocol (RDP) and VNC sessions. NX uses a variety of techniques, including compression and caching, to minimize the amount of data sent over the wire and increase responsiveness. NX uses Secure Shell (SSH) as a transport protocol, which provides authentication and encryption in a standard way.
NoMachine offers commercial NX server products and free client software for Windows, Linux, Mac OS X, and Solaris. It provides the core NX technology and software libraries under the GNU General Public License (GPL), which makes it possible for others to develop their own NX servers. FreeNX is a GPLed implementation of an NX server, built on top of the NX core libraries.
FreeNX might not have all the features of NoMachine’s commercial products, but it’s good enough to provide the performance benefits of NX technology. You can upgrade to one of NoMachine’s commercial servers later, if you decide that you need features that are available only in the commercial products, such as multiple sessions, sound, and Samba/SMB support.
Installing FreeNX
The easiest way to install FreeNX is to use a package tailored for your distribution. My machine runs Ubuntu Linux, so I installed FreeNX using the following steps:
- Add the “seveas” repository, which contains the FreeNX packages, by editing /etc/apt/sources.list and adding the line:
deb free.linux.hp.com/~brett/seveas/freenx/ breezy-seveas freenx
- Add the GNU Privacy Guard (GnuPG) key for the “seveas” repository to your GnuPG keyring:
gpg --keyserver subkeys.pgp.net --recv-keys 1135D466gpg
--export --armor 1135D466 | sudo apt-key add - - Retrieve the list of packages from the newly added “seveas” repository:
sudo apt-get update
- Install the required packages:
sudo apt-get install freenx nxviewer
For more information on FreeNX with Ubuntu, see the FreeNX page on the Ubuntu wiki.
If you’re using FreeBSD, you can use the FreeBSD port for FreeNX. Others have written instructions for using FreeNX under Fedora Core, SUSE Linux 10, and Gentoo Linux.
Typically, you install FreeNX from a RPM or a Debian package, and the package takes care of setting up FreeNX for you. If you run into problems getting FreeNX to work, you may want to verify that the installation script took care of the items below.
- Verify that you have a new user called “nx” whose login shell is set to /usr/X11R6/NX/bin/nxserver. When troubleshooting, it is sometimes helpful to test the “nx” user account by running su nx as the root user.
- You may or may not need to do something like the following:
nxsetup --install --setup-nomachine-keynxserver --adduser marc
 # change to your desired user namenxserver --passwd marc
 # change to your desired user name
The –setup-nomachine-key option installs for the “nx” user an SSH Digital Signature Algorithm (DSA) public key from NoMachine that corresponds to a private key that is set up to be the default in the NX client software. You can find this public key in ~nx/.ssh/authorized_keys2.
|   | |
| Figure 1. NX client main screen |
You can also use your own SSH keys for additional security. To do this, add your public key to ~nx/.ssh/authorized_keys2. When I talk about the NX client later, I’ll tell you where you configure your private key. Note that the user added with the nxserver command, unlike the previously mentioned “nx” user, is specific to FreeNX and thus doesn’t appear in your system user/password database, such as the /etc/passwd file, or the Network Information Service (NIS).
Ensure that your network configuration allows connections to the FreeNX server via SSH. One advantage of the NX protocol is that it is carried through SSH, so if you’ve already opened TCP port 22 for SSH you don’t need to open additional ports for NX access. If you’re running sshd on a port other than 22, you need to configure FreeNX for that by editing the file /etc/nxserver/node.conf.
NX client software
Now you need an NX client program. The NX client software is included in some distributions; check to see if you already have it or if it is available via your favorite package management software. If not, you can download and install a free NX client from NoMachine for your platform of choice.
Launch the client and you should see a screen like Figure 1:
Click the “Configure…” button to set up a connection to your FreeNX server. You should see a screen that looks something like Figure 2:
|   | |
| Figure 2. NX client session configuration screen |
You can change the display size, the server and port to connect to, and the amount of compression applied. You can also choose whether to use the GNOME or KDE desktop environment. You could even create two separate sessions — one configured for GNOME and one for KDE. Typically, most of the default options work well for a generic setup.
By default, the dropdown in the “Desktop” section is set to “Unix.” This is the right option for most cases, but you can change it to “VNC” to use the FreeNX server as a proxy to a VNC server, or to “Windows” to use the FreeNX server as a proxy to a Windows RDP server. The VNC and Windows options are interesting because they let you connect to existing VNC and Remote Desktop servers, and also because FreeNX is able to accelerate these types of connections somewhat, although a native NX protocol connection will always be faster.
You can also replace the NoMachine SSH DSA private key with your own key if you wish, by clicking the “Key…” button. For this to work, you must configure the corresponding public key on the server, as described above. I recommend not trying to change the SSH keys until you’ve gotten FreeNX working.
|   | |
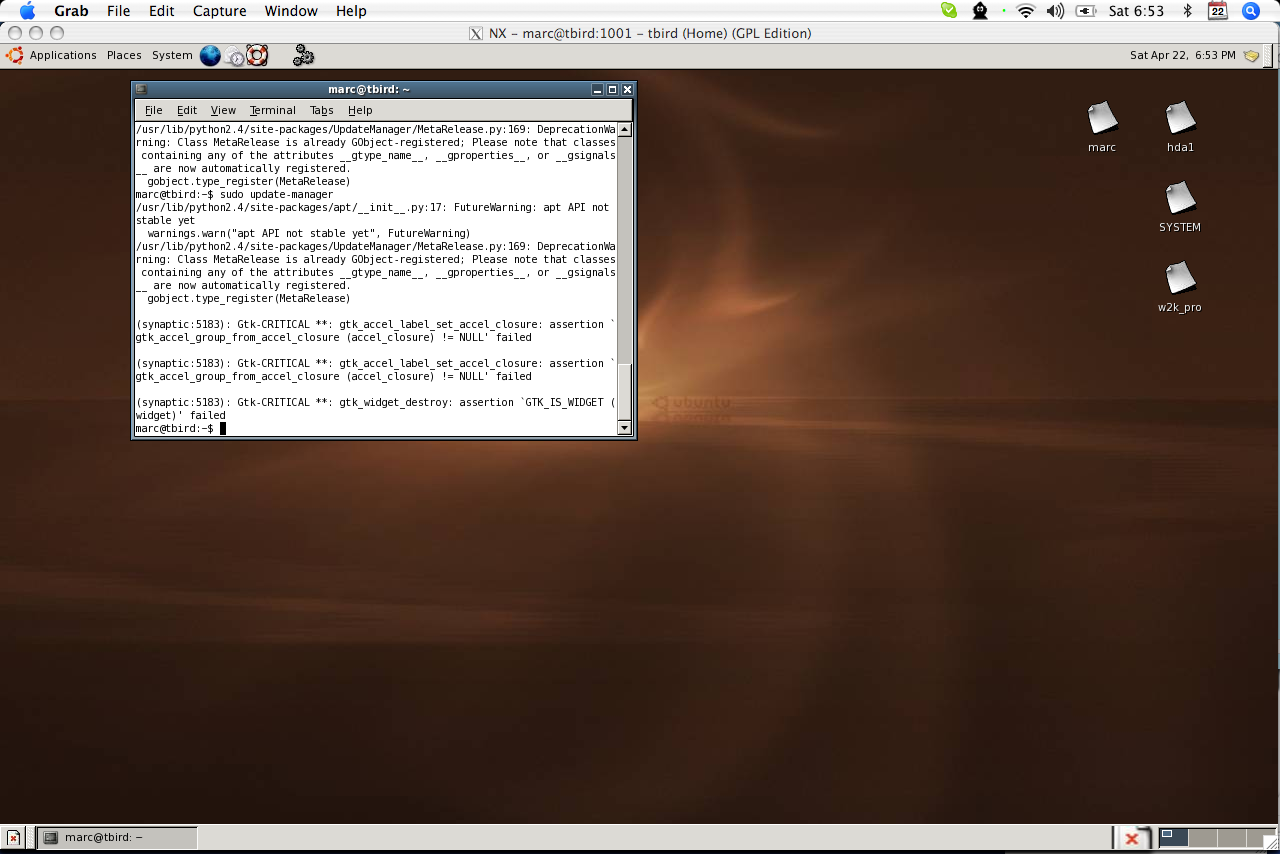
| Figure 3. NX to a GNOME session – click to enlarge |
Once you have your session configured, it’s easy to connect from the NX client by choosing a session from the dropdown and typing in the correct password. NX displays a progress dialog that shows what it’s doing, and if something goes wrong, it shows the error. If the “Details…” button is not grayed out, then clicking it will give you more information about the error that could be useful for pinpointing the problem.
If all goes well and you connect successfully, the NX client will display the desktop of the remote machine. If you try interacting with the machine, you will probably be pleasantly surprised by how responsive it is, compared to VNC.
Figure 3 shows me connected to a GNOME desktop on my Ubuntu Linux machine from my Mac OS X PowerBook.
The NX Session Administrator application, which comes with the NX client software, in theory allows you to suspend and resume sessions, although I haven’t had any luck getting this feature to work.
NX offers much improved responsiveness and security compared to older protocols such as VNC. You may not want to bother with VNC after you see the increased responsiveness of NX. With fast access to your remote desktops, you can do just about anything from home that you can do at the office.


