
Author: Kevin Quiggle and Mike Whitton
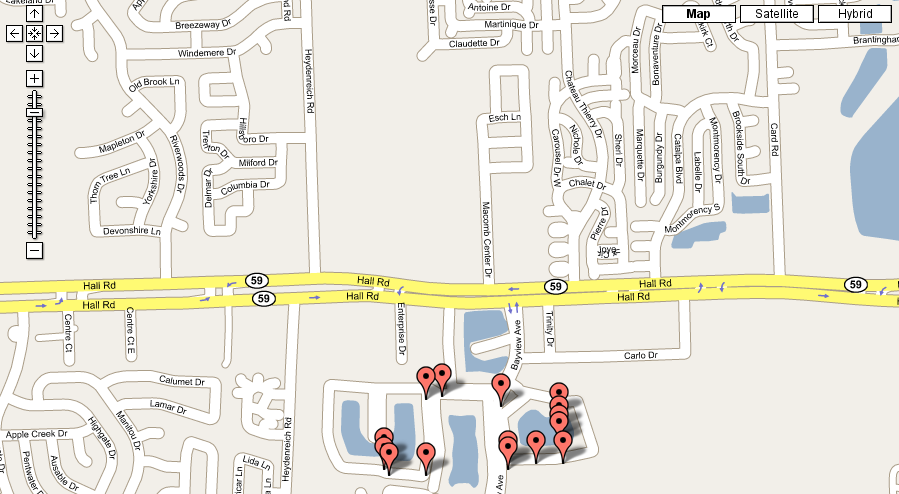
The project was inspired by, and is loosely based on, Tim Vidas’ work, with numerous additional refinements. See Figure 1. to get an idea what the finished product looks like.
The project makes use of the Google Maps’ “info window” feature. This feature includes the ability to created tabbed info windows, in which a map pin can represent more than one photo at a particular location. Each tab shows a different
thumbnail image, clicking on the image displays a full size picture; see see Figure 2 for a sample.
Building a geo-located photo album requires five major components:
- Exif (Exchangeable Image File Format); the detailed standard can be found here
- A digital camera with support for Exif and the ability to connect to a GPS receiver
- A GPS receiver
- Google Maps API (requires an API key; click here for details)
- Programming: Perl, PHP, and JavaScript
The Exif format
The Exif format is a key element of this effort. Exif provides a standard method for embedding metadata tags into standard image formats such as JPEG and TIFF. The metadata tags can include information such as the date and time a picture was taken, the camera settings, and the location at which the picture was taken. Not all digital cameras support the Exif format in general, and even among those that do, few cameras support the location tag, which is crucial for our purposes.
|
Figure 1. Map with geo-located “pins” – click to enlarge |
The camera and GPS receiver
Whitton selected the Nikon D200 digital camera because it supports Exif location tags, and because it stores the data more accurately than some higher-priced models (in which the last two digits of latitude and longitude are truncated). The important lesson here is to make sure that Exif location tags are supported, but also to make sure the required level of accuracy is supported; this is a function not only of the GPS receiver, but also of the level of precision with which the data is recorded.
In addition to Exif support, the digital camera must also provide for connection to a GPS receiver. For the Nikon D200, an MC-35 GPS adapter cord is required, and of course, you must have GPS receiver which will work with a PC cable. The MC-35 connects to the GPS receiver cable, but you must purchase the PC cable along with the GPS receiver. The GPS receiver used here is a Garmin eTrex Vista, but most Garmin and Magellan GPS units with RS-232 serial outputs are compatible with the D200. If the GPS unit does not require a non-zero voltage to transmit (a D200 requirement), conforms to at least v2.01 of the NMEA 0183 protocol, and has a serial PC link cable (USB is not supported), it should work properly.
|
Map pin with tabbed info window – click to enlarge |
When the GPS receiver is properly connected to the D200 using the Nikon MC-35 adapter and serial PC cable, the GPS indicator in the camera control panel begins to flash. When the GPS receiver is locked in (tracking a minimum of three satellites) the indicator becomes steadily illuminated, and any pictures taken are automatically tagged with the current latitude, longitude, altitude, GPS time/date stamp, number of satellites being tracked at time of picture, and map datum.
Processing the photos
Once the pictures are taken, you can upload them unmodified from the camera by FTP to the server where they are to be processed. The PHP and Perl code for the project is developed on a SUSE Linux 9.2 server, which is hosting the Web site used for project development. Readers interested in implementing a similar project can download the code from the links in this article for their own use. Whitton does picture post-processing on this server too, but this could just as easily be done on a PC.
The processing is done is two major steps: First, a Perl script retrieves the relevant Exif data from each photo and creates an XML file that contains all of the information needed to locate the “map pins” on the map, as well as to populate the info windows. Second, some PHP code generates a base map, parses the XML file, and dynamically creates the JavaScript that is used to generate the map markers and tabs. The programs use Google Maps technology; during development, Whitton used the most current version of the maps API (2.54). The latest default version of Maps API 2 is automatically used by the mapping script.
Let’s look at each of the post-processing steps in more detail. The Perl script creates a list of photos to be processed, and then processes each photo in the list. It retrieves the relevant Exif data from the photo; if there is no GPS data available, the photo is skipped. If GPS data is present, it is converted from degrees/minutes/seconds to decimal degrees.
This geographic information is then used to determine the local timezone, and to convert GPS time to Unix time format. Note that the timezone script uses a time zone table typically included in all Linux distributions; the script looks for this table in /usr/share/zoneinfo/zone.tab.
The script also makes an entry to a “tab distance” array that will be used to determine if a series of photos was made at the same location. If they are, tabbed “info windows” (Google’s name for the shadowed pop-ups that appear when you click on a map pin) will be created for the resulting map. The thumbnail image in the info window is generated by the camera, and is part of the Exif data. In addition, if necessary, the script will rotate the photo to horizontal. Finally, the script generates an XML file.
Following XML file creation, PHP generates a base map, parses the XML file, and generates a tab array with all required tab information. The PHP code is automatically activated when the map Web site is accessed; thus the map is dynamically created upon access. The PHP code processes the tab array to generate appropriate JavaScript for either a single info window or a tabbed info window, and the map is loaded into the Web browser.
Future developments
Although Whitton has developed the core elements of this geo-located photo album, more remains to be done. The next major improvement will be to match up the GPS location data with a database of cities, to automatically identify the city in which the photos were taken. From this information a “city index” will be generated so that all photos in the album can be sorted (and selected) by the name of the city in which they were taken, or alternatively, the closest major city. In addition, while the code generates a complete new XML file when the user accesses the map page now, in future this will be changed so that new additions are simply appended to an exisitng file.
While the camera and other hardware required for this project are relatively expensive today, we expect the price of the technology to go down in the near future. Further, the eventual implementation of GPS 3 will improve the availability and accuracy of GPS data. These developments promise exiting new capabilities in the management and presentation of geo-located photographic data.
Category:
- Web Development


