
Author: Nathan Willis
At good workflow ensures that every stop the image file makes along its journey — scanner, digital camera, editing software, monitor, printer — is a known quantity, so the color management system can apply the correct transformation to the image at each step.
Often the very first step is a scanner, which can be quite tricky. Every model is different, there are variations among every device of the same model, and a scanner’s characteristics change over time. The way around such problems is to make a scan of a tightly controlled target image for which you know the correct color values. You can then measure the scan against the known values and create a device profile that a color management system can reference for all scanning jobs.
Getting ready
The open source color management system LittleCMS has a GUI tool called Lprof to help us do just that. Lprof is GPL-licensed, uses Qt for its interface, and you can download it from lprof.sourceforge.net. The current release is tagged 0.11.4. The SourceForge.net releases are source code, and you can build the app yourself, but most Linux distributions now supply Lprof through their package management systems. If you can install it that way, do so to save a little time.
| IT8.7 target. Click to enlarge |
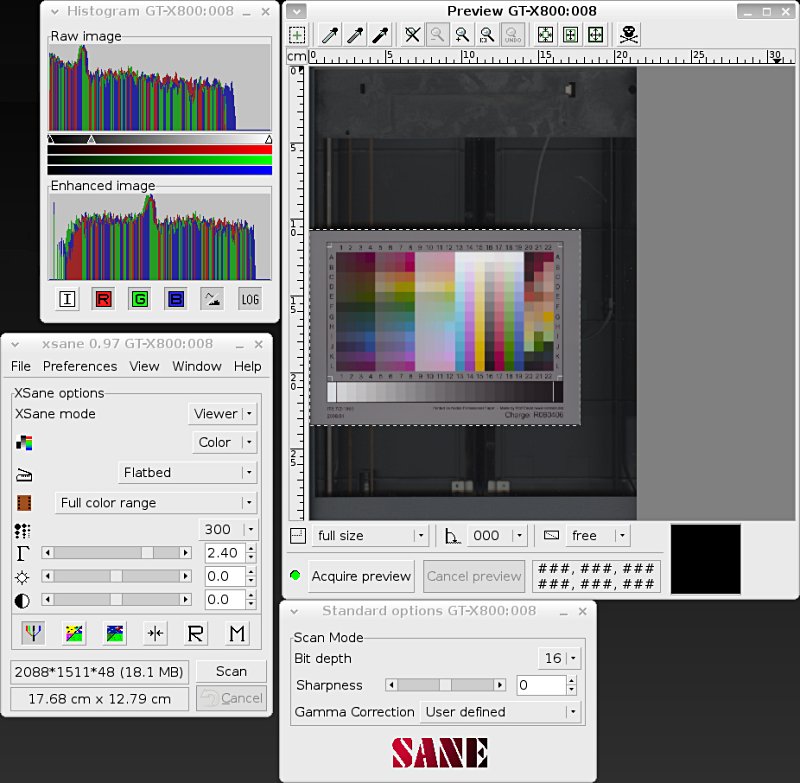
To make an accurate profile, you will need a target image. The standard reference for scanner calibration (which Lprof expects) is called an IT8.7 (or occasionally, ISO 12641) target. It contains a matrix of more than 200 color and grayscale patches of graduated hue, saturation, and value, arranged in numbered rows and columns. Accompanying each is a text file listing the correct color values for each patch. You can find IT8.7 targets both for “reflective” scanners (meaning flatbeds) and on slide film for use with film scanners.
Film companies such as Kodak and Fuji make rather expensive target images. Your best bet is to purchase one from Wolf Faust, an open source fan whose coloraid.de site contains a lot of helpful links about color management. Faust makes IT 8.7 targets in a wide range of formats and sells them at reduced cost. Accompanying each target you buy from Faust is a CD with the appropriate text references files — copy them someplace convenient, because you will need them when setting up your Lprof preferences.
Make a scan of your reference target using your normal scanner software (XSANE or Kooka, for example). For calibration purposes, be sure to turn off all automatic image tweaking and to save your scan in a lossless image format. Use as high a bit-depth as you can, set brightness and contrast controls to their defaults, and set the gamma control to something reasonable (the Lprof documentation recommends 2.2 to 2.4).
A scanner correctly
With your scan complete, fire up Lprof. You will be working mostly in the Camera/Scanner Profiler tab, but before getting started, click on the Preferences tab to do some setup. First, click on the “…” button next to the “Monitor profile” drop-down box. A file selector dialog will pop up; locate the directory in which your existing ICC profiles are located and click OK. You can then select a profile for your monitor from the drop-down box. If you have a specific profile for your monitor, use it, otherwise use something generic, like AdobeRGB or sRGB.
Second, click on the button labeled Install Reference File. Click on the “…” button next to the IT8 Target drop-down and locate the directory containing the text reference files corresponding to your IT8.7 targets. In the drop-down box, pick the reference file for the target you scanned, and you are ready to begin.
| Target alignment. Click to enlarge |
All that remains now is to load your scanned image and have Lprof measure it against the reference file. In the Camera/Scanner Profiler tab, click on “Load Image” and find your scan. Double-check that the IT8 Target selected in this tab is the same one you chose in the preferences file. With the mouse, mark the four corners of the target on your scanned image. Lprof will overlay a green rectangle onto each color patch in the image — if it is a little off-center, you can adjust where you put the corners.
Click the “Create Profile” button, and Lprof will work its magic, sampling the color of every patch and computing the necessary correction based on the reference file. By default, Lprof samples each patch 16 times. You can change this setting by clicking on the “Profile Parameters” button.
For my money, I would use the maximum number of samples, 33. The time difference is negligible, and it is far more accurate. For the same reason, I also recommend checking the “Local convergence analysis” and “verbose” options in Profile Parameters. You get better results, at the cost of only a few extra seconds.
Once you have made your profile, you can examine it by clicking on the “Profile Checker” button. In the Profile Checker, you can see a plot of your newly created profile against a CIE chromaticity diagram, examine a detailed error report, and look at various plots of your scanner’s capabilities. I found that my scanner is a little bit off on the green-magenta channel, which is not uncommon.
| Error report. Click to enlarge |
| LUT curve. Click to enlarge |
| CIE diagram. Click to enlarge |
For fun, try creating a profile using Lprof’s default sampling parameters and compare it to a profile created with the maximum sampling quality. Even with the exact same scan, the increased sampling frequency can make a huge difference.
With an accurate profile of your scanner’s capabilities in hand, you can now scan images, assign your scanner profile to them in any image editing application that supplies color management tools, and be assured that you are working with a color-corrected, top-notch image. Life is good.
Monitors, cameras, and other devices
You may have noticed that Lprof includes a Monitor Profiler tab and that the scanner profiling tab is labeled Camera/Scanner Profiler, and you may wonder why I haven’t mentioned either. Two reasons.
For digital cameras, you could certainly make a snapshot of your IT8.7 target and walk through the profiling process, but your camera’s image sensor has a far larger gamut than the printed target, so the resulting snapshot will drastically underrepresent your camera’s capabilities. The camera manufacturer probably supplies accurate profiles for each device in its software bundle; look for those and use them with your favorite RAW image converter.
For monitors, Lprof supports two methods of profile creation. The “coarse” method is a simple walk-through in which you adjust your monitor settings by eye. It is easy to do, and if you want to read more about it, I covered the topic in an article titled “Monitor calibration under X.” Lprof’s method uses Norman Koren‘s calibration charts — the same ones I discussed in the aforementioned article.
For a truly accurate monitor profile, you have to use a hardware color meter. Lprof’s “accurate” method can do so if you already have a table of measurements from such a hardware device, but it does not support taking the measurements itself. There is preliminary Linux support for a few color meters at a much lower level, but we are still a ways away from seeing the functionality built directly into Lprof.


