
Author: Nathan Willis
Most people never bother with fixing perspective distortion in their photos, unless they find a particularly egregious one — and then they try the pull-on-the-corners Perspective tool in Photoshop or the GIMP, often with miserable results. On the other hand, panoramic photography aficionados must fix the distortion in their images, or else they won’t stitch together correctly. As a result, the panoramic photo apps all have perspective correction tools, and they are top-notch.
Don’t be scared off by the obscurity of the software category here; you don’t have to know or care anything about creating panoramas in order to use this one function. I’ll walk you through it, and tell you everything you need to ignore.
Getting into Hugin
For starters, download and install Hugin, the panoramic photo workhorse. It runs on Linux as well as Windows and Mac OS X. Linux packages are available for Fedora, Debian, Mandriva, and Slackware. Some Ubuntu users have had success with the Debian packages; others have not and went so far as to create an (unofficial) installation script that automatically compiles the packages from source. I’ll testify to how well that method works; it is what I used to install Hugin, and the example screenshots are proof.
Upon launching Hugin, you will see a horizontal tool bar at the top and a main window beneath it with five tabs. The active tab is Images, and it is where we start. Click on the Add Individual Images button, and load up the photo that you want to correct. Load only one image at a time — after you correct the first one, remove it from the list, then tackle the next. That sounds like a hassle, but it does not take any additional time to speak of. Every image has different corrections to be made, so it is not as if you could batch process them anyway.
Next, click on the Camera and Lens tab. Make sure that the Lens type box is set on Normal (trust me; if you were using one of the other lens types, you would not be reading this). Hugin wants to know the optical characteristics of the lens used to take the image — luckily, in a digital photo, this information is encoded in the EXIF data. Click the Load EXIF button and it will be set for you automatically. Alternatively, you can manually enter the data in the fields if you have it.
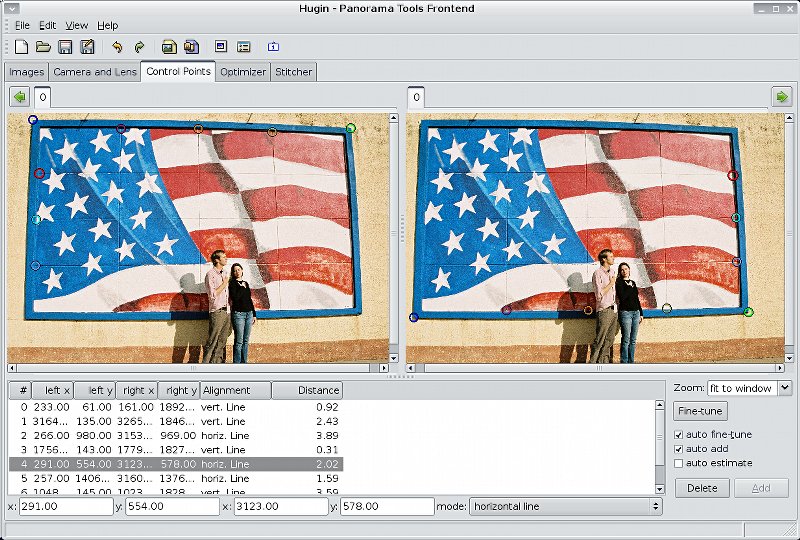
Now the fun part: click on the Control Points tab. If we were stitching together a panorama out of multiple images, here is where we would mark both images with “control points” to tell Hugin where the two images should line up — marking the same object in both the left and right photos. But since we are working with just one image, we have the same photo on both the left and right. Instead of marking the same point in both of them, we are going to mark where the straight lines ought to be. You’ll see how it works.
Straightening up
| Marking pairs of control points. Click to enlarge |
Make sure that “auto fine-tune” and “auto add” are checked in the bottom toolbox. Then start by clicking on a point in the left frame. Pick one end of a straight vertical or horizontal object. Hugin will zoom in and let you fine-adjust your choice. Then, in the right frame, click on a point at the other end of the vertical or horizontal object. Get it? You mark one end in the left frame, and the other end in the right frame. Hugin adds your control point to the list at the bottom — note the way it knows without being told whether you are marking a vertical or a horizontal edge.
You can zoom in at will to fine-adjust all of your control points with the mouse. When you are manipulating a control point, the selected point and its partner in the opposite frame both light up in red. Otherwise, each pair is assigned a separate color by the program, so you can keep straight which belong together. Don’t worry if Hugin pops up a message saying “No similar point found” — that’s just an artifact of the auto fine tune feature (it’s looking out for you, but it doesn’t matter for this task).
When you give Hugin the word, it will calculate the transformations necessary to bend the image so that the vertical pairs line up vertically and the horizontal pairs line up horizontally. The only question is how many control points you need. Obviously more is better, up to a point. At minimum, you should try to have a couple of vertical pairs and a couple of horizontal — it depends on the image, of course. I shoot for three of each, usually — more is nice if the image is very complex, but you get diminishing returns after eight or nine.
| Corrected image. Click to enlarge |
Once you have your control points picked, click on the Stitcher tab. Under Panorama, select Rectilinear, and under Field of View, click on the Calculate Field of View button. All that these settings do is tell Hugin that you are interested in fixing the image as-is, not in warping it into some panoramic shape. Under Quick Stitcher, I always choose Stitch the images into a high quality TIFF file — it is lossless and simple.
Now you’re ready to do some calculatin’ — click on the Optimizer tab. Choose Optimize Positions, View and Barrel, then click the Optimize Now button. A moment later, Hugin will pop up a dialog reporting success and asking if you want to apply the changes. Do it. To preview the results, press Ctrl-P. The preview window will show you a thumbnail of the result. If you are unhappy with it, go back and tweak the control points — no changes have been made yet. You can recenter the image from the preview window to make sure you like it, and when you do, go to the Stitcher tab and click Stitch Now. You can name the resulting file anything you want; Hugin does not alter the original file.
A little outside perspective
That’s it. Honestly, it takes a lot longer to describe than it does to see.
| Before and after correction. Click to enlarge |
Take a look at the example images. This is a photo I took of my brother and sister-in-law in front of a seemingly random outdoor mural we chanced upon. It was interesting, but too large to capture except with a wide-angle lens, leaving it kind of distorted. But by lining up what ought to be the vertical and horizontal lines, Hugin can give me the picture I wanted but couldn’t take at the scene.
As far as ease of use goes, there is a lot of hopping around in the different tabs in this process — simply because Hugin has a lot of features we are not using. The real work in perspective correction is in marking the control points; everything else could be automated. The whole process would make an excellent GIMP or Photoshop plugin, on par with the red eye reduction we take for granted in user-friendly photo apps these days.
As soon as the mass-market software makers realize this, we will probably see perspective correction in every photo application on the shelf. But until then, it will just be our photos that stand out from the crowd — and if it makes us look like better photographers — well, so be it!


