Author: Alex Roitman
Poster presentations are a common way of presenting results, proposing strategies, and explaining concepts and methods. You can create nifty poster presentations with Scribus, the free desktop publishing tool.
Begin by considering the requirements for the poster. It will most likely combine text of various sizes, some graphics (such as images), and elements like boxes, lines, and arrows. The latter are, strictly speaking, also graphics, but we will consider them separately.
The physical size of the poster is typically much larger than your everyday printed page, and the amount of contents presented is also large. The text and graphics have to be big enough to be clearly seen from a distance of a few steps, yet small enough to fit all the contents onto the poster. The quality of text and images has to be extremely good: pixelated graphs or unevenly running text may ruin the appearance of the presentation and make it look unprofessional.
Before you start, you need to find out two things: the desired size of the poster (in inches or centimeters, not pixels!) and the resolution of the printer that will be used to produce it. You specify the width and height of your custom size when you start a new document in Scribus. You use the printer resolution to properly prepare your images and to render the final poster.
Preparing the contents
After you have decided what will be presented, you need to prepare the text and the images. Although you could type in the text as you make the poster, it is better to prepare it beforehand, so you can spell-check and polish the wording before worrying about layout details.
Because the poster will be printed, you should only use certain kinds of images. If your images are graphs or drawings, prepare them in a vector format such as SVG, OpenOffice.org Draw, or EPS — don’t use raster graphics formats such as JPG, PNG, or anything else that records pixels as opposed to objects, because when you try to scale bitmap images to a larger size, they lose quality. Graphs and drawings are typically just a few lines or bars, which is
not a huge overhead for vector rendering. If you use photos, scanned drawings, or any other bitmap images, try to avoid JPG format. In most instances, the JPGs are compressed images, and while they may look fine on a typical 96-dpi monitor, they are nowhere close to the quality needed for print. If you have to use bitmaps, prepare your images in PNG or TIFF format. I use PNG because it handles transparency, which I like for the graphs. Prepare your images at high resolution. Ideally, you would have bitmaps at the same resolution as the poster’s printing resolution. Higher resolution will not make a difference, while lower resolution will show as pixelization.
If you use vector graphics, you may find that your system’s performance degenerates when there are too many of them. This is the price you pay for the nice rendering. If you find that Scribus becomes unbearably slow, try rendering your images into PNG files in your vector graphics application, at the final printing resolution. When using these PNG images, you will not sacrifice output quality and will regain some performance. The down side is that you’ll need to go back and rerender the vector images into PNG every time you want to resize an image on the poster.
Good layout practices
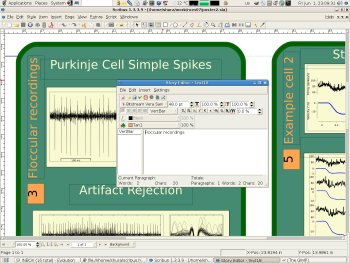
Now you are ready to lay out the presentation. In most cases you do this by combining frames. Some presentations use panels differing by color from the poster’s background. Others use invisible frames so that only the alignment indicates the structure, much like the newspaper page. Either way you are dealing with some kind of boxes or frames.
Scribus provides text and images frames, and tables. To start with the title, insert a text frame and invoke the Story Editor dialog by selecting Edit Text item after a right-click over the frame.
A word about styles: Scribus allows you to specify appearance for only the present piece of text, or to define styles and then mark text pieces as bearing a particular style. I strongly suggest you use the second approach. Not only will it save you time and effort, it will also make the presentation more consistent, and therefore more professional-looking. To define a style, select Edit Styles from the Edit menu in the Story Editor. Once you’ve created a new style, select it for your text in the Story Editor.
Similar to text, you can insert an image frame and then specify the image file to use as the frame’s graphics. But remember — use high-resolution images!
Beyond text and images
In addition to your images, the frames themselves, any connecting lines, arrows, and shapes that you insert, and background color or gradient — all of these will be directly rendered by Scribus. You work on these similarly to other drawing applications. The elements you draw, as well as the text, will be rendered by Scribus at the resolution of your choice, so you don’t need to worry about print quality here.
You can drag and resize all elements of your presentation to arrive at your desired layout. For example, it is common to have images and text inside colored panels. You can create a rectangular shape for the background panel, and then a text frame and an image frame, both positioned on top of the larger rectangle. Once you are done with the panel, you can group its content together to make it a single object. You can easily align several panels like this, or distribute them uniformly on the page.
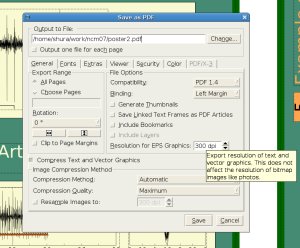
The final step in producing a poster is the rendering. I recommend using PDF format for the poster. Any commercial printer is guaranteed to understand PDF. Set the resolution for rendering to that of the printer you’ll use.
At this point, your job is done, and it’s time to print your poster.
Summary
Once you learn the concepts, using Scribus is fun. It makes simple things easy and complex things possible. To learn more about the application, consult the Scribus documentation site. The Scribus Basics section is a great place to start.
Alex Roitman is a free software enthusiast and the member of the GRAMPS development team. He has been involved with the GRAMPS project since 2002.
Category:
- Desktop Software


