
Author: Luigi Paiella
Hugin is available in several different languages and is cross-platform; it can run on Linux, FreeBSD, Mac OS X, and Windows. I installed Hugin under Kanotix, a Debian-based distribution, following the instructions available at the download page. In order to use it, I installed wxwindows with xrc extension, panotools (libpano12), enblend (optional, but I recommend installing it), and, of course, hugin itself (version 0.5beta20050404).
To create a panorama, you join two or more consecutive, partially overlapping images in JPG, TIFF, or PNG format, telling the software which are the corresponding reference points from one picture to the other. With Hugin you don’t need the pictures to have the same exposure, to be created with the same camera, or in a special camera mode. In fact, Hugin lets you use every kind of image, including scanned ones. However, in order to get good results, you should take your pictures without a dramatically different exposure, with a certain level of overlapping (a minimum of 20%-30% of the same portion of view have to be contained in both the consecutive pictures), and with recognizable spots in the overlapping area. Ideally the spots should be available around the whole overlapping area and not just in a limited small region of the pictures. If you choose moving points (waves, leaves in the wind, fast clouds) the images will not match and the results will be unpredictable.
To practice, and to save time, you can try Hugin with reduced-size pictures. Define all the parameters and, after having made the tests, use the discovered best parameters with the full-quality images.
Figure 1 – Part 1 of the Panorama |
|
Figure 2 – Part 2 of the Panorama |
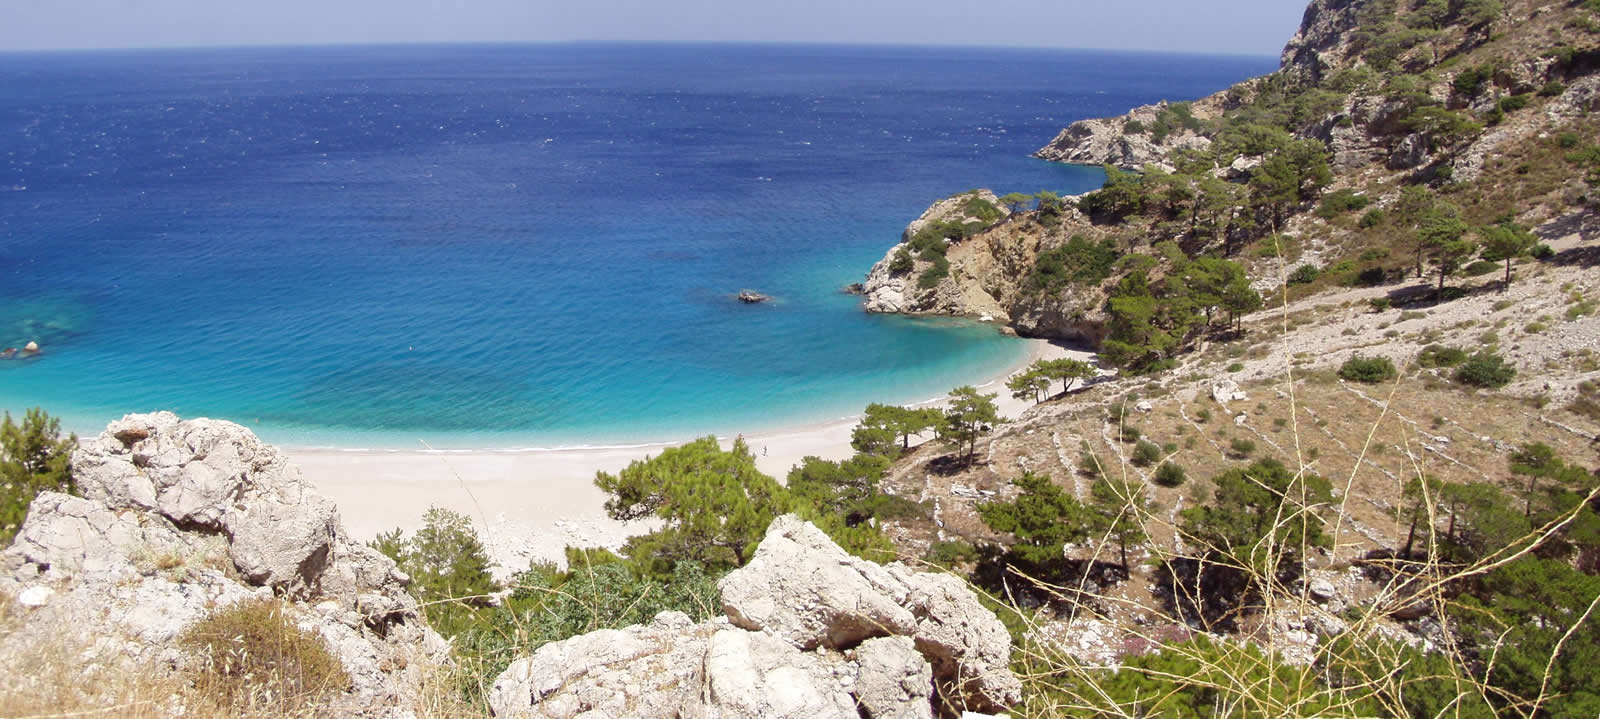
Below you can see two pictures (see Figures 1 and 2) meant to be parts of a panorama: they represent the left and right sides of the Apella beach in Karpathos island, Greece, one of the most beautiful beaches in the Mediterranean Sea. Each is a JPG image, 1984×1488 pixels, that takes up about 640KB of disk space. We’ll work with them to illustrate how to use Hugin.
You can start Hugin through the shell with the command hugin. The clean interface contains a menu, a few buttons, and five tabs. You can make a panorama by going through the five tabs in order.
In the Images tab you upload the pictures to be joined, leaving the “crop factor” as set by default. You don’t have to upload the pictures in precise order, but I recommend following a left to right sequence to avoid confusion, especially if you have more then two pictures.
Next, the Camera and Lens tab provides adjustments for several technical aspects, but the only one strictly necessary is the field “degrees of view (v).” Select the first picture and change this field value to 40, which is the standard value for normal cameras.
The third tab, Control Points, lets you define the references points the software uses to understand how and where the pictures are overlapping. Here we find two views in which we select the image 0 on the left panel and the image 1 on the right one (all the pictures we upload are identified with a sequence number starting from zero). Be sure you’ve selected the options “auto fine-tune” and “auto estimate” on the lower part of the panel. Start identifying the control points, choosing points that are highly recognizable (such as edges and contrasted areas) and available in both pictures. Even if the selection in the second photo is not so accurate, Hugin can adjust it automatically. If the second point is unrecognizable, Hugin will issue a warning message and let you retry. You can confirm the pair by right-clicking.
Hugin requires typically seven to 10 control points. Adding more usually does not increase the panorama’s quality. You can see the control points I chose, some rocks edges and some trees details (see Figure 3). Note that I tried to spread the points as much as possible in the vertical and horizontal directions: the broader scope helps the software align the pictures in the best way.
If you install the Autopano-sift application you can create your control points automatically by pressing a button in the first tab (Images). I usually avoid using this because I prefer to decide the control points by myself; Autopano-sift works well in recognizing the pairs, but I feel it takes points too close to each other, leading to a possible final distortion of the panorama. In addition, I like seeing how Hugin is able to automatically center the points on the second picture even if the clicks are not so precise.
Figure 3 – Selecting Control Points |
On the fourth tab, Optimize, just click on the Optimize button to adjust image orientation and lens settings.
In the fifth and final tab, Stitcher, choose the option “Stitch the images into a high-quality TIFF file”. That tells Hugin to use the nona stitching engine and Enblend (soft blending option). Enblend smoothes the transition between two pictures, especially if the exposures are not the same. In addition to the open source stitching engine nona, which is part of Hugin, Hugin can use PTStitcher, but it seems to be available just in binary format. Note that nona supports the Enblend option only when the output is in TIFF format. PTSticher can use Enblend with any output file format.
On the Stitcher tab, make sure you select the option “as a rectilinear panorama.” As a rule of thumb, use the rectilinear option for a two-picture panorama, equirectangular for more than two pictures, and cylindrical for 360-degree panoramas.
Click on “Calculate Field of View” to let Hugin recalculate the panorama’s dimensions. Finally, click “Stitch now!” and choose the name of the output TIFF file. After few seconds or many minutes (depending on your hardware and the quality level of the starting images) Hugin creates the panorama (see Figure 4).
Figure 4 – A Hugin Panorama |
|
|
Figure 5, the final product – click to enlarge |
You can still make some adjustments to finalize the image. The simplest way is to open the image with the GIMP and crop a rectangular selection of your panorama to eliminate the areas you don’t care for. Figure 5 shows the final result I made.
After you’ve had some practice creating panoramas you will be able to improve your images using the many options and fine adjustments that Hugin provides. Complete documentation and useful tutorials are available at the Hugin Web site. I recommend in particular the tutorial explaining how to use Hugin to join portions of a scanned document when the original is too big to fit on your scanner.


