
Author: Michael Stibane
InstallJammer’s technology
InstallJammer is written in Tcl/Tk. It sports a full blown GUI with numerous features to build a self executing installer for software. The resulting installers include the compressed program files, plus a 1MB to 2MB binary on top (all in one executable file) which holds the wizard dialogs and the Tcl interpreter.
Since Tcl is cross-platform, one can use InstallJammer installers on Windows, Linux, AIX, BSD, and HP-UX. All these systems are offered in the Install Builder as build targets. Mac OS X support is in the works, but not yet available.
InstallJammer creates either GUI or command line installers, and also offers the inclusion of an uninstaller wizard that will be installed aside the program files to allow users to remove the software easily. InstallJammer even supports unattended installation and removal of software.
Program features
After starting InstallJammer the first time, an empty project manager will appear and a wizard will guide you through the setup of your first project. It asks for your company name, version information, and asks for the main directory, where all the program files are located. So it’s a good idea to use ./configure --prefix=/home/user/programdir to compile the sources, so that all the files are in one spot.
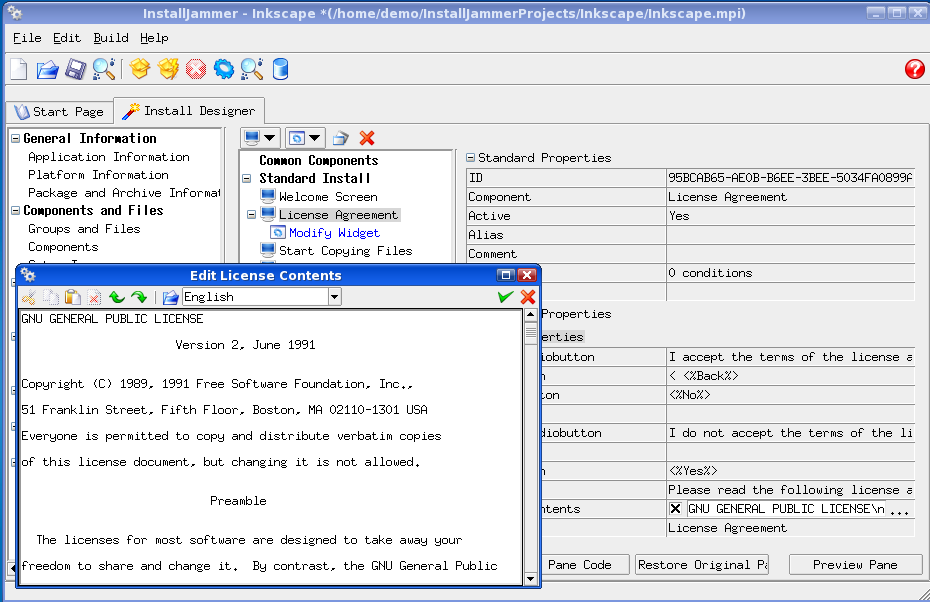
The install builder itself sports a common tree structure on the left of the project manager wizard with all the steps you’ll use to build a perfect installer. Go through the steps from top to bottom and you’ll have your installer.
|
InstallJammer installer creation – click to view |
On the right side of the wizard, you can change the settings. This includes the target directory for the installation, version and build information about the program, and the text the installer wizard shows to the user. The main program directory and its contents, chosen in the project wizard, will already be listed under Components and Files.
You can change the target installation directory for some of your project’s files and directories, so if want to install most of your application to one directory, but need to place config files in /etc, this will let you set that up. Of course, you can also add and remove files.
The files can be grouped in components. So you can have a program component, a documentation component, which allows you to build setup types from these components. So you could package a sources component, a developer documentation component, and the main program component, and group it in a “developer setup type.”
Building wizards
The dialog screens of the wizards are called panes. A common set of panes exist for the project by default. They appear in a second tree structure. At the Un/Install User Interface dialog you can modify the panes to suit your installer. Using the buttons on top you can add new panes, or right-clicking on a pane allows you to remove it. Just mark a pane and choose one of the preconfigured GUI layouts (e.g. License Agreement pane) and it gets added above the marked pane. You can preview the panes’ appearance with the click of a button.
Each pane has multilingual settings at the right. You can, for example, add the GNU General Public License (GPL) text in different languages. For each pane you can add actions. If you have a special kernel module that needs to be built for the kernel on the target system, you could whip up a Bash script to do this, and call the script from inside the installer with an “Execute external program” action.
This external script can echo a success or failure string to STDOUT and the wizard will display it. For working with such variables, InstallJammer supports Virtual Texts, which are string variables you can display in a pane by adding <%VariableName%, or use it in conditions.
Each action or pane can be bound to these conditions and by comparing the strings you can also use the string variables as boolean. Conditions for user input, such as a yes/no dialog, are supported as well. With the help of individual panes, actions, conditions, and external (or embedded Tcl) scripts you can tailor your installer to every target scenario.
More features
InstallJammer 1.1 and later versions integrate with Debian and RPM package databases. The individual files are not registered, but the package is. The installer attempts to build a dummy package on the target system using standard tools and then installs it.
Dependencies, however, are not satisfied this way. If you uninstall it with RPM or dpkg, the InstallJammer uninstaller wizard starts. For packaging the installer an extra step in the tree structure exists. You can choose the build targets here and log the build process output. In the last step you test the installer in different scenarios: without installing files, in the unattended, or console mode install. The console install shows a ncurses wizard interface while the unattended install works without any user interaction
|
SaxenOS installer, created with InstallJammer – click to view |
InstallJammer’s documentation proved very complete and helpful. I needed it for my own project of building a graphical installer for my Linux distribution SaxenOS. Actually I didn’t use the file packaging feature of InstallJammer. I “misused” the program as a generic way for building wizards that call external Bash scripts which do the actual job of installing the whole distribution. For the installed base system still the Slackware package management tools and Zenwalks Netpkg do their job, but I plan to integrate InstallJammer for additional packages.
It cost me three days, a few extra grey hairs, and many tries. Of course the scripts need extensive review but being just a user and no programmer at all, I’m quite pleased with the result. A screenshot gallery of my installer can be found at the SaxenOS Web site.
Conclusion
I’m not going to judge about existing Linux package management. I just know it’s a great thing that dpkg, rpm, pkgtool, apt-get, slapt-get, or yum exist. Each solution with its different front ends has its pro and cons and in the end they do what you expect from them: install and remove software. But is this what a Windows-centric software company expects to package its software for Linux? Maintaining different package formats in different versions means a lot of work and increases costs.
I’m also not aware of feature-rich GUI building tools for Slackware, RPM, and/or Debian packages. Software companies, who package their program for Windows, are used to these build tools, for example Installer Wyse. Of course, the porting work is hard and costs money as well, but having a familiar install for users is also a priority.
And is it what a long time Windows user expects when he makes the switch to Linux? As we all know, Joe Windowsuser likes things as they are: If he tries new things, they should mostly look like before. So self-executing installers are a good thing for software companies offering their products for Linux, and end users will feel at home when the wizard pops up. An installer that work in conjunction with one of the existing package management tools is something I could imagine as a successful solution.


