Author: Dmitri Popov
Need a simple yet effective way to back up your laptop or desktop machine to a network-attached storage device or a network hard disk running Samba? Using Samba’s smbmount utility and the grsync backup tool, you can set up a backup system that is both reliable and straightforward in use. And since both programs are available as packages for most Linux distributions, you don’t have to get your hands dirty compiling from source code and fiddling with settings.
Before you get started, check whether the smbfs package is installed on your machine. While many Linux distributions come with smbfs preinstalled, on other distros you have to install the package. On a Debian-based system you can use either the Synaptic package manager or the sudo apt-get install smbfs command.
With smbfs installed, you can mount a Samba share using smbmount, a clever little tool that mounts a Samba share to your local file system as if it were a directory on your hard disk. By default, you can use smbmount only as root, so if you want to be able to run it as a non-root user, you have to change its permissions by using the following command:
chmod u+s /usr/bin/smbmnt
Next, you have to create a mount point — a directory where the Samba share will appear. For example, you can create the sambashare folder in your home directory. You can then mount the Samba share into the created sambashare directory using a command like:
smbmount //smb/share /home/user/sambashare -o username=smbusername,password=smbpassword
The //smb/share part refers to the actual path to the Samba share — for example, //192.168.1.7/Documents. The second path points to the mount point on your local machine that you created earlier. While you can specify the user name and the password directly in the command, that’s not especially secure, since they are then recorded in the .bash_history file. For better security, you might want to save credentials in a text file (e.g. smb_credentials) as follows:
  username = smbusername

  password = smbpassword
You can then point smbmnt to the credentials file:
smbmount //smb/share /home/user/sambashare -o credentials=/home/user/smb_credentials
Once the Samba share has been mounted, you can use it as a place to which to back up local files and directories. For that you need rsync, a popular command-line synchronization and backup tool. If you haven’t tried rsync, take a look at Back up like an expert with rsync, which will help you to get started. As an example, here is the command I use on my machine to back up Firefox settings:
rsync --verbose --progress --recursive --times --perms --compress --delete /home/dmpop/.mozilla /home/dmpop/smbshare/backup/

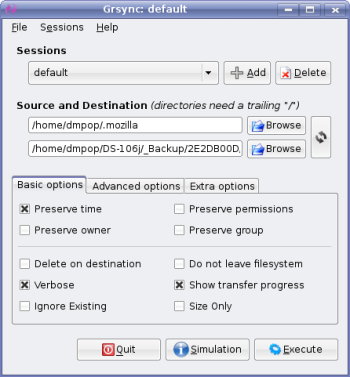
If working from the command line doesn’t tickle your fancy, try grsync, a graphical front end to rsync that makes the backup process simple. It also allows you to create and manage multiple backup profiles (called sessions). To create a new profile, press the program’s Add button, give the profile a name, and press OK. You can then enter the paths to the source and destination directories and specify the desired options by ticking check boxes. If you are not sure what each check box does, hover the mouse over it to see a pop-up window with a brief explanation.
That’s all there is to it. Once you have the basic backup system in place, you can improve it. For example, you can create a simple bash script that runs the specified rsync commands, and you can schedule backups using tools like KCron.
Categories:
- Tools & Utilities
- Backup & Data Recovery


