Author: Bruce Byfield
DVD burners such as as K3b and GnomeBaker use standard commands for manipulating .ISO images, such as mkisofs. However, they give users only limited control over the resulting images beyond selecting their contents. Users cannot even save the image to an .ISO formatted file; instead the burners save in their own project formats. Fortunately, this functionality gap is bridged by ISO Master, a program that, despite a slightly awkward interface, is intuitive enough that most users can quickly learn its fundamentals without having to refer to online help. Only the adding of a boot record is likely to give average users any trouble.
ISO Master’s project page offers versions for recent versions of Debian, Fedora, SUSE, Mandriva, OpenBSD, and FreeBSD, as well as a variety of smaller distributions. If your distribution is not listed, or has only an older packaged version, as Arch Linux and Gentoo do, you can scroll down to the bottom of the page for the address for the Subversion repository or for tar archives of older releases.
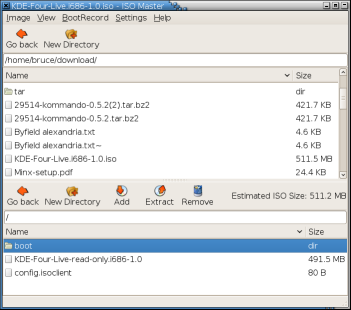
The ISO Master interface is roughly similar to those of K3b and GnomeBaker, with a list of files on your hard drive in the top pane, a list of files added to the new or open image in the bottom, and a running estimation of the file size clearly visible. The main difference is that ISO Master does not support dragging and dropping files with the mouse. Instead, you select a file in one of the panes, then an icon from one of the task bars. Somewhat confusingly, the top pane has its own navigational taskbar, while the second taskbar below it has two icons for navigating the bottom pane followed by one action — Add — that applies to the top pane, then two more — Extract and Remove — that apply to the bottom page. However, general navigation remains simple enough that, for most people, the confusion should be only momentary.
Configuration choices are also somewhat disorganized, with options for viewing hidden files or displaying directories first under the View menu and options for eliminating duplicate files or following symbolic links under Settings. But again, given the limited number of options, you should have few problems finding your preferences so long as you take the trouble to explore the program thoroughly before using it.
The simplest action in ISO Master is editing an existing image by selecting it from Image -> Open. Once the image’s contents display in the bottom page, you use the icons on the second task bar to add files — space permitting — create new directories, and extract files in much the same way you would an archived file.
In addition, you can also select Image -> Properties to edit the image’s metadata. The time when the image was created is uneditable, because ISO Master does not overwrite the original file. However, you can edit the Volume Name and Publisher, as well as the image’s support for Rockridge and Joliet ISO images — that is, the image’s support for Unix-like and Windows operating systems — although in many cases you want to leave it with support for both. ISO Master does not offer the detailed selection of Rockridge and Joliet characteristics that K3b does, but, since few people are likely to require them, or even be aware of them, that is unlikely to be a concern for very many.
Another handy function in ISO Master is the ability to read the details of the image’s boot record by selecting BootRecord -> Properties. Although you probably don’t need the details when working with an existing image, they can be extremely useful when creating a new ISO image image. For the most part, creating a new image is no more complex than editing an existing one, but if you want the image to be bootable, you may have some difficulties.
If you feel equal to the task, you can refer to ISO Master’s Web site and pore over the standards documentation to learn how to write an El Torito boot specification. Although ISO Master maintainer and lead developer Andrew Smith modestly refers to himself as an amateur, he clearly knows more about the standard than the rest of us ever will.
As an alternative, however, you can identify the boot record in an existing image, extract it to your hard drive, then add it to your own images. You may waste a CD or DVD or three in learning which of the five options under BootRecord -> Add is appropriate for your borrowed boot record, but with luck and patience, the research will allow you to make your own bootable ISO images at will.
Not everyone, of course, needs to create their own ISO images, which is why most burners either don’t include much of the functionality or else hide it where only advanced users are likely to find it. However, if you do need to manipulate ISO images, ISO Master should give you all the functionality you need.
Categories:
- Reviews
- Tools & Utilities
- Desktop Software


