
Author: Preston St. Pierre
Using DCOP
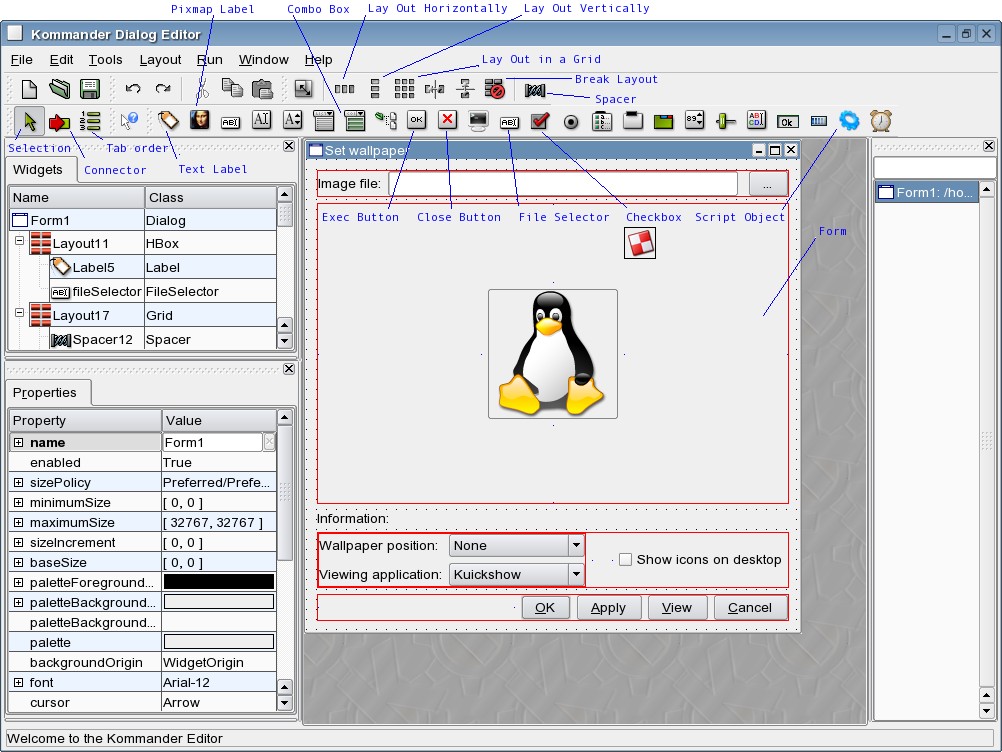
| Click to enlarge |
Our example application is growing in functionality fast, so now we’ll add almost all the remaining widgets to the window. First, add a CloseButton called okButton and labeled “&OK”, setting its “default” property to true. This will cause the button to become the default one, which is activated when Enter is pressed in the dialog box. Next, add an ExecButton called applyButton and set its text to “&Apply”. Then, add a checkbox called “showIcons” with the text “Show icons on desktop”, followed by a combo box called “position” and a text label with the text “Wallpaper position:” to accompany it. Double-click the position combo box to edit its contents and enter the following items: None, Centered, Tiled, Centered tiled, Centered maxpect, Tiled maxpect, Scaled, Centered auto fit. Preserve the order, as we will treat this combo box in a way similar to the viewingApplication combo box — each item’s position corresponds to a magic number that KDE uses to identify a particular wallpaper position.
We are now going to implement the functionality of changing desktop wallpapers. The key to this is the Desktop Communications Protocol (DCOP), which KDE applications use to communicate with each other. By issuing DCOP calls you can for example control your music player, enter text into an open KWrite window, or tell the KDE screensaver to lock your session. You can also get and set information related to the desktop background. General information about using DCOP and related tools can be found elsewhere, but there are two useful things to know. Firstly, you can check what DCOP calls are available for running applications using the program kdcop, which displays each application’s interfaces in a nice tree. This program is a part of KDE itself and is not directly related to Kommander, though it is quite useful for people writing Kommander applications. As an exercise, after we enter our code into Kommander, you can try to navigate through kdcop in order to find the calls we used. Secondly, there is a command line tool, dcop, which makes it possible to issue DCOP calls from the command line. In some situations, you must use this instead of Kommander’s built-in DCOP functions.
So, first we will use DCOP calls to set the initial values of our dialog’s controls so they reflect the desktop’s settings. One widget whose state is not set based on settings received from KDE is the wallpaper position. Unfortunately, there seems to be no easy way to get it using DCOP calls, so the best we can do is to set it to some arbitrary value, e.g. 6 (Scaled). Append this code to the form’s initialization slot:
@fileSelector.setText(@dcop(kdesktop,KBackgroundIface,"currentWallpaper(int)",0))
@switch(@dcop(kdesktop,KDesktopIface,"isIconsEnabled()"))
@case(1)
@showIcons.setChecked(true)
@case(0)
@showIcons.setChecked(false)
@end
@position.setCurrentItem(6)
Clearly, the @dcop function is used to make DCOP calls. In the first call, we ask the application kdesktop to execute its currentWallpaper function available through its KBackgroundIface interface. This function takes one integer parameter (the virtual desktop number), which we pass as the last parameter to @dcop. The result of this DCOP call is used to set the file selector’s text. In a similar way, we ask kdesktop whether desktop icons are currently enabled. By the way, your application can also issue DCOP calls to itself. Just use the special @dcopid identifier as the first parameter to @dcop.
As you see, we have to work around a small inconsistency, namely that setChecked function expects either true or false while the DCOP call returns 1 or 0. In Kommander versions newer than 1.1development2, we can use both the 1/0 and the true/false notation, so the much more obvious call @showIcons.setChecked(@dcop(kdesktop,KDesktopIface,"isIconsEnabled()")) can be used instead. On the other hand, thanks to this inconsistency in older versions, we get a chance to see an example of Kommander’s switch/case instruction. Another possible workaround, which requires less code, is to use an array to map 1 to true and 0 to false.
Kommander offers an interesting way of getting the state of checkboxes and radio buttons. We will now use the value provided by the showIcons checkbox in a DCOP call. The @dcop function expects parameters of type bool to be either “true” or “false”. When you open the Kommander Text editor for our showIcons checkbox, you will see that it has three special slots: checked, unchecked, and semichecked. The last one is for three-state checkboxes, which we will not discuss at the moment. The other two are quite interesting, however. When you enter a @showIcons function call somewhere, the text entered for one of these slots is returned, depending on the checkbox’s state. So, just enter “true” for the checked slot and “false” for the unchecked slot, since that’s convenient in our situation. In other situations, other values may be more appropriate. Imagine, for instance, that you have a button that executes ls in order to list a directory’s contents (you would have to run the program from the command line to see the result). You can create a checkbox called longFormat and assign the text “-l” to its checked slot and the text “@null” to its unchecked slot. The latter one is a Kommander special function which simply returns an empty string. Now if your button’s default slot has the script “ls @longFormat”, “ls -l” will be executed if the checkbox is on and “ls” if it is off.
Now let’s consider the OK and Apply buttons. They are both supposed to perform the same action, and the only difference is that OK closes our program afterwards (which is done automatically anyway, since it’s a CloseButton). It would be nice to not have to enter the same code twice in two different places (and have to correct it in both places, too, when an error is found). Script objects serve this very purpose for us. They are objects that don’t appear in running window and only serve as containers for scripts. We will now use one to make both Apply and OK perform the same action when clicked.
Create a new script object called applySettings anywhere in the form (it’s invisible in the running dialog anyway). In the default slots of okButton and applyButton, enter simply:
@applySettings
This will cause the script contained in applySettings to be executed when these buttons are clicked. We could also use the longer form @applySettings.execute for the same effect.
The default slot for applySettings is rather simple and quite similar to what we already know. DCOP calls are used to set the wallpaper image and its position as well as to enable or disable desktop icons:
@dcop(kdesktop,KDesktopIface,"setIconsEnabled(bool)",@showIcons)
@dcop(kdesktop,KBackgroundIface,"setWallpaper(QString,int)", @fileSelector.text,@position.currentItem)
Notice how it now pays off that we conveniently made showIcons return directly “true” or “false” instead of some other values which we would have to convert to the desired format now.
Since we want the dialog box to be usable even without a mouse, we should set the correct tab order for the widgets. First, we will need to make the file selector selectable through tabbing since by default it isn’t. In order to do that, change its focusPolicy property to StrongFocus, which allows the widget to be given input focus both using the mouse and using the Tab key. Next, select the tab order tool and click on widgets until the displayed numbers reflect a sensible order. Users will now be able to navigate the dialog easily using the Tab key. After you’re done, choose the Selection tool again to return to previous mode.
Our application has now got all the functionality we want it to have. The only thing that’s not quite as good as it should be is the widgets’ positions and sizes, which are rather random at the moment. Using layouts, we’ll get this fixed in no time.
The complete script at this stage can be downloaded here.
Layouts
Layouts provide a way of automatically placing and resizing a window’s widgets in a reasonable way. Generally, a layout is like a box in which a number of widgets reside. Layouts can contain not only widgets but also other layouts, which makes arranging large sets of widgets possible. There are three types of layouts in Kommander: horizontal (where items are placed side by side), vertical (items placed one over another in a column), and grid, where widgets are placed in the cells of an imaginary table.
We will now add some layouts to our dialog box. You can have a look at another tutorial for a better description of all the different layout types (it is based on Qt Designer, which was used as a basis for Kommander Editor, and as such it is very similar).
The way widgets will behave once packed into layouts depends on some of their properties. The sizePolicy property has two important subproperties: hSizeType and vSizeType, which control how the widget’s horizontal and vertical sizes change inside the layout. Some of the most often used values are: Fixed (the size cannot change), Preferred (the widget stays at its optimal size if it can, but it can also shrink or stretch to fill empty space if necessary) and Expanding (the widget can shrink but it prefers to stretch and is very willing to do so). Other values are explained here. Widgets also have minimumSize and maximumSize properties, using which you can restrict them from growing too large or shrinking too small. An extra tool used with layouts is spacers, which are widgets that aren’t visible in the running application, but which are used to push other widgets into appropriate positions (in the editor, they are represented by objects resembling springs). There are two types of spacers: horizontal and vertical. Spacers have a sizeType property using which you can control how they affect other widgets. “Expanding” is the most often used type, and we will not discuss other modes in this article.
The best way to learn about layouts is through hands-on experience, so let’s lay out our sample dialog. First, we will line up the four push buttons. We want them to always stay aligned with the dialog box’s right edge, so add a horizontal spacer just left of all the buttons. Now, select the spacer and the four buttons and from the context menu select “Lay Out Horizontally” (or click the horizontal layout icon in the toolbar). The objects are now surrounded by a red frame indicating that a layout is controlling their sizes and positions. You will notice that you can’t resize or move widgets that are inside a layout, even though you can change their other properties. To be able to manually change the widgets’ sizes and positions, you have to right-click the layout and select “Break Layout” from the context menu. You can move the whole layout around and resize it. You will notice that when the layout is resized, widgets inside are moved and resized too, according to their sizeType properties. You will also notice that the spacer actually works, pushing buttons to the right side of the layout regardless of how we scale and move it.
In the next step, create a grid layout using the wallpaper position and viewing application combo boxes and their labels, using the technique outlined above. By default, combo boxes’ horizontal size type is set to Minimum, which means that the widget can’t shrink below a certain size (this will be the size it was at the moment it was added to a layout). When you horizontally stretch the newly created layout, you will notice how the labels and the combo boxes expand equally. This is because both Preferred and Minimum allow the widget to grow and are, so to say, equally strong. In contrast, Expanding indicates that a widget is more willing to grow than one using Preferred size type and that it will try to take up as much space as possible. When you now change both combo boxes’ horizontal size type to Expanding, you will notice that now resizing the layout causes labels to stay the same size all the time, while combo boxes take up all the remaining horizontal space.
To exercise using spacers a bit more, we will align the checkbox to the right window margin, too. Put a horizontal spacer between the layout created in the previous step and the checkbox. Select that layout, the spacer, and the checkbox, and from the context menu choose “Align Horizontally”. This again proves that we can put one layout inside another. You can resize the outer layout to check how the different widgets inside it behave now. In order to make the file selector and its label play nicely together, put them both in a horizontal layout, too.
| Click to enlarge |
Now comes the tricky part — positioning the image preview and the script object. In theory, a script object is completely invisible in the window. However, in some older Kommander versions, while it is transparent, it can influence layouts and appear as empty space in the window. Thus, to make sure the window will look good in all versions, we will create a layout which prevents the script object from messing up the rest of the widgets.
First, we will change the image preview’s minimumSize and maximumSize properties to 40×30 and 400×300, respectively. This is to prevent the window from becoming excessively large when a large wallpaper is opened. Now, surround the image preview with four spacers laid out in a cross pattern: one vertical spacer above and one below the image, and one horizontal spacer to the left and one to the right of it. Now, make sure that the script object is located to the right of and above the image. Select the image, the four spacers, and the script object and lay them out in a grid. Since we placed the script object in the upper right corner of our 3×3 grid whose center is occupied by the image preview, it can’t distort the layout of other widgets very much (in worst case it adds a little margin around the image). To reduce its destructive effect, set both its size types to Ignored, which will basically let it expand and shrink to any size.
Our dialog is almost finished now. The complete script at this stage can be downloaded here.
The last step to perform is to create a layout which will take care of positioning the layouts we have already created. First, resize the layout containing the image preview to be large enough to contain the 400×300 maximum size we assigned to the preview (when you resize an object you can see its current size in a tooltip). Resize the form as needed, too. Once all objects in the window are roughly positioned, right-click on an empty place in the form and select “Lay Out Vertically”. This way you create a layout that encompasses all the top-level objects the window contains. You can now resize the window and see all the widgets nicely move and resize to fill the window’s contents. In a similar way, you could lay out objects located inside a group box by choosing the appropriate layout option from that group box’s context menu.
The application is now complete. You can use all the widgets’ functionality and resize the window to put the layouts at work.
The complete script for the finished application can be downloaded here.
Notes on executing Kommander scripts
Kommander programs are not compiled into binary form, but a special program, Kommander Executor, reads the source files and executes them in a way similar to how shell scripts are run. This makes distributing software simple, since most projects need only this single source file to be distributed. This eliminates problems with binary incompatibility or package management systems. If you plan to create and distribute Kommander apps, you may also want to have a look at Kommander Project Tools, which simplify this task.
Kommander scripts usually have the extension .kmdr and are internally XML files, which means they can be viewed and edited with a text editor, should a programmer find some reason not to use Kommander Editor. To execute a Kommander program, simply click on your .kmdr file in Konqueror. To run it from the command line, invoke Kommander Executor with the following command:
kmdr-executor your-script.kmdr
For often-used Kommander programs, it is convenient to put the above statement inside a shell script.
Conclusion
In the course of this tutorial, we have created a working Kommander application without writing much code. Kommander makes rapid development of small GUI applications easy and often frees the user from having to use more heavyweight languages like C++. Superb integration with existing command-line tools and shell scripts puts the power to create graphical applications for KDE in the hands of people with little or no programming experience. Finally, thanks to DCOP bindings, integration with KDE is a breeze. We are certainly going to hear more about Kommander soon.
Links
Kommander homepage
Download site for all Kommander releases, including obsolete ones
Search for Kommander applications on kde-apps.org
Kommander Project Tools
Introduction to DCOP and related tools
Qt Tutorial: Layouts
Qt Tutorial: Layouts (ctd.)
Description of the sizeType property
Kommander Looks to Shake Up the Desktop
See an updated version of this article at the author’s Web site.
Michał Kosmulski is a student at Warsaw University
and Warsaw University of Technology.


