Author: Joe Barr
December’s release of Nmap 4.50 marked the popular port-scanning tool’s tenth anniversary. The 4.50 release includes Zenmap, a cross-platform GUI front end for Nmap which includes a command creation wizard, a scripting engine, and a host of other improvements. Zenmap makes it easier than ever to use Nmap.
Port scanners are security auditing tools that allow you to discover hosts and the ports they have open on your LAN or across the Internet. Sometimes criticized for helping the bad guys find opening in the cracks of sites on the Internet, their real value is in allowing network security pros — and those trying to protect their own machines and networks — to test their own defenses. They can help ordinary users learn more about networking and network security.
I downloaded Nmap’s source code, compiled, and installed the latest release — 4.53 at this point — for this review, since Nmap is still at the 4.20-2 release in the Ubuntu 7.10 repositories. If you run into dependency or other compilation issues while building Nmap from source code, you can turn to the project’s detailed instructions for the process. The standard build procedure creates both the nmap command-line executable and Zenmap, the new GUI front end.
Zenmap: The new front end
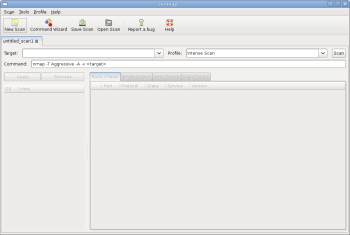
Zenmap is the new GUI in Nmap. It’s built on work done during the Nmap Summers of Code in 2005 and 2006, when Adriano Monteiro Marques created Umit. You’ll want to run it as root, or you won’t be able to use most of its advanced scanning techniques. Figure 1 shows Zenmap immediately after being started, ready to run the default scan based on the Intense Scan profile as soon as you enter a target and click the Scan button.
Of course, you don’t have to use the default scan. If you like, you can click on the down arrow attached to the Profile display and choose one of the other available scan profiles. Or you can simply enter the complete nmap arguments for the scan you want to run into the Command text entry on the line below Target and the Profile.
To see some results for a simple scan, enter a target and click Scan. By default, Nmap does port scanning in two distinct steps: host discovery followed by examination of ports. You can enter the target specification using a single IP address, a host name, CIDR notation, or IP address with octet ranges, so you can define subnets or ranges of IP addresses to include or exclude from the scan.
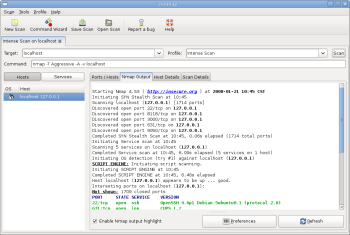
To scan the system you’re using, enter 127.0.0.1 — or localhost — as the target. Note that as you enter the target specification, it appears as part of the command text at the same time. What you see in the command text box is what Nmap will execute when you click Scan.
Figure 2 shows the results of running the default Intense Scan on my desktop box. You can examine other views of the results by clicking on the Hosts/Services, Host Details, or Scan Details tabs in the right pane. To save the results for further analysis, click on Save Scan in the menu bar. Once you save results, you can recall them using the Open Scan dialog.
If you really want to see Zenmap’s magic, click Command Wizard on the menu bar. The Command Wizard is designed for use by Nmap newbie and guru alike. You can use it to craft an amazingly sophisticated scan command, or create and save a new profile that you can grab from the profile menu next time, or you can edit an existing profile with it.
In the Command Wizard dialog, select Expert rather than Novice in order to use the advanced features found in the Profile Editor, which we’ll use to build a profile that examines 256 random hosts to see if they are running Microsoft SQL Server.
On the next page, enter MS-SQL Scan as the name, and for a description type “Random check for MS-SQL” — but don’t click OK yet! Clicking OK completes the profile, and we haven’t done anything except give it a name thus far. Click on the Ping tab and check “Don’t ping before scanning.” Click on the Target tab and check “Scan random hosts,” then enter 256 in the text entry box alongside.
Continuing on the same tab, check “Ports to Scan,” and in the associated entry box enter 1434. Now you can click OK. When you do, the Profile Editor closes and you’re back in Zenmap.
To execute the profile, first make sure that the target text box is clear, then select MS-SQL from the drop-down Profile menu. The command to be executed should look like this:
nmap -p1434 -iR 256 -PN -sS target
That’s all there is to it for this scan, but if you spend a little time examining the Profile Editor’s various tabs (Scan, Ping, Target, Source, Other, and Advanced), you’ll get a sense for how much more the Zenmap Command Wizard can do for you. Nmap’s excellent online documentation also includes a Zenmap manual.
Nmap at the command line
Of course, many folks prefer the command line to the GUI, and Nmap is still available old-school. If you’re crafting ad hoc Nmap scans on the fly, the CLI is probably the best way to go because you can enter them more quickly at the keyboard than you can click through the wizard in the GUI. You’ll also want to use it to take full advantage of yet another feature, the Nmap Scripting Engine (NSE), which provides Nmap with the ability to do scripted scanning.
Like Zenmap, the NSE has its own documentation beyond what’s covered in the Nmap Reference Guide. Nmap comes with built-in scripts, written in the LUA scripting language, which are used for a variety of purposes.
Here is one example of how you can use scripts at the CLI. Suppose you are running a small multi-OS network and have concerns about becoming infected with malware because of the presence of machines with proprietary operating systems. To stay on top of the situation, you want to run a scan on a regular basis that will check for all the malware Nmap knows about. Thanks to the scripting engine, it’s a snap to do just that.
Each NSE script is assigned to one or more categories identifying the type of work it does: safe, intrusive, malware, version, discovery, or vulnerability. If you specify the -sC option in your Nmap command, Nmap will execute all the scripts it finds that are identified as being either safe or intrusive.
Those defaults don’t fit our purposes, so we need to tell Nmap explicitly which category of scripts to use. Assuming the LAN is sitting behind a router at 192.168.1.1, the Nmap command to execute every malware-related script in the Nmap inventory is:
nmap --script=malware 192.168.1.1/24
If you write your own NSE scripts, or modify existing ones, you must update the Nmap scripts database, which tracks them, with this command:
nmap --script-updatedb
Conclusion
Nmap offers much more in its GUI and at the command line than we’ve covered here. If you haven’t used Nmap before, reading its documentation will improve both the speed and scope of your learning curve.
At age 10, Nmap may be the most popular network security tool in the world. Given its power, ease of use, and the excellence of its documentation, it’s not hard to see why. Security professionals and casual desktop users alike can benefit and learn from this tool. If I had a “must have” list of all the apps I use, Nmap would rank near the top. If you’re not familiar with it, grab it and give it a go.
Categories:
- Security
- Networking


