For those users of Microsoft Office looking to migrate to a more cost-effective, less-limiting office suite, you have made the right choice. And for those users who actually want to take advantage of more than the basics of the tools, there are plenty there for you to enjoy. You have probably already read my “Lesser Known, But Very Helpful Features in OpenOffice.org Writer” and now it’s time to put the same focus on Calc, the OpenOffice.org spreadsheet application.
Before I actually get into the bulk of this article I should point out that OpenOffice.org’s speadsheet application, Calc, is an outstanding replacement for Excel and can nearly match the Microsoft tool feature for feature. So if you need spreadsheets fr your daily job you can rest assured that OpenOffice.org’s Calc can most likely cover all of your needs. Now, with that said, let’s take a look at some of the lesser known tips and tricks you will find in Calc.
Open a .txt or .csv File in Calc
I do a lot of work with text files. And many times I like to create data files in text form and THEN open them as a spreadsheet. This comes in very handy when you need to cut and paste data for use in a spreadsheet. But how can this be accomplished? Simple. The first thing to do is make sure your .txt or .csv file is set up correctly. For example, I have a list I am creating to track distribution installations within a company. This list looks like:
PC LOCATION,DEPARTMENT,DISTRIBUTION
RM 100,Administration,Ubuntu 9.04
RM 101,Human Resources,Elive Compiz
RM 102,Advertising,Fedora 11
RM 103,Graphics,Ubuntu Studio
Notice that is a comma-separated list. This file can be opened by OpenOffice.org Calc with a few simple steps. The first step is to create and save the file. This file I am working with is called distributions.txt. Here are the steps for opening this file:
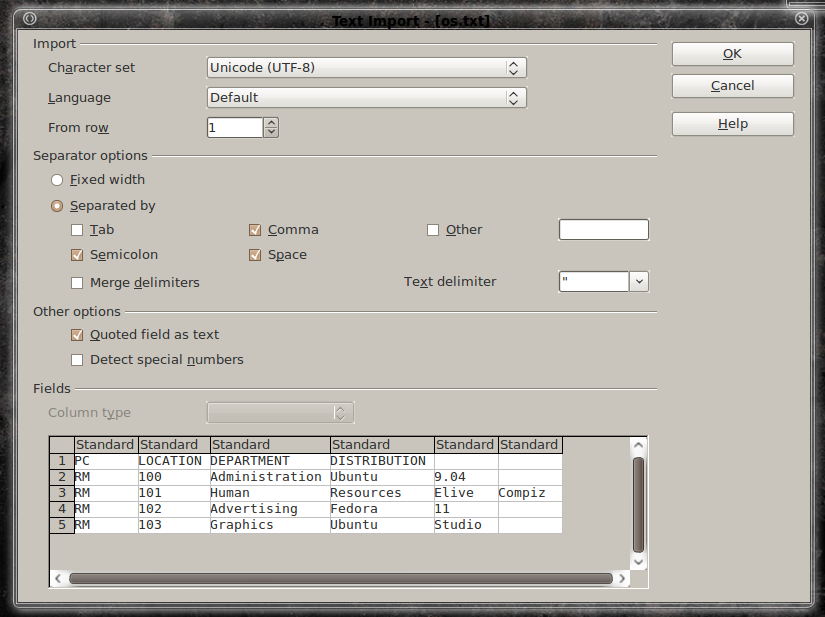 Open up Calc.
- Click on the File menu and select “Open”.
- In the navigation window select “Text CSV” from the drop-down.
- Navigate and select your file.
- Click Open.
- In the new window select the options relevant to your file.
- Click OK.
In the options window (see Figure 1) you will notice there are different separator options you can add or remove. Say, for example, you have a list that is separated by both commas and spaces you can have both. The problem arises if you have a comma separated list but a single value can be two words. Take a look at my sample text above. If you were to include spaces as a separator with that file you would mess up the column structure. In that case you would only want to select Comma from the possibilities as including Space would separate the single value “Ubuntu 9.04” into the values “Ubuntu” and “9.04”. When this file is opened you will have a 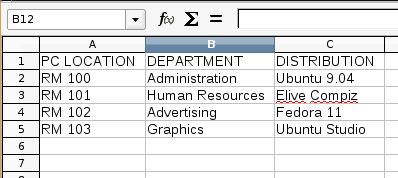 perfectly formatted spreadsheet ready for you to work with (see Figure 2). If you edit this file in Calc you will notice some changes. Once in Calc I added another line to this file:
Rm 104,Development,Gentoo
After saving this file I opened up the txt version of the file which now looks like:
“PC LOCATION”,”DEPARTMENT”,”DISTRIBUTION”
“RM 100″,”Administration”,”Ubuntu 9.04″
“RM 101″,”Human Resources”,”Elive Compiz”
“RM 102″,”Advertising”,”Fedora 11″
“RM 103″,”Graphics”,”Ubuntu Studio”
“Rm 104″,”Development”,”Gentoo”
Notice the addition of the quotes around each entry? You can continue to go back to the txt file and edit so long as you continue to save the file in its original format within Calc.And you don’t have to worry about adding the quotes when editing with a text editor. The next time you open the file file with OpenOffice.org, Calc will format it for you.
Data Consolidation
If you’ve never used Data Consolidation you have been missing a very handy tool. What you can do with this feature is, with the help of an easy graphical wizard, copy data from a range of cells and/or multiple sheets and run one of many functions on that data. Let’s take a look at a very simple example.
Let’s say I have three sheets in a book. Sheet one has one set of data, sheet two has another set of data, and sheet three should contain the sum of the data on the two sheets. The data looks like this:
| Sheet 1 | Sheet 2 | Sheet 3 |
| Column A Cell 1: 1 | Column A Cell 1: 6 | Column A Cell Sum Sheet 1 Cell 1 + Sheet 2 Cell 1 |
| Column A Cell 2: 2 | Column A Cell 2: 7 | Column A Cell Sum Sheet 1 Cell 2 + Sheet 2 Cell 2 |
| Column A Cell 3: 3 | Column A Cell 3: 8 | Column A Cell Sum Sheet 1 Cell 3 + Sheet 2 Cell 3 |
| Column A Cell 4: 4 | Column A Cell 4: 9 | Column A Cell Sum Sheet 1 Cell 4 + Sheet 2 Cell 4 |
| Column A Cell 5: 5 | Column A Cell 5: 10 | Column A Cell Sum Sheet 1 Cell 5 + Sheet 2 Cell 5 |
What the consolidation process does is actually run the function on the data without placing the forumla in the resulting cell. So instead of the formula =SUM(Sheet1.A1;Sheet2.A1) being placed into Sheet 3 Column A Cell 1, the total value of the cells is inserted (In this case 7).
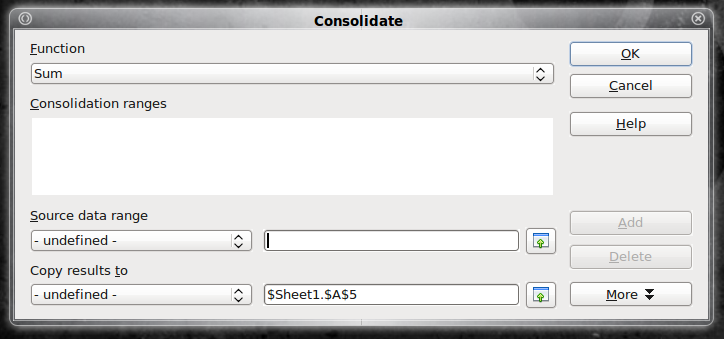 So let’s see how this is done. The first thing you would have to do is open up a new spreadsheet with three sheets in the book. In sheets 1 and 2 enter the data you see in the table. Now go to the Data menu and click on the Consolidate entry. When you do this a new window will open up (see Figure 3).
When this window is open follow these steps:
- Click on Sheet 1.
- Select the cells in Sheet 1 you want to add (For our example it would be Column A cells 1-5)
- Go back to the Consolidate window and click the Add button.
- Click on Sheet 2.
- Select the data (Column A cells 1-5).
- Go back to the Consolidate window and click the Add button.
- Delete any contents in the “Copy Results to” field.
- Click on Sheet 3.
- Select Cells 1-5 in Column A.
- Select Sum from the Function drop-down.
- Click OK.
Now you should see, in Sheet 3, the resulting summation of the data chosen.
Wrap Text Within Cell
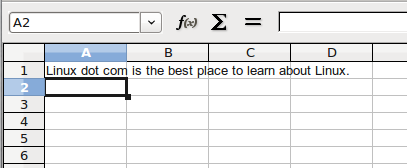 How often have you created a spreadsheet with text that goes beyond the size of the standard cell? Not only does this look bad, it makes using your spreadsheet difficult. If you’re not sure what I’m talking about, take a look at Figure 4 for an example.
As you can see the sentence “Linux dot com is the best place to lean about Linux.” overlaps cells A-D 1, but only belongs in cell A1. How do we manage to keep the contents of this cell contained in A1? Simple. By employing text wrapping within the cell the contents can be contained within the confines of the single cell.But how is this done? Actually, quite simple. Here are the steps (sticking with our example):

- Select the cell containing the content.
- Click on the Format menu.
- Click the Cells entry.
- In the new window click on the Alignment tab (see Figure 5).
- Click on the “Wrap text automatically” check box.
- Click OK.
Once you click OK you will see the entirety of the cell contents now conveniently wrapped within the single cell. The results are shown in Figure 6. Of course you do have to deal with with rest of the cells being confined to a minimum size, but you can drag the column and row handles to change the size. You might also want to adjust both the horizontal and vertical text alignment to make the contents look as good as possible. By default the Vertical alignment will stick to the bottom. So if you change the size of the rows the text can wind up looking a bit strange. I prefer to use the Justify alignment for Horizontal and Top for Vertical alignment. This keeps the cell contents looking their best.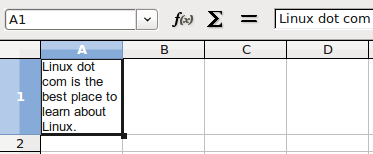
Final Thoughts
OpenOffice.org Calc contains so many features it’s impossible to cover them all in one tutorial. But by seeing these easy-to-use features, you can see that OpenOffice.org Calc is a very robust and user-friendly tool. Have you discovered a cool feature in Calc? If so, share it with your fellow Linux.com readers in the comments.


