
Author: Joe Barr
IPCop is a specialized Linux distribution whose sole purpose is to safeguard the computers and networks it is installed on. The distro proudly claims, “The Bad Packets Stop Here!” I recently installed IPCop 1.4.16 on my SOHO LAN, and found that it accomplishes what it sets out to do.
My LAN is constantly in a state of flux, but at a minimum it contains at least two computers and a wireless access point. I use the wireless router both for Internet access from my laptop and to provide access to a Hewlett-Packard network printer that’s located in a spot where a cable would be inconvenient. I add and remove the odd computer from the mix on an ongoing basis.
I mention my LAN topography because the first thing you should do when considering an IPCop deployment is to plan its configuration. IPCop can handle everything from a single machine to a LAN with both wireless access and Internet-facing servers.
The software provides the ability to create different zones on your LAN, with varying degrees of security, and with each having its own network interface card. If your Internet connectivity is Ethernet, you’ll need at least two NICs in the machine it’s installed on, and perhaps as many as four in total, depending on your LAN. If you connect to the Internet by modem, you may need only one.
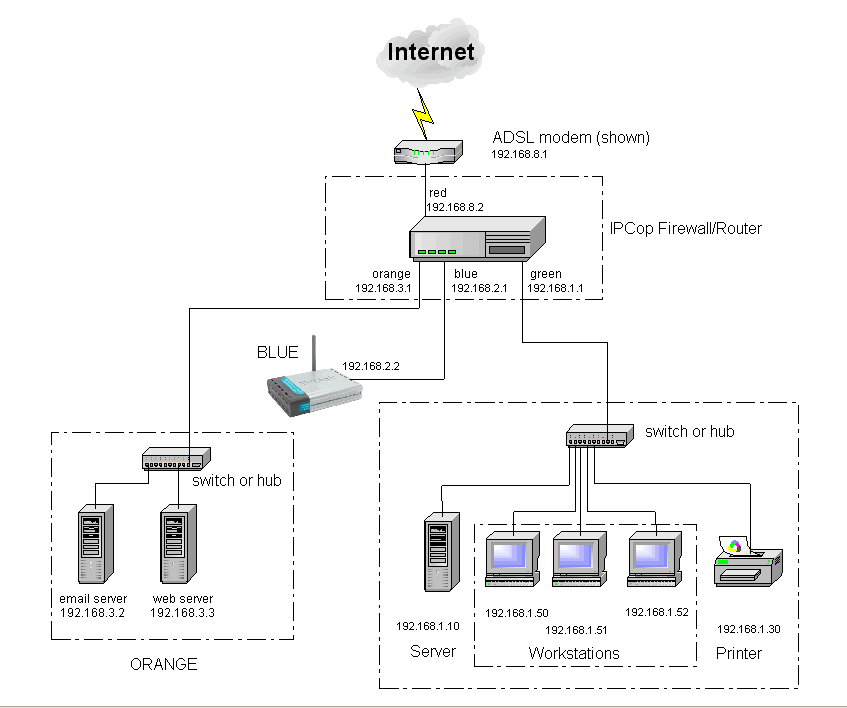
IPCop uses color coding to identify the relative security for each Zone/NIC:
- Red — the wilds of the Internet
- Green — the safe zone for maximum protection
- Orange — a DMZ designed for Web, mail, or other Internet servers
- Blue — for wireless networks
If you are not familiar with the concept of firewall zones, think of each as a separate network entity, with no traffic across zones allowed without special permission. You need to determine the different zones required for your LAN before you begin the installation, because the topography will drive both the hardware requirements (NICs and cables) and the installation and setup of IPCop, including the address ranges you’ll want to use in the various zones.
In the simplest configuration, with a single machine behind the IPCop firewall, you’ll need only a red and a green zone, with one of your two NICs connected to the Internet — via the cable modem in my case — and the other to the computer it’s guarding. I need three NICs: one for the cable modem, one for the green zone, and one for the blue, so I can protect my green zone computers from access by someone connected to the wireless AP in the blue zone, while allowing access to the Internet.

I downloaded the latest version and burned the ISO to CD. I also downloaded the documentation for installation and administration, which available on the same page, so I could get to it if I had problems during the installation and had no Internet access.
The installation process is quick and easy. After booting from the CD, you’re warned to kiss all the data on your hard drive goodbye, and then you’re off and running, choosing the correct language, keyboard layout, and installation method — local or network. When you give the OK, IPCop formats and partitions your hard drive. That took more than 10 minutes on my system’s 120GB drive, and I was beginning to think the install had failed when it finally moved on to the next step, copying files from the CD to the drive.
In the next step of the installation, IPCop will ask which NIC you want to use for the green zone, and for the IP address to associate with it. I kept it simple, following the examples in the documentation, and chose 192.168.1.1 as the IP address for the green zone interface. At this point, you’ve installed IPCop, but, save for the green zone interface, not configured it.
The installer then prompts you to remove the CD, and without rebooting starts the setup program, which allows you to finish configuring the system. You can run setup again anytime you need to change your configuration simply by entering the command at the IPCop console.
If you are unclear as to what you want your IPCop configuration to look like, or what IP addresses to use, refer to the illustration provided in section 1.2.1.5. of the installation manual and use it as a guide.
The setup program also allows you to set passwords for IPCop root, administration, and backup user IDs. Once you’ve assigned them, IPCop will wait for your OK before booting from the hard drive for the first time.
IPCop presents you with four choices at boot time: IPCop, IPCop SMP, IPCop ACPI, or IPCop SMP with ACPI HT. The plain IPCop is considered to be the failsafe option. Whichever boot option you select will become the default choice to be used when an unattended reboot occurs.
Now it’s time to test the IPCop green zone. From a machine in the green zone, ping the IPCop machine. For me, that meant ping 192.168.1.1. If that works, you’re ready for the next step. If not, check your cabling and the NIC setup on both machines. If you’re directly connecting to the IPCop box from another machine, you may need to use a crossover cable. Some NICs handle the crossover for you automatically, but many do not.
Once you can ping the IPCop machine, you can administer IPCop via its GUI interface using your browser. To do so, point your browser at port 445 on the IPCop’s secure Web server — by default, https://192.168.1.1:445. After logging in you’ll be at the IPCop home page. From there, you can visit specific areas of the site as needed: System, Status, Network, Services, Firewall, VPNs, and Logs. Context-sensitive help is available on almost every page of the IPCop GUI. Click on the small lifesaver icon in the lower right corner to display the appropriate documentation for the page you’re on.
To complete the installation on my LAN, I had additional work to do. First, I needed to allow access to the Internet from the blue zone so that I could surf the Net from my laptop. Next, I needed to open a DMZ pinhole so I could use the network printer located in the blue zone from my desktop in the green zone.
I use a Linksys WRT54GS running OpenWRT as my wireless router. Before tinkering with the IPCop configuration, I reconfigured the router to appear as 192.168.2.100 in order to match the 192.168.2.1 address I had assigned to the blue interface, following the IP addressing scheme for the interfaces suggested by the documentation. Previously, the router had used the IP address now assigned to the green zone interface. Then I started to work on IPCop.
I began on the Blue Access page in the Firewall section of the IPCop GUI, which appears only if you have a blue zone defined. There I added the wireless router and a laptop, using previously determined IP addresses for each. Then I changed to the Firewall DMZ Pinholes page and opened a pinhole between the router’s Web server and my desktop machine, which allows me to configure the wireless network as needed. Then I repeated the same process for the printer, so I can administer it as well. The last thing I needed to do in order to actually be able to use the printer was to update the printer URI on my desktop box so that it pointed to the printer’s new IP address.
IPCop allows you to run the SnortIDS by simply by clicking a few buttons. In fact, you can run it on any of your IPCop zones. From the IPCop main page, select Services -> Intrusion Detection, then check each interface you want Snort to monitor. Click the Save button and you’re done. In my configuration, I run Snort on both the red and the blue interfaces to log intrusion attempts.
Installing IPCop was both an educational and a practical thing for me. Not only do I have better protection for my LAN than I did previously, thanks primarily to the segregated zone where my wireless router now lives, not to mention the Snort coverage on both my blue and red interfaces, but the whole thing is easy enough to administer that I don’t need to be a system administrator to install and use it.
My usage is fairly simple. Not only can IPCop do a lot more than I am asking of it, it is extensible as well, as you can see from its list of readily available add-ons. I can see a DMZ (the orange zone) in my future, perhaps to run a Web site, or mail server, or honeypot, or an exotic penetration testing workstation.
The bottom line is that IPCop is a mature, robust, sophisticated, and well-polished security distribution. It’s also well supported. The installation and administration documentation is excellent, and I’ve found the #IPCop IRC channel on freenode.net to be a friendly, helpful place to ask questions of other IPCop users. There are also several mailing lists; after spending a day of not being able to get wireless working as I wanted, a query to the ipcop-user list resulted in exactly the information I needed. I give IPCop an A+.
Categories:
- Security
- Networking


