
Author: Joe Bolin
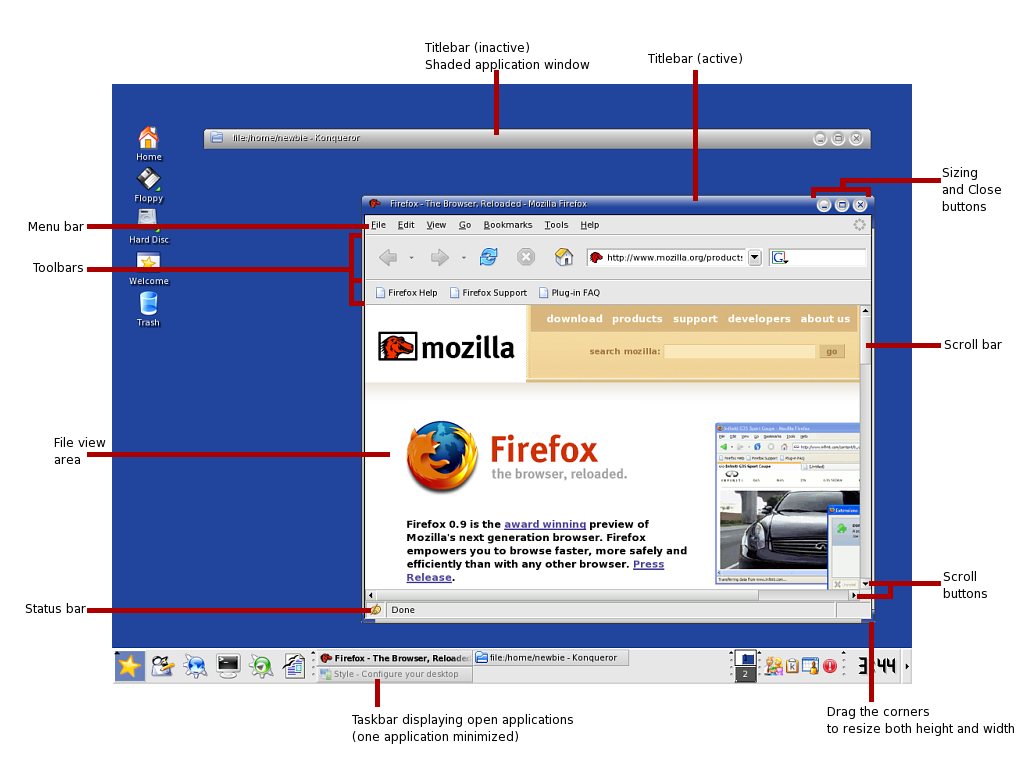
Most desktop applications are surrounded by an application window consisting of thin borders on the right, left, and bottom sides and a thicker area containing the titlebar at the top. The application window allows you to manipulate the application within your desktop.
| Application windows – click to enlarge |
While the look of a desktop application remains the same no matter what desktop environment (or window manager) you are using, the appearance of the application window is dependent on the style setting of the desktop environment.
The titlebar displays a tiny icon of the application, the name of the file that you are working with, and the name of the running application on the left side. The titlebar also contains the sizing buttons (minimize and maximize/restore) and the close button, usually grouped together on the right side of the titlebar.
The minimize button is usually the leftmost button of the three and is usually represented with a small horizontal line. Clicking on it removes the application from the desktop to allow you to work with other applications. Though it is minimized, it is still running; you can access the application again by clicking the button that corresponds to the application on the taskbar.
The maximize and restore buttons both take up the middle position, but never appear at the same time. The maximize button, indicated as a small square, makes the application take up the entire desktop area. The restore button, shown as two small overlapping squares, restores the application to its original size. A few applications do not have a maximize/restore button on their titlebars, because those applications have a fixed sized that cannot be changed.
You can also change the size of an application window by dragging its edges with the mouse. Move the cursor over any edge or corner of a window until the cursor changes into a line with two arrows on each end. By dragging the border you can change the window’s size. The direction shown by the mouse cursor indicates the direction that the window may be resized. You can also use the mouse to reposition a window on your desktop by dragging the titlebar.
Shading is another technique for manipulating desktop windows, and one that, unlike all the previous techniques, Microsoft Windows lacks. By double-clicking the titlebar, you can make the application roll up like a window shade and show only the titlebar. To restore a shaded application, simply double-click the titlebar again.
| Application menus – click to enlarge |
Most of the above actions can also be accomplished by clicking on the small icon located on the left side of the titlebar and selecting the appropriate action in the menu it displays. From
that menu you can also select other options for manipulating the behavior of the application window. You can elect to keep the window above all others on the desktop even when the application is no longer the active application. Just the opposite of keeping the application above all others is the option to keep the application below all others. Full screen mode is another option; it allows you to expand the application to fill the entire screen area. You can also determine which virtual desktops the application will appear on; next week we’ll talk about virtual desktops in detail.
When you have multiple applications open, all but one of the applications’ titlebars are grayed out. This indicates that an application is no longer active, meaning that you are not directly working in that application. Only one application may be active at a time. Applications can receive input only if they are active.
Each desktop application has its own distinctive set of actions it can performed. To organize these actions, applications use a menu bar located at the top of the application. The menu bar has several small menus on it, and each menu works in the same manner that the desktop menu works. Some common menus seen on the menu bar are:
- File — This menu contains actions to manage the file that you are
viewing with the application. Common entries include: New, to create a
new file; Open, to open a file for viewing or editing; Save, to save the
file after making changes; Save as…, to save the file and specify the
name to save the file as; Close, to close the file but leave the
application running; and Quit, which closes the file and quits the
application. - Edit — Here you will find actions for manipulating the file.
Usual items found here are: Copy, to copy selected items from the file;
Paste, for pasting a previously copied item into the file; Undo, to
undo the last action performed on the file; and Redo, for undoing a
previous undo command. - View — Actions that change the way a file or application
appears. here you will also find entries for adding and removing
toolbars. - Help — This is probably the most useful menu when using an
application for the first time, and it is also probably the least used
menu. Here you will find the entry for launching the application’s help
system. The help system contains information on how to use the
application.
While the menus on the menu bar act similarly to the desktop menu,
some entries contained in these menus are actually options for the
application. Some of these options are single options that can be either
enabled or disabled. A small check mark is displayed on the left of the
menu entry when the option is enabled. Clicking the entry changes
the option from enabled to disabled, and vice versa. Other option areas
in the menu contain multiple options that can be enabled only one at a
time. These options have a bullet — a small solid circle — to the left
of the enabled option. Simply click on another option in that section to
change the settings.
Some menu entries have keyboard shortcuts, also called keystroke
shortcuts, that appear to the right of the menu entry. Keyboard
shortcuts perform the menu action when the keyboard keys shown are pressed. These shortcuts can be single keys or a combination of
keys. For examples, a keyboard shortcut represented by F11 is a shortcut
performed by pressing the F11 key on the keyboard, while one
represented by Ctrl+V is a shortcut performed by pressing the Control
(Ctrl) key and the letter V on the keyboard at the same time. Keyboard
shortcuts differ from application to application. They can be an
invaluable time-saving tool.
Below the menu bar you can often find an area called a toolbar. A toolbar contains
icons that represent the most common actions used in the application. To execute an action, click on an icon on the toolbar. Some applications contain multiple toolbars. You can usually control which toolbars are shown from the View menu on the menu bar. You can also customize some
toolbars by adding or removing icons. Right-click the toolbar and select Customize from the pop-up menu that appears to edit the appearance of the toolbar.
As you might expect, the majority of an application’s window is taken up by the file or object that you are viewing. This is where you interact with the object, by actions such as typing text in a text document or clicking links on a Web page. Sometimes the file that you
are viewing is larger than the file viewing area. When this happens, you can use the scroll bars that appear on the right and bottom of the file viewing area to view additional contents of the file. Simply drag the scroll bar, or click the scroll arrows located at either end of the scroll bar, in the direction you wish to see more information.
At the bottom of the application is another bar called the status bar, which displays useful messages relating to the status of the file you are working with. The status bar is dynamic, meaning that it changes depending on the state of the application or file.
Those are the basics of working with desktop applications. There are, unfortunately, a couple of exceptions to the general rules. Some applications, such as XMMS (a multimedia player), do not have an application window, but instead offer built-in buttons for performing some of the same actions as the application window does, such as minimize and close. Other applications operate in full screen mode until you quit; Frozen-Bubble, an amusing and addictive game, is an example of one such application.


