
Author: Jem Matzan
My girlfriend’s ancient HP Pavilion was dead, and she wanted a replacement
that was a little different from the standard desktop computer. I showed
her a few ATX chassis designs on some Web store sites, then casually
mentioned that some people like to make computers out of strange and unusual
objects. “Really? Could you make one out of a pirate treasure chest?” she
asked. She just happened to have one lying around; I just happened to have a Linux-compatible
Mini-ITX VIA EPIA ME6000 motherboard/CPU combo lying around. Here’s the story
of the pirate chest EPIA project, complete with photos.
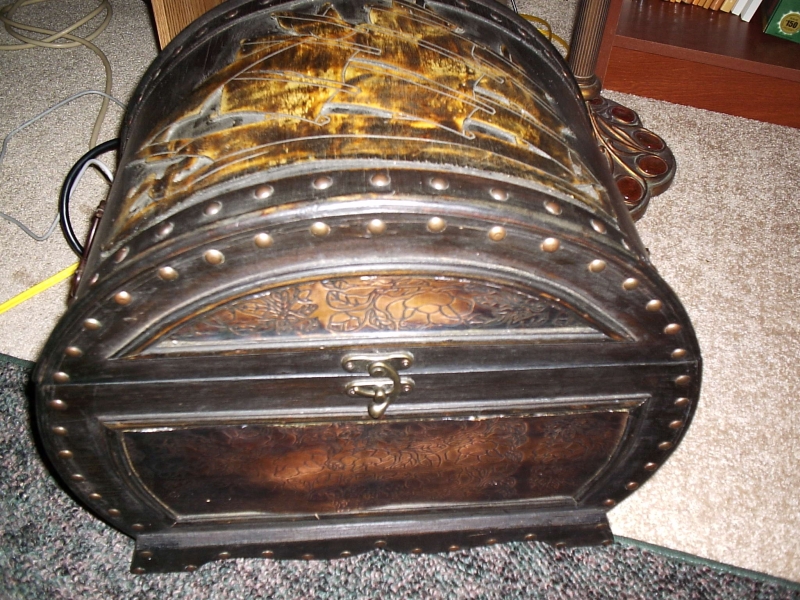
A pirate chest like this one is not an ideal computer chassis because of
its irregular shape. This particular chest was also cheaply made out of 1/4
inch plywood, glue, nails, and a thin copper faceplate. It looks fine sitting
on the floor, holding old magazines or something else innocuous. It looks
good as a computer, too, but getting it to that point was easier dreamed
than done.
I test-fitted the motherboard into the chest along with a hard drive
to see if everything would fit comfortably. Even with a full-size ATX power
supply, I had enough room to mount all of those parts securely on the
bottom of the chest. We decided not to bother with a floppy drive since neither
of us had any diskettes left. She definitely wanted a DVD writer, however,
and that would be a problem due to space constraints.
The power supplies that people typically use for modern computers
are fairly robust, having more than 350 watts of output and
several molex and fan connectors. These are designed for midrange to high-end
computers with power-sucking video cards, 100-watt (or more) processors,
multiple drives, and an array of USB peripherals. However, the tiny VIA system
uses so little power that the CPU doesn’t even need a fan. Further, since
we were using the onboard peripherals (video, sound, LAN) and only a single
IDE hard drive and optical drive, we didn’t need a large power supply. I
purchased a slimline Athena power supply
from Newegg.com for $60. It fit in the chest a little more comfortably
than a larger supply would, and since it doesn’t get very hot, it doesn’t
have large fans that create a lot of noise.
| Made for booty, not booting (click to enlarge) |
For the hard drive, I purchased a Western Digital caviar WD800JB. I’ve used
several of these in the past with only one failure. In fact, the one I used
for this system was a warranty replacement from Western Digital. The DVD-RW
was a NEC ND-3520A with a black faceplate, which cost just under $50.
The EPIA ME6000 (like most EPIAs) only has one memory slot, and it’s
only rated for unbuffered, non-ECC, non-registered memory modules of up to
512MB in size. I had a 512MB Crucial PC2700 module sitting around, so that
went into the build. The motherboard spec calls for PC2100, but PC2700 is
less expensive and easier to find in stores. If necessary, it can clock its
frequency down to PC2100 speeds. Slightly better memory bandwidth is possible
with PC2700; however, on a 600mhz VIA machine, I doubt this would significantly improve the performance.
The treasure chest was purchased some months back in a thrift store for $10.
Extra equipment
There’s always something you forget when buying parts for a computer
build. Here’s a list of tools and extra materials that I needed to complete
the project:
| Parts is parts (click to enlarge) |
- A power drill with a 1/4″ bit (other size bits will work, but you want it to be large enough to make a hole that can accommodate the jigsaw bit)
- A handheld jigsaw
- A ruler and pen for measuring and marking cut lines
- Small wood screws
- Brass mounting brackets in straight and L-shapes
- Rubber grommets
- Two 80-wire IDE cables, one 36″ and one 12″
- An internal analog CD audio cable
- A brown Sharpie marker (spray paint, varnish, or other stains/dyes/paints will work too)
- Wood putty
- An emery board (sandpaper or a metal file would work just as well)
- A long-handled phillips screwdriver (it has to be long for two reasons: better leverage with the wood screws, which can be difficult; and easier to reach screws that go in corners)
The rubber grommets provided a necessary buffer between the screw head
and the bracket for the optical drive. Driving a screw through the bottom
of the chest wasn’t such a big deal — I lopped off the exposed portion
with some sheet metal shears. But when you’ve got screws sticking through
the top, that’s a problem because they’re more visible. The solution is to
either use shorter screws — which can be difficult to find, or buffer them
somehow, so that they don’t need to be driven in completely. In this case, I scrounged
up some rubber grommets. In addition to providing a space buffer,
they also supplied a vibration buffer for when the DVD drive spins up.
| I cut it three times and it still wasn’t long enough (click to enlarge) |
I used a marker and wood putty to fix splinters and other cutting
mistakes. Jigsaws are not gentle with thin plywood, and I’m not the world’s
greatest woodworker.
Measuring and drawing the cutting lines took the longest of any phase in the project. Once I figured out where everything would go, I needed to make
sure the components would be well centered in their places, level
with the bottom of the chest and stable enough to operate without difficulty.
With all the cutting lines drawn, I began drilling holes inside the corners
of the square outlines. I started with the I/O backplate, then drilled the
power supply opening, followed by the DVD drive. (I could have cut out additional
slots for the PCI and the extra USB and FireWire ports that can connect to
the motherboard, but none of these was necessary for this project.)
After I drilled and widened the holes, I started with the
jigsaw. I had never used one before, so it took some practice to get the
hang of cutting with it. In retrospect, I should have practiced on a spare
piece of plywood before I tried my skills in production. The I/O backplate
hole ended up being a little too tall, but it wasn’t a problem because
the metal plate still covered the hole. It just didn’t snap into place as
I had planned.
After I finished all the cutting, I filed down the rough edges with
an emery board, cleared out the sawdust, and test-fitted all the components.
After a few re-cuts and more sanding, everything fit nicely. My girlfriend filled in all the splintered parts
of the chest facade with wood putty and, once dry, colored it in with a
marker.
Putting it all together
Because the motherboard took up the largest area of the chest, it went
in first. EPIA motherboards come with a pink foam liner underneath them.
Usually you would take it out, but in this case I left it in to act as a shock
and pressure buffer between the motherboard and the bottom of the chest.
| Now it’s got guts (click to enlarge) |
The power supply went in next. Since the outward-facing portion was held
tightly in place by the slot I cut out for it, it only needed two screws
to secure it. I used two screw brackets that were conveniently built
into the power supply.
For space reasons, I had to place the hard drive in vertically. I could
have designed hanging mounting brackets for it, but that would have required
a lot of extra work to accomplish something that could just as easily be
done with clever economy of space. It was impossible to secure the drive without
some kind of bracket, so I went to the hardware store and bought three
bracket kits — one straight and two L-shaped. I ended up using only the
L-shaped brackets, but even a slight modification in internal design decisions
could have easily changed that. (If your project requires straight brackets,
you can bend them to custom angles and lengths with the aid of a bench vise
and heavy-duty pliers.)
With the standard metal screws that came with the drive, I secured two
L brackets to the hard drive. Wood screws secured the brackets on the bottom
and held the drive firmly in place. The data and power cables connected on
top. This was an ideal position for the drive because the cables weren’t
stressed and the jumpers could be changed easily if necessary.
| The inside is finished (click to enlarge) |
Installing the DVD drive was tricky because it went into the lid of the chest. I could
have cut out a section in the front of the chest for it, but the person
for whom the system was being built wanted the DVD drive in the lid, facing out
the back of the chest. In other words, the front of the chest would be totally
untouched, and all of the interfaces, buttons, and connectors would be at
the back of the chest.
Getting the DVD drive centered and close to the top of the lid (for
stability) was more difficult than I anticipated. I measured and cut the
opening for the DVD drive at the same time I cut all the other openings.
Then I attached it to the brackets described above. It’s important to do
all your measuring, drawing, and cutting at the same time in order to avoid
damaging computer parts.
Once I cut all the holes and installed the components, it was time to
connect the cables. Everything worked perfectly on first boot — no adjustments
needed. If something were to go wrong at this step, you would check your
cables, connections, and jumper settings.
| My girlfriend’s chest (click to enlarge) |
The operating system of choice was Xandros Surfside Linux. All the
hardware was properly detected and neither of us found any problems between
the software and the hardware. A week later, everything still worked perfectly.
Conclusion
Building a GNU/Linux-based EPIA system out of a pirate chest was challenging
and fun. The entire project took about four hours, with much of that time
spent figuring out things that an experienced woodworker would already
know.
Below is a breakdown of costs involved:
- VIA EPIA ME6000: $160
- Crucial PC2700 CL3 512MB: $53
- Western Digital WD800JB hard drive: $56
- NEC ND-3520A DVDRW drive: $44
- Athena small formfactor power supply: $60
- Pirate chest: $10
Total cost of listed parts: $383
If you need IDE cables, they can run anywhere from $5 to $25, depending
on how fancy you want to get. The EPIA comes with one IDE cable, but you’ll
need two cables due to space constraints. 80-wire IDE cables that will reach
the drives are sufficient, and you may already have one lying around someplace. The CD audio cable, which costs about $1.50, isn’t necessary if you aren’t going to play CDs directly from the drive. Your total price may be higher than this depending on which parts and tools you have already.
One final note: the EPIA ME6000 is not very speedy. For my girlfriend’s
needs (email, IM, Web, or word processing), it’s fast enough and certainly
better than what she had before. VIA makes EPIA motherboards with more than
twice the processing power and a wide array of extra features, such as PCMCIA
slots and enhanced onboard audio and video. I would never put anything other
than an EPIA machine in a “chassis” like this one due to space, heat, and
power constraints. More creative system builders than myself, who don’t
mind spending 2 to 3 times the price of this pirate chest system, will
certainly find ways to make Athlon 64 or Pentium4 systems work well in other
custom spaces.


