
Enabling webcam in Skype
The current Eee PC models are shipped with a version of Skype that doesn’t support the built-in webcam. There is probably a reasonable explanation for this, but that doesn’t mean you have to put up with the situation. Fortunately, making Skype play nicely with the webcam is straightforward. In the Easy Mode, switch to the Settings section and click on the Add/Remove Software button. You should see the latest version of Skype under the Internet tab. Press the Update button, and reboot your Eee PC once the latest version has been installed. To see whether the webcam works properly with Skype, choose Options -> Video Devices, and press the Test button. If the webcam doesn’t work, the most probable reason is that it’s not enabled. You can turn the webcam on by running the following command in the terminal:
sudo echo 1 > /proc/acpi/asus/camera
In a similar manner, you can turn the camera off when you close Skype:
sudo echo 0 > /proc/acpi/asus/camera
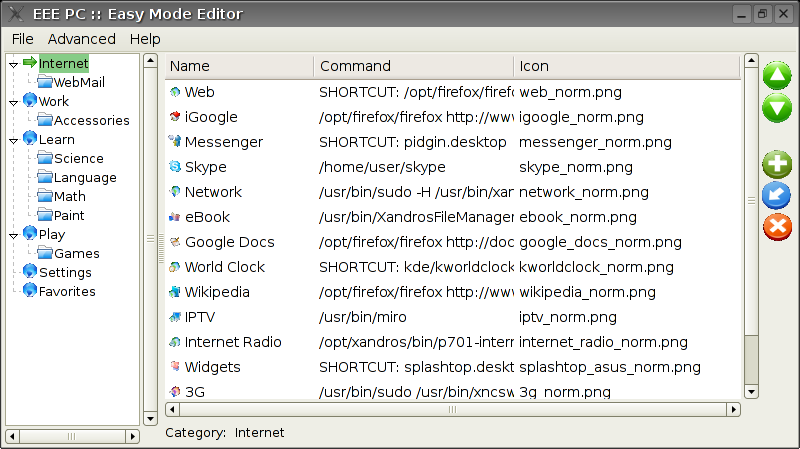
Tweaking the Easy Mode interface with Easy Mode Editor
Despite its limitations, Easy Mode has a few advantages compared to the full-blown desktop: it boots fast, and you can access frequently used applications in one or two clicks. However, customizing the Easy Mode interface to suit your needs — adding more applications and renaming the default sections as well as adding new ones — requires manual tweaking of the simpleui.rc file, which stores the interface settings. If hacking text files is not your cup of tea, the Easy Mode Editor tool is here to help you. It provides a graphical interface which you can use to easily add and rearrange sections and applications.
Since the Easy Mode Editor is available as a .deb package, it’s easy to install. In File Manager, right-click on the .deb file and choose Install DEB file. You can then launch the Easy Mode Editor by running the emeditor command in the terminal.
The first thing you might want to do is to add the Easy Mode Editor itself to the Settings section. Press the Add button, make sure the Parent tab is set to Settings, and give the new item a name (e.g., “Easy Mode Editor”). Switch to the Icon tab, and select the emeditor icon from the Existing icon drop-down list. Click on the Command tab, and enter /usr/bin/emeditor in the Command field. Press OK to close the window, and save the modifications by choosing File -> Save. Restart the graphics server by pressing Ctrl-Alt-Backspace, and you should see the Easy Mode Editor icon in the Settings section.
The clever part is that the Easy Mode Editor doesn’t overwrite the default simpleui.rc file. Instead, it saves all the modifications it makes in the /home/user/.AsusLauncher/simpleui.rc file. This means that if anything goes wrong or you want to revert to the original configuration, all you have to do is to delete the /home/user/.AsusLauncher/simpleui.rc file.
When adding an application to the Easy Mode interface, you can pick an icon for it from the list of default images. All icons in this list are stored in the /opt/xandros/share/AsusLauncher/ directory. You can add more icons by copying icon bundles into the directory. The EeeUser Wiki has a page of alternative application icons created by Eee PC users. Download the package you like, unpack it, and move your new .png images to /opt/xandros/share/AsusLauncher/.
Adding repositories and installing additional software
Although the Eee PC runs Debian-based Xandros Linux, and comes with APT and Synaptic package managers, there is not much software to choose from in its default repositories. However, the Eee PC community has already set up a few additional repositories. The EeeUser Wiki provides a detailed description of how to add repositories to your system. This is essentially a two-step process: first, you add the repositories to the sources.list file, and then create a preferences file that contains pinning information that specifies which repositories get higher priorities. There are two things you have to keep in mind here. First, the repositories listed on the wiki are not official, and some software may not install or work properly — the usual “use it at your own risk” disclaimer applies. Second, because of the Eee PC’s limited storage, you don’t have much disk space to play with, so choose your packages carefully.
One thing you might want to install right from the start is the advanced-desktop-eeepc package that enables the Full Desktop. To do this, use the command sudo apt-get install advanced-desktop-eeepc. Another tool worth considering is the VLC media player, and installing it is just as easy: sudo apt-get install vlc libdvdcss2.
Upgrading OpenOffice.org
The Eee PC comes with OpenOffice.org 2.0, which lacks some features available in the latest version of the office suite. Most notably, OpenOffice.org 2.0 can’t run many of the useful extensions. To upgrade the bundled version of OpenOffice.org, start by removing the installed version using the sudo apt-get remove openoffice* command. Download the latest release of OpenOffice.org for Linux (you need the DEB version) and unpack the downloaded archive. In the terminal, switch to the DEBS folder inside the unpacked directory, then run the following command to install OpenOffice.org packages:
sudo dpkg -i openoffice.org*
To add OpenOffice.org icons to the KDE menu in the Full Desktop mode, switch to the desktop-integration directory inside the DEBS folder, and run the sudo dpkg -i openoffice* command. By default, OpenOffice.org applications are installed in the /opt/OpenOffice.orgx.x/program/ directory; if you want to run them from the /usr/bin location, so that you can launch them without having to navigate first to the directory they’re installed in, you have to add symlinks as follows:
sudo ln -s /opt/openoffice.org2.3/program/swriter/usr/bin/sudo ln -s /opt/openoffice.org2.3/program/scalc/usr/bin/sudo ln -s /opt/openoffice.org2.3/program/simpress/usr/bin/sudo ln -s /opt/openoffice.org2.3/program/sbase/usr/bin/sudo ln -s /opt/openoffice.org2.3/program/soffice/usr/bin/sudo ln -s /opt/openoffice.org2.3/program/smath/usr/bin/sudo ln -s /opt/openoffice.org2.3/program/sdraw/usr/bin/
The last thing you need to do is fix links to OpenOffice.org applications in the Easy Mode. You can use the Easy Mode Editor to do this with minimum fuss. Launch the Easy Mode Editor, select the Documents entry in the Work menu, and press the Edit button. Switch to the Command tab, clear the Shortcut field, and enter /usr/bin/swriter in the Command field. Press OK when you’re done. Repeat these steps for Spreadsheet and Presentations items, replacing the default shortcuts with the /usr/bin/scalc and /usr/bin/simpress commands.
Syncing time
The version of KDE shipped with the Eee PC doesn’t have the ability to synchronize time with a remote time server — but it does include the rdate tool, which you can use in a simple bash script that helps you to keep the Eee PC’s time in sync. Create a new text file with the text editor, and enter the following script in it:
#!/bin/shsudo /usr/sbin/rdate -s time.fu-berlin.de
In this example, the script uses a time server located in Berlin, but you can replace it with one closer to you. Save the file and give it a name (e.g., “synctime”). Make the saved file executable by running the sudo chmod +x synctime command. Finally, move the file into the /usr/bin directory. You can then sync time by executing the synctime command in the terminal.
Using Mercury launcher
When working in the Full Desktop mode, you can speed up access to applications and scripts using the Mercury launcher, a tiny utility that resembles Katapult. While Mercury is a bare-bones tool, it’s still a useful time-saver worth having in your arsenal.
Download the latest release of Mercury and unpack it. In the terminal, switch to the resulting directory and run the ./update-database.sh command to index executable files and documents. Once the data has been indexed, you can launch Mercury using the ./mercury command. Using the KMenuEdit tool (launch it using the kmenuedit command in the terminal), you can add Mercury to the KDE menu and assign a hotkey to it. When assigning a hotkey, make sure to uncheck the “Enable launch feedback” option.
These are just a few software tweaks that can help you to get the most out of your Eee PC. If you are looking for more, visit the EeeUser wiki, which provides a wealth of useful information about the popular tiny laptop.


