
Author: Joe 'Zonker' Brockmeier
Data Crow is a Java application, so you’ll need to have Java installed on your machine before you download the most recent production version‘s binary zipfile. Unzip the file in a directory where you want Data Crow to live, and start Data Crow by running java -jar datacrow.jar. You might notice that it takes Data Crow a bit of time to start, even on a relatively fast machine. I’m running it on an AMD X2 4200+ system with 4GB of RAM and it still seems slow to start. However, once it’s loaded, Data Crow is respectably fast.
Adding and editing items
After Data Crow starts, you’ll see the main window with the media types displayed in the left-hand module list, and you’ll have one item in your database — an entry for Data Crow itself. You can add items to the database manually, you can try to get Data Crow to coax the information out of online services like Amazon, MusicBrainz, and Internet Movie Database, or you can import data from text files. Let’s start with the manual process.
To add an item manually, click the New button in the Data Crow toolbar or press Ctrl-n, which will bring up the new item dialog. You’ll see several tabs for item data (these will vary, depending on the type of item you’re adding) and the Save and Cancel buttons. You should need to add only the Title information for any given item; the rest of the fields are optional. Once you’ve entered all the information you want to add, click Save and the item will be added to your collection.
Obviously, this is the slow way to go about things. I’d recommend this only if you have items that aren’t going to be found via online services, because if you’re adding any quantity of items it’s going to take quite a while.
To search via online sources, click the Online Search button and select the service you want to use. For instance, if you’re searching for audio CDs, you can search using Amazon, MusicBrainz, and FreeDB. With Amazon, you have the option of searching regional Amazon databases as well. Note that you can also do this via the Item Wizard, but it allows you to select only one item at a time, and otherwise works pretty much like the Online Search feature.
Provide the artist or title in the Keywords field and hit Find. Depending on the type of media, you can also search by barcode, ISBN, or the Amazon Standard Identification Number (ASIN) (the ASIN is the same as the ISBN for books).
Search results are displayed in the online search window. If you want to add one or more items to your collection, click them and hit Add Items. The window closes and you’ll see the new items in the tab for new items for whatever module you’re working with. Click Save and the items are added to your collection.
|
Data Crow loan administration – click to view |
It may take multiple searches via Amazon and MusicBrainz to turn up all the CDs you want to add to your Data Crow database. Data Crow seems to be hard-coded to return only 10 results for any search, so if you’re trying to add, for example, all of your Pink Floyd CDs to your database, a search will fail to report some of the titles you’d expect to see. Unfortunately, there doesn’t seem to be any way to increase the number of results or search for the next 10 items — re-running the search only provides the same 10 results.
If you have the CD in your computer, you can use Data Crow to search FreeDB for information. If you have a lot of CDs, this can be a time-consuming way to add items to your database.
Unfortunately, many of the search results lack an image. You can add an image to an item that doesn’t have one, but the way to do it is not obvious. Double-click on the item you want to edit, then select the Picture Front tab. You’ll see a big question mark, but no “add image” button. Double-click on the question mark to bring up a picture viewer dialog. Click on the small folder to the right of the dialog and navigate to the image you want to add. Click Save, and then click Cancel to close the item window.
To add data from a tab-delimited text file, go to the Tools menu and select File Import. Click the folder next to “Select source” in the File Import dialog and then click Apply. Data Crow will let you match up the fields in the text file with the field names used by Data Crow. After you’ve done that, click Run and Data Crow will import the file.
You can use Data Crow to manage images too. Select Images from the left-hand list of modules and then click Import. You’ll see an Image Import dialog, which you can use to select a directory of images to import into Data Crow. Give a location identifier (just a name for the directory) and click Run. After Data Crow has imported the pictures, you can click Cancel to exit the dialog.
Though I like Data Crow for managing movies, books, and music, I prefer digiKam for working with my photos. Data Crow lacks a lot of features that you find in specialized photo management apps, such as the ability to resize, crop, and rotate photos.
Note that Data Crow has a third tab in each module called Blocknote for saving notes about your media collection, like the books and CDs you want buy. I haven’t found much use for this feature, but if you keep notes about your media collection, it’ll come in handy.
Item views
Data Crow offers two views of your collection: a “card view,” which displays thumbnails of your media’s artwork (if available) and the title, and a table view, which displays the data in a spreadsheet format. You can toggle between the two by using the View menu, or by pressing F2 for the table view and F3 for the card view.
The table view is particularly useful if you want to go through your collection to edit information you grabbed online or by importing information from another source.
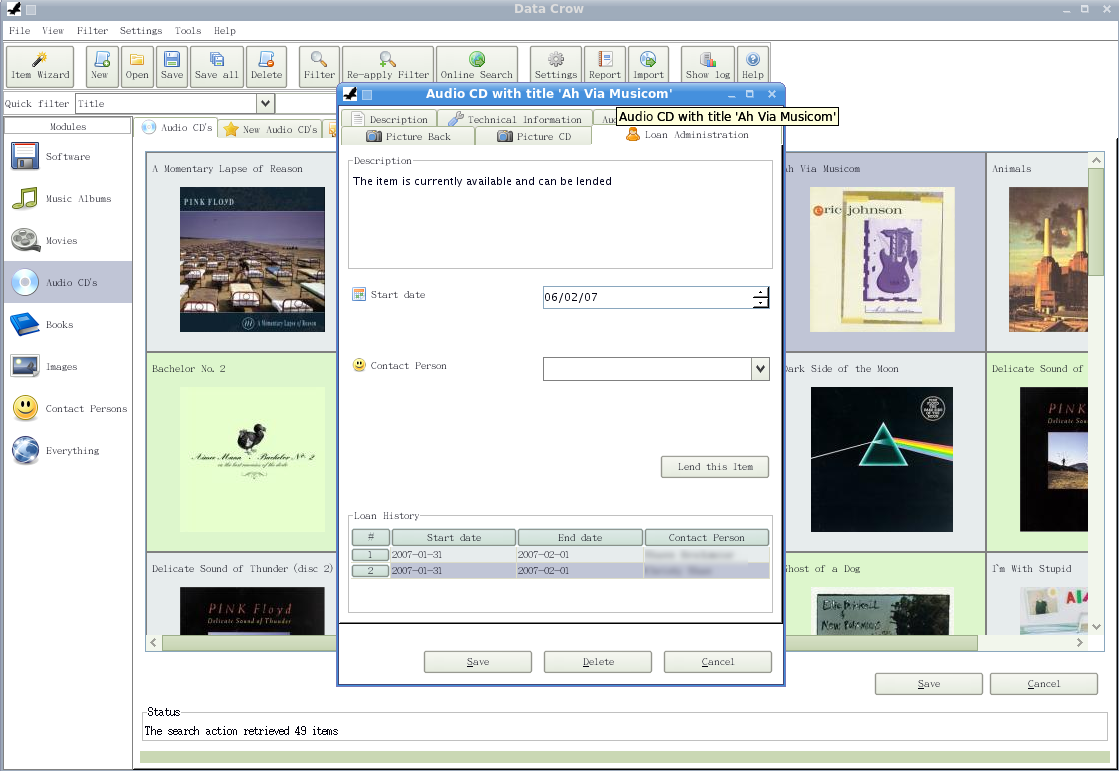
Tracking loaned items
Once you start to amass a respectable library, you might want to loan out books, movies, and CDs to friends and family. You can track loaned items by adding people to the Contact Persons module, then double-clicking an item and selecting the Loan Administration tab, as in this figure. Select the Contact Person you want to loan an item to, and the start date if it’s different from the current date, then click Lend this Item. Once you’re done, just click Cancel. It seems more intuitive that you’d click Save after adding the loan information, but Data Crow just complains that there’s no information to save.
Once an item is returned, you go back to the Loan Administration tab and click Return Item. Again, to exit the dialog, click Cancel.
You’ll also be able to see the lending history for any item under the Loan Administration tab. This is useful when you go looking for your copy of The Lust Lizard of Melancholy Cove and can’t find it on the shelf, and can’t remember who you’ve loaned it to.
Backing up your collection
After you’ve spent time entering hundreds of books, CDs, DVDs, and whatnot into Data Crow, you’ll probably want to make a backup of the database just in case you have a catastrophic disk failure or just want to import the database onto a different system.
To make a backup, go to the Tools menu and select Backup & Restore. All you need to do here is select the directory where you’d like to save the backup, and click Backup. One word of caution — the backup does not seem to carry over to cover images. I did a few tests of the backup/restore functions and noticed that if I deleted items and then did a restore, the items were re-imported, but the cover images were gone.
Reports
If you want to share a list of the items you have in your media collection, you can use Data Crow to generate a report with information on all of your media. For instance, if you want to share your CD collection, just go to the Audio CD tab, then go to Tools -> Create Report, or just press Ctrl-e. That will bring up the Create Report wizard. You can select/deselect the data fields you want in the report and give Data Crow a name for the file Data Crow will create when it generates the PDF.
If you’re really particular about the format, you can adjust the header, footer, font, and colors used for the report. Just click the Settings button and tweak to your heart’s content.
The only thing missing from Data Crow is a way to scan bar codes on media, which would make it easier to build your database in the first place. Other than that, it’s an excellent program that is well worth trying for anybody who wants a way to track their media collection on a Linux system.


