
Author: Joe Barr
MSF was originally developed by H. D. Moore. Matt Miller and a small number of other developers joined Moore in developing the 2.0 release. The developers formed Metasploit LLC last year for the purpose of “preventing commercial abuse and ensuring the longevity of the project.” Metasploit LLC owns all rights to the Metasploit software, domains, and trademarks. MSF is licensed under the Metasploit Framework License, which has not been approved by the OSI nor ruled a free software license by the FSF.
The current development version of MSF — revision 4701 from svn — comes with 190 exploits and more than 100 payloads. Think of an exploit as the weapon that gets you in the door, and a payload as ammunition; payloads contain the instructions on what to do once you get inside. For a walkthrough of a specific exploit and payload usage from msfconsole, see our review of the 2.6 release.
Installing and using db_autoPwn
In order to use the db_autopwn module, you have to install some extras for database support. You can choose MySQL, Postgres, or SQLite database managers. I installed MSF on Ubuntu 7.04 Feisty Fawn and chose SQLite3 for my database engine.
There are platform-specific installation instructions online, and Moore has put up an excellent guide to using db_autopwn on the Metsploit blog. For those of you using Ubuntu 7.04 and SQLite3, here’s an abbreviated list of the steps you can take to install the latest development version of MFS, plus everything you need to run db_autopwn.
- Install Subversion.
- Install MSF from svn.
- Install Ruby and related packages.
- Install RubyGems.
- Install Ruby on Rails (
gem install rails) and answer Y to all. - Install libgtk2-ruby, libglade2-ruby, sqlite3.
- Install libsqlite3-ruby1.8 and libdbd-sqlite3-ruby1.8.
- Install Nmap.
If all is correctly installed, you will be able to use the db commands from msfconsole, including one command that will execute Nmap and automatically record its results in the database. If you prefer, you can run Nmap by itself and import the XML file of the results of the scan. Ditto for Nessus scans output in its NBE format.
The next thing you need to do is create a database. Enter the subdirectory for MSF that was created by svn, and enter the following command: sudo ./msfconsole. Once msfconsole loads, the next two commands will load the database driver and create the needed database:
msf> load db_sqlite3
msf> db_create pentest
To check that all is well to this point, enter help at the MSF console, and a list of all available commands should appear, with all the database-related commands at the top of that list:
Database Backend Commands
=========================

    Command               Description
    -------               -----------
    db_add_host           Add one or more hosts to the database
    db_add_port           Add a port to host
    db_autopwn            Automatically exploit everything
    db_hosts              List all hosts in the database
    db_import_nessus_nbe  Import a Nessus scan result file (NBE)
    db_import_nmap_xml    Import a Nmap scan results file (-oX)
    db_nmap               Executes nmap and records the output automatically
    db_services           List all services in the database
    db_vulns              List all vulnerabilities in the database


SQLite3 Database Commands
=========================

    Command        Description
    -------        -----------
    db_connect     Connect to an existing database ( /path/to/db )
    db_create      Create a brand new database ( /path/to/db )
    db_destroy     Drop an existing database ( /path/to/db )
    db_disconnect  Disconnect from the current database instance
Moore suggests running db_autopwn at this point with no arguments to get a feel for what you can ask it to do. Here’s how it responds:
msf> db_autopwn
[*] Usage: db_autopwn [options]
        -h         Display this help text
        -t         Show all matching exploit modules
        -x         Select modules based on vulnerability references
        -p         Select modules based on open ports
        -e         Launch exploits against all matched targets
        -s         Only obtain a single shell per target system (NON-FUNCTIONAL)
        -r         Use a reverse connect shell
        -b         Use a bind shell on a random port
        -I [range] Only exploit hosts inside this range
        -X [range] Always exclude hosts inside this range
And while you are still in “getting to know you” mode, you might try the show command as well. It lists all the exploits, payloads, auxiliary Ruby scripts, and plugins — like the one that allows it to work with SQLite3 — known to the framework. Moore defines auxiliaries as “anything not an exploit,” and cites discovery scripts, fuzzers, DOS (Denial of Service), and administrative attacks as examples.
Putting it to the test
Counting the Linksys router, I have three Linux boxes on my LAN. I decided to turn MSF 3.0 loose on them. I began by reconnoitering the lanscape, using the db_nmap command to look at every system on the LAN:
msf > db_nmap 192.168.1.* Starting Nmap 4.20 ( http://insecure.org ) at 2007-04-18 15:15 CDT Interesting ports on 192.168.1.1: Not shown: 1693 closed ports PORT STATE SERVICE 22/tcp open ssh 23/tcp open telnet 53/tcp open domain 80/tcp open http MAC Address: 00:0F:66:49:9A:AF (Cisco-Linksys)Interesting ports on desktop.lan (192.168.1.101): Not shown: 1695 closed ports PORT STATE SERVICE 22/tcp open ssh 5900/tcp open vnc
Interesting ports on hamshack.lan (192.168.1.111): Not shown: 1694 closed ports PORT STATE SERVICE 80/tcp open http 139/tcp open netbios-ssn 445/tcp open microsoft-ds MAC Address: 00:00:00:00:00:00 (Edimax Technology CO.)
Nmap finished: 256 IP addresses (3 hosts up) scanned in 38.580 seconds
I confirmed those hosts were in the database using the db_hosts command, then tried the db_services command as well. Here’s what I got back:
msf > db_services
[*] Service: host=192.168.1.1 port=22 proto=tcp state=up name=ssh
[*] Service: host=192.168.1.1 port=23 proto=tcp state=up name=telnet
[*] Service: host=192.168.1.1 port=53 proto=tcp state=up name=domain
[*] Service: host=192.168.1.1 port=80 proto=tcp state=up name=http
[*] Service: host=192.168.1.101 port=22 proto=tcp state=up name=ssh
[*] Service: host=192.168.1.101 port=5900 proto=tcp state=up name=vnc
[*] Service: host=192.168.1.111 port=80 proto=tcp state=up name=http
[*] Service: host=192.168.1.111 port=139 proto=tcp state=up name=netbios-ssn
[*] Service: host=192.168.1.111 port=445 proto=tcp state=up name=microsoft-ds
Note that the db_autopwn command by default will attack every host in the database, so if you wish to exclude some of them, you must either remove them or use the include/exclude range options shown above following the bare db_autopwn command.
Next, I asked db_autopwn to check for vulnerabilities. As you can see below, it found none that it had the tools to exploit.
msf > db_autopwn -t
[*] Analysis completed in 3.79338097572327 seconds (0 vulns / 0 refs)
I suppose that’s good for my security, but disappointing for other reasons. I used the info command at the console to take a closer look at the few Linux exploits available to see if I could find a vulnerable package to install. The linux/proxy/squid_ntlm_authenticate exploit looked promising:
msf > info linux/proxy/squid_ntlm_authenticateName: Squid NTLM Authenticate Overflow Version: 4419 Platform: Privileged: No License: Metasploit Framework License
Provided by: skape
Available targets: Id Name -- ---- 0 Linux Bruteforce
Basic options: Name Current Setting Required Description ---- --------------- -------- ----------- RHOST yes The target address RPORT yes The target port
Payload information: Space: 256
Description: This is an exploit for Squid's NTLM authenticate overflow (libntlmssp.c). Due to improper bounds checking in ntlm_check_auth, it is possible to overflow the 'pass' variable on the stack with user controlled data of a user defined length. Props to iDEFENSE for the advisory.
References: http://www.osvdb.org/6791 http://www.idefense.com/application/poi/display?id=107 http://www.securityfocus.com/bid/10500 http://cve.mitre.org/cgi-bin/cvename.cgi?name=2004-0541 http://milw0rm.com/metasploit/67
But, alas, even after installing and running Squid, I could not exploit the system.
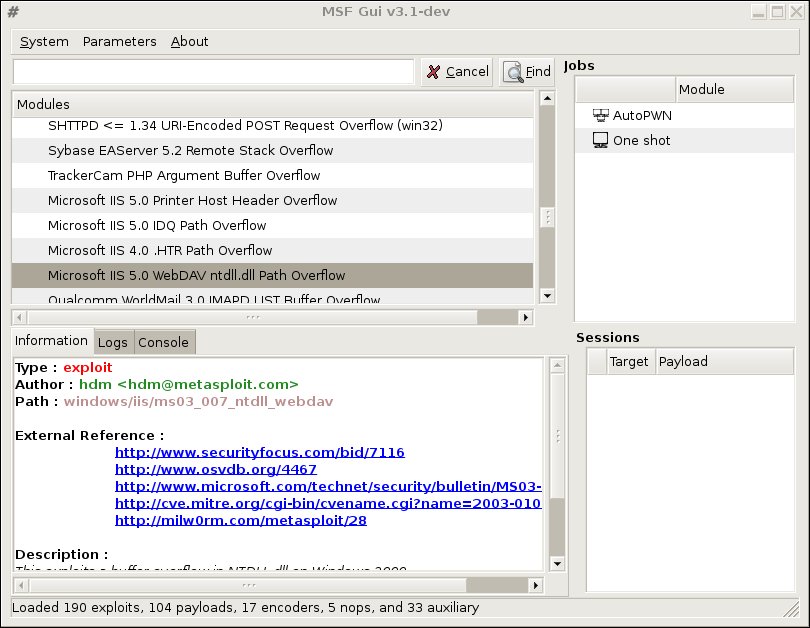
About the GUI and other interfaces
| Click to enlarge |
In addition to the console, MSF offers a command-line interface to provide easy scripting and automation of penetration testing, and a Web interface as well. I didn’t play with either of those, but I did take a look at the experimental GUI, which is currently in development.
To start it, I entered sudo ./msfgui in the framework directory where previously I had entered sudo ./msfconsole. An empty frame appeared almost immediately, and about 10 seconds later it was completely loaded, showing drop-down menus for all the exploits, payloads, auxiliary, and other modules it knew about.
While playing with the GUI, I learned that I could display information about any of the items mentioned above by clicking first on the icon to expand one of the categories, then clicking on the item I was interested in. The pane immediately below the menu list then displayed all the information about the item selected.
More experimentation revealed that a right-click on a selected item brings up another icon which will execute the selected item if you click it. What I haven’t discovered yet is how to set information about the targets: IP addresses, ports, and payload arguments. I’m told on the mailing-list, however, that it can be done.
Note: Fabrice Mourron, the msfgui developer, helped me locate the problem I was having in executing msfgui. He tracked it down to the old, buggy version of libgtk2-ruby in the Ubuntu 7.04 repositories. Not only that, he created a new online demo of msfgui in action, showing the msdns_zonename exploit.
Documentation and support
A nicely done MSF 3.0 User Guide is available in PDF format. Also available from that same page is a Developer Guide and documentation on various APIs. If after reading them you still have questions, send a blank email to framework-subscribe@metasploit.com to subscribe to the project’s mailing list, or browse the list’s archive.
Conclusion
MSF 3.0 is a big step forward toward automating security testing. Not only is it more powerful than ever before, especially with the db_autopwn feature, but the experimental GUI makes it easier to use.
Most of the exploits that come with MSF 3.0 are at least slightly dated. That’s probably a good thing, because otherwise it would probably do more harm than good. But it is still a loaded gun, and there are still lots of systems on the Internet that are vulnerable to its exploits. With MSF 3.0 they can be cracked in a heartbeat by a casual user.
Imagine a hat of the black persuasion, armed with a database full of zero-day exploits and a case of payloads with bad intentions, scanning subnets for potential victims and then plucking them like low-hanging fruit from behind msfconsole. Not a pretty picture. On the other hand, imagine security pros able to verify patches and conduct their own penetration testing to find the cracks before the bad guys.
MSF 3.0 is a powerful tool that can be used for good or evil. Use it to test your systems’ security before someone else tries to.
Category:
- Security


