Digital video capture cards and USB dongles can be had for less than $50 a piece. With such cheap hardware, turning a Linux server into a personal Digital Video Recorder (DVR) becomes very tempting. Of course, you don’t just want to watch live TV but also pause it, setup automatic captures of those science programs that air at 3 am, or record the live network coverage of events you are planning to attend in person, so you can watch them at a more agreeable hour.
In this two-part series, we’ll take a look at setting up MythTV on two Fedora 11 machines. I say two machines because MythTV allows you to split tasks into a video server machine that does all the capturing and video storage and one or more client machines that control the server, telling it what to do and also grab video content from the server to decode and display on the client machine. The server machine in this example will be an old AMD X2 running at 2.2Ghz and an ancient graphics card that allows only a text console to be presented. The client will be an Intel Q6600 with an NVidia GTS 250 graphics card. MythTV can take advantage of Video Decode and Presentation API for Unix (VDPAU), which, as the name implies, lets you use the GPU for video decoding and presentation.
Using an existing server machine to run the MythTV server means you don’t have to always run your desktop machine and lets you control MythTV from laptops, Internet tablets, or any device with a Web browser. A slight down side is that if your capture hardware comes with a remote control and infrared receiver, you might not be able to use them if your server machine is in another room.
If you don’t already have capture hardware, the LinuxTVWiki provides great information about what hardware is supported and how to get it ticking. In particular, the Digital Devices (DVB) subsection lets you drill down to see PCI(e), USB, Firewire, and other hardware for a particular DVB standard. You will need to know which DVB standard is used in your part of the world, ATSC for North America, DVB-T for many other countries.
I tested digital TV using both a WinFast DTV Dongle Gold and DViCO FusionHDTV DVB-T Plus PCI card. Both were connected to a roof-mounted aerial. I found that signal strength was significantly less and some channels could not be viewed properly using the USB Dongle. Whether this was due to the USB dongle form factor or simply that the chip employed by the PCI card was better at its job was hard to tell without testing other capture hardware.
Packages of MythTV are available for Fedora 11 machines from the RPM Fusion repository. You’ll want to install mythtv-backend and mythtv-setup on the server machine and the mythtv-frontend and mythvideo packages on the client machines. You might also consider installing the mythplugins package on client machines to pull in support for viewing the Web, weather information, RSS news feeds, image collections; and play games or monitor video cameras, all from the MythTV interface. At the time of writing, the current version of MythTV from RPM Fusion was 0.21-19.fc11.
On the server machine you’ll need one or more directories that MythTV can use to store video files. As these files can run up to 5 Gb for an hour of video, you’ll want to have a fair amount of storage available. Probably the best idea is to attach a new 1.5- or 2-Tb drive to the server just for TV files.
The Installing and using MythTV guide mentions that you should make the storage directories in subdirectories of the filesystem that contains them. For example, if you are mounting a 2-Tb filesystem at /var/TV and you tell MythTV to use /var/TV to store content, if for any reason the /var/TV filesystem does not mount when booting the machine, MythTV will still try to store video content to /var/TV, which will likely still be the /var filesystem. Filling up /var will make the system very unhappy. If, on the other hand, you tell MythTV to store its content to /var/TV/mythfiles, then the mythfiles directory will not exist unless the /var/TV filesystem is mounted. If /var/TV/mythfiles does not exist, then MythTV will not try to write video files to it. So /var will not fill up if /var/TV does not mount.
At this stage, if you run mythtv-setup on the server machine you will find that you are unable to connect to the database. The MythTV documentation mentions that you must setup a MySQL database using the mc.sql file. I couldn’t find that SQL file in the RPM Fusion packages, so I grabbed it from the MythTV sources. For reference, the file from 0.21 is shown below.
 CREATE DATABASE if not exists mythconverg;
 GRANT ALL ON mythconverg.* TO mythtv@localhost IDENTIFIED BY "mythtv";
 FLUSH PRIVILEGES;
 GRANT CREATE TEMPORARY TABLES ON mythconverg.* TO mythtv@localhost
 IDENTIFIED BY "mythtv"; FLUSH PRIVILEGES;
 ALTER DATABASE mythconverg DEFAULT CHARACTER SET latin1;
As you can see, the mc.sql file is just responsible for creating the database and assigning the mythtv user access to it. I used the version below, which sets a proper password and also allows access from a given subnet to the MythTV database.
 # mysql CREATE DATABASE if not exists mythconverg;
 GRANT ALL ON mythconverg.* TO mythtv@localhost IDENTIFIED BY "ChangeMeNow";
 FLUSH PRIVILEGES;
 GRANT CREATE TEMPORARY TABLES ON mythconverg.* TO mythtv@localhost IDENTIFIED BY "ChangeMeNow";
 FLUSH PRIVILEGES;
 ALTER DATABASE mythconverg DEFAULT CHARACTER SET latin1;
 grant all on mythconverg.* to mythtv@"192.168.7.%" identified by "ChangeMeNow";
 flush privileges;
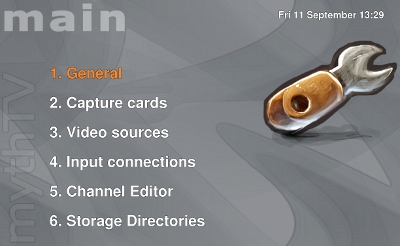
 Once the empty database is in place, running mythtv-setup lets you complete the setup. You have to supply the database host name, database name, as well as the user name and password to connect to the database. As I was running MythTV on the same machine as MySQL, I only had to change the password and MythTV connected fine. After this, the theme images are prescaled to your native resolution and a more general menu is presented for you to finish configuration. The mythtv-setup configuration menu is shown in Figure 1. I ran mythtv-setup over ssh and its GUI was shown on my desktop machine just fine. (Remember, for this example, the server machine I was using can only run a text terminal on its local display.)
One thing about the menu presented by mythtv-setup: it is best to move around with the arrow keys on the keyboard, because trying to use the mouse is rather frustrating. In the general setup, you’ll want to assign an IP address other than localhost to both backends so that you can connect over the network. Page 2 captures information on your location for video formats (PAL/NTSC/SECAM etc). Many of the subsequent pages allow fine tuning of the system but I skipped through these to get video capture going before focusing on tweaking. The steps to set up MythTV are roughly the six steps shown in the screenshot in Figure 1.
After the General setup just discussed, you will tell MythTV about your capture hardware, where to find program listings (Video sources), tune your TV channels (Input connections), then tweak the channels (Channel Editor), before finally telling MythTV where on the filesystem to store its video files.
In the “Capture cards” menu, once I selected the right DVB standard for my location, MythTV picked up my capture device and configured things for me. I would have liked to give the capture device a descriptive name rather than DVB:0, though you do get to name the capture device in the “Input connections” menu. The Input connections page is also where you tell MythTV to use the capture device to scan for TV channels. Before going to the Input connections page, the Video sources page is where you tell MythTV about the programs that can be recorded. You can either fetch the information from the Internet from SchedulesDirect.org, use the information transmitted over the DVB network, or use xmltv to grab the information from the Web.
To use xmltv, install the xmltv-grabbers and xmltv-gui packages and the Listing grabber drop down will include Country (xmltv) for each Country that xmltv can get listings for. As MythTV directly understands the XML files that xmltv creates, you only need a grabber program for your country and/or region and you are in business. I choose to let MythTV get this information from the DVB capture device.
Scanning for TV channels presented the first major glitch to operations. Shortly after scanning MythTV would generate a “X Error: BadRequest” and either freeze or close. Running MythTV inside a VNC session worked better but I could still generate errors while trying to tune.
To avoid sauch problems, you can perform the channel scanning outside MythTV and import the channel data. There are a few ways to tell your DVB device to scan for channels such as w_scan and scandvb, which are available for Fedora in the w_scan and dvb-apps packages, respectively. Using w_scan only requires you to tell it your country code; scandvb comes with a collection of region information in /usr/share and you pass the correct file name in for your location. Invocation of both programs is shown below, and I ended up using the output from scandvb.
 # w_scan -c us -X | tee channels.conf
 # scandvb /usr/share/dvb-apps/dvb... | tee channels.conf
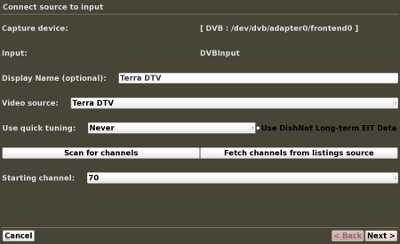
 Once you have a channels.conf file, you import it into MythTV using the “Input connections” page from mythtv-setup. The Input connections screen is shown in Figure 2 for MythTV subversion revision r21776. Clicking on Scan for channels will let you either tell the card to scan or import data from a channels.conf file, among other options.
The later menu options let you edit the channel information that was found and tell MythTV where to store video files. The Channel Editor page also lets you download icon files for your TV channels from the Internet.
Once I was done with initial configuration using mythtv-setup, I found that I had to manually set the MySQL password by editing an /etc file before I could complete the installation as shown below.
 # emacs /etc/mythtv/mysql.txt
 DBPassword=ChangeMeNow
 # service mythbackend restart
 # mythfilldatabase
So now you have a MythTV server configured. Next time we’ll look at the client side, or front end as it is called by MythTV.


