
Author: Preston St. Pierre
Evolution (nee Ximian Evolution) has become a world-class email
client. It’s sleek, beautiful, and very powerful. Because it can do
so many things, it can be a bit intimidating for first-time
users. We put together this guide to help new Evolution users do one thing: filter the mail. Here is a brief overview
of filtering and nine tips to help you take advantage of Evolution’s
sophisticated filtering capabilities.
Mail filters typically examine incoming mail, parsing each
message against predefined rules, and taking action based on what
they find. Even if you send and receive mail from only one person,
you can use filters to separate the good mail from your known
correspondent from the daily flood of spam. That’s a simple
case. At the other end of the spectrum are exotic actions based on
a sophisticated set of rules. In Evolution, for example, filters
can be used to do all sorts of things: sort the mail into folders,
identify spam, flag important mail, sound a beep, execute a
program, delete mail, and more.
How to create a filter
You can create a filter in Evolution in one of two ways: by
clicking on Tools->Filters or by right-clicking on an open email message
and selecting Create Rule from Message (a choice also available on Evolution’s Tools menu), and then opting to create
the filter based on Sender, Subject, Recipients, or Message List.
Be sure to choose one of the Filter criteria, not one of the
VFolder options; VFolders (virtual folders) are a subject for
another day.
You can tell by the granularity of choices that creating a
filter based on a specific email message gives you a running start
at defining the rules for the filter, so use that option as often
as possible while you’re still on your way to becoming a filtering
guru.
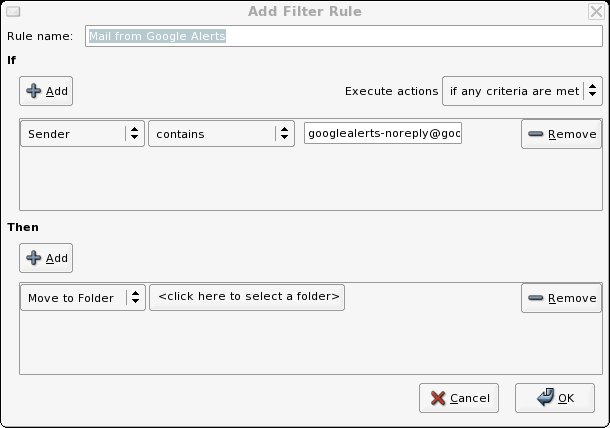
| Click to enlarge |
The
Add Filter Rule window you see alongside this text popped up after
I selected filter creation based on Sender. Note that the rule has
already been given a name, selection criteria (the If side of the
rule), and part of the Then side. All that’s left for me to do —
assuming I like the name and the select statement — is to select
a folder for selected mail to be deposited in as it’s received.
Doing that is as simple as clicking on <click here to select
a folder> and following the dialog to choose an existing folder
or to create a new one.
That’s the simplest case. You can also add, change, or remove
elements from either the If or the Then side. The rules on the If
side define what to examine, the condition to test for, and the
data required for the test. In our example above, Sender is the
test element, Contains is the test condition, and the googlealerts
address is the data for the test. There are 19 choices of message
elements you can examine, and 10 possible conditions. Since you
can add additional criteria as needed, and define multiple actions
as well, it can get quite complicated.
The simple rule created above as our example provides the fodder for our first two tips.
Nine tips for creating filters
1. Double-check the settings for Execute Actions. That’s a
binary test applied to the entire filter. It can be set to Execute
the action(s) defined in the Then section of the filter if any —
or if all — criteria is met. When you have multiple criteria in a
filter, it’s very easy to leave it set to the default (any
criteria) when you really only want the action(s) executed when
all the criteria are met.
2. Always add a Stop Processing action as the last action to be
taken. This prevents the same message from being sorted into
additional folders other than the one you wrote the filter to put
it in. The importance of this tip grows along with the number of
filters you have in place. Get in the habit of doing it from the
beginning.
3. Organize your mail in folders. The primary purpose of
having filters in the first place is so that you can be more
productive and efficient. Email from your boss, for example,
doesn’t need to be lost among messages on a high-volume mailing
list, Nigerian scam spam, or phishing expeditions trying to learn
the details of your financial dealings. It’s better to have too
many folders than to have an important message lost in the
crowd.
4. Create at least one folder for spam and junk mail. You may
end up with 20 different filters all depositing mail in the same
folder, but that’s fine. The important thing is to get it out of
the way of your real mail with as little fuss and involvement as
possible.
5. Create a folder and matching filter for each mailing list
you’re on. Keep these filters at the top of the filter list. Do that by
clicking on Tools->Filters, then highlighting the new filter and
clicking on the Up arrow. Don’t forget to add the Stop Processing
action! These are normally higher-volume categories, so the quicker
you get past them, the quicker your mail in general will be processed.
6. Create folders and filters for email you receive from work,
friends, family, school, church, and so on. These are normally
lower-volume categories, so they should follow the mailing-list
entries in your filter list.
7. Do you receive sensitive mail? If so, create a folder and
filter especially for it. Depending on how sensitive it is, you
might want to encrypt it as it is received — by piping it to an
encryption program which stores the encrypted result elsewhere —
and then deleting the mail as it is received.
8. If you have more than one email account defined in Evolution,
create a separate folder in your Inbox for each one. Do this by
highlighting Inbox in the list of folders, right-clicking, and
selecting New Folder. Then enter a name for that email account.
Create a filter for each email account, based on your email address for the account
being contained in Recipients. The actions to be executed if any
criteria are met are to move the message to the folder for that
account, followed by a Stop Processing action. Keep these filters
at the bottom of your filter list, so they are the very last to be
executed.
9. On a regular basis, go through any unsorted mail left in the
account-specific folders you created, and apply step 2 to as many
of them as you can. Remember to place the new filters above the
filters that dropped the mail in that folder. Before you know it,
these folders will contain 98% or 99% spam and junk mail,
allowing you to read and process your real mail in a more
efficient manner.
By the way, you can also apply filters to outgoing mail. This allows
you to keep all the mail on a particular topic in one place, whether
you receive it or send it. By default, all sent mail ends up in the
same folder.
Nine tips not enough? If you have tips of your own on the subject, please leave a comment describing them.


