

Released in February, the Raspberry Pi Model 2 B is an update to the original board that brings quad cores for six times the performance of the original, 1 gigabyte of RAM for twice the memory, and still maintains backwards compatibility. The many CPU cores are brought about by moving from the BCM2835 SoC to the BCM2836 SoC in the Raspberry Pi 2.
It retails for $35, but you will also need a microSD card in order to use the Raspberry Pi 2 which brings the overall cost up a little bit. It does retain the physical form of the Raspberry Pi 1 Model B+, so you should be able to select from the many snazzy cases that already exist for your new Pi version 2.
But how does this beefed up board compare to the other substantial ARM machines? Let’s boot it up in Raspbian, run it through some standard graphics and performance tests, and gain access to those 40 GPIO pins.
Set up RPi2 with Raspbian
The Raspberry Pi downloads page includes disk images for Raspbian (which is Debian Wheezy), Snappy Ubuntu, Fedora 20, and two XBMC/Kodi targeted distributions. The latter should be of interest to folks wanting to play back media files on the Raspberry Pi 2.
I tried installing Debian Wheezy and although mplayer, xine-ui, and xbmc could easily be installed using apt-get, performance was very slow on Big Buck Bunny, perhaps in the range of one frame per second. Clearly there is some tinkering to be done in order to unlock the video decoding features on the Raspberry Pi 2 if you are using the Debian image.
The Raspberry Pi must use a microSD card in order to boot. If you are planning to use the Pi frequently you might like to use a faster (more expensive) microSD card. The Raspbian image can be copied to a microSD card on a desktop Linux machine using the ‘dd’ command. Instead of writing directly to a /dev/sdX file, I highly recommend using the links in /dev/disk/by-id to avoid accidentally writing over the wrong disk. I have found that using a large block size as in the below command can speed up writing the image.
# dd if=raspbmc-2014-11-24.img
 of=/dev/disk/by-id/the-right-disk bs=1048576
Then move that microSD card into the Raspberry Pi 2 and you are ready to fire it up. On first boot up a text menu appears on the HDMI output of the Raspberry Pi 2 with nine options. The first allows you to resize the installation to take up all the space on the microSD card. So you don’t have to worry about how to expand the filesystem to allow you to use all the space on your microSD card. You can also set the password for the user ‘pi’ from the menu and ensure that SSH is enabled.
Once you login to the Raspbian installation, you can get root access by running ‘sudo su -l’. A very useful option is to set where audio goes by default; to the HDMI connector or to the audio jack.
In the advanced menu you have options to enable the SPI and TWI interfaces for the board and overclock the hardware should you feel the desire. The finish button in the menu offers to reboot the machine for you which will be useful the first time so that the resized filesystem will let you access all the space on your microSD card.
Once you reboot the Raspberry Pi 2 you should see a desktop at 1080 resolution. Feeling lucky I installed kde-full on the machine and tried out a full KDE desktop. I think the use of a cheaper microSD card made that experience more painful than it might have been. The option to run KDE/Openbox was more usable but did still have some graphical artifacts on scrollbars. Though having kde-full installed did give access to all the KDE applications.
Performance
All benchmarking was done from Raspbian.
Comping openSSL 1.0.1e using -j 4 took about 9 minutes on the RPi 2. The Radxa took about 8 minutes to do the same, around 4 minutes on the ODroid-U2, and just under a minute on an Intel 2600K desktop machine. Storage speed might also be coming into play during compilation as the ODroid-U2 used faster eMMC storage. Keep in mind that the openssl speed test shown below is single threaded and will only take advantage of a single core. For openssl speed the RPi 2 is slightly below other ARM machines. For RSA signatures the performance was close to the BeagleBone Black.
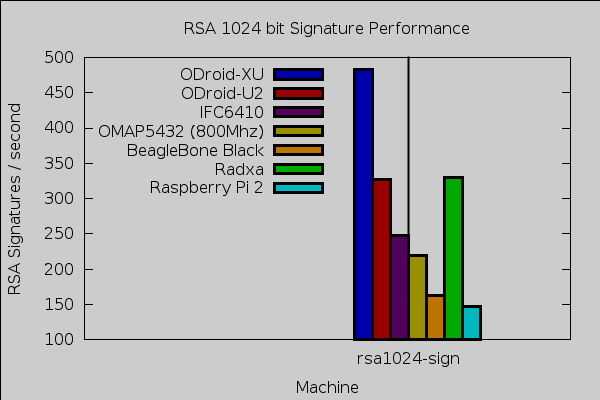
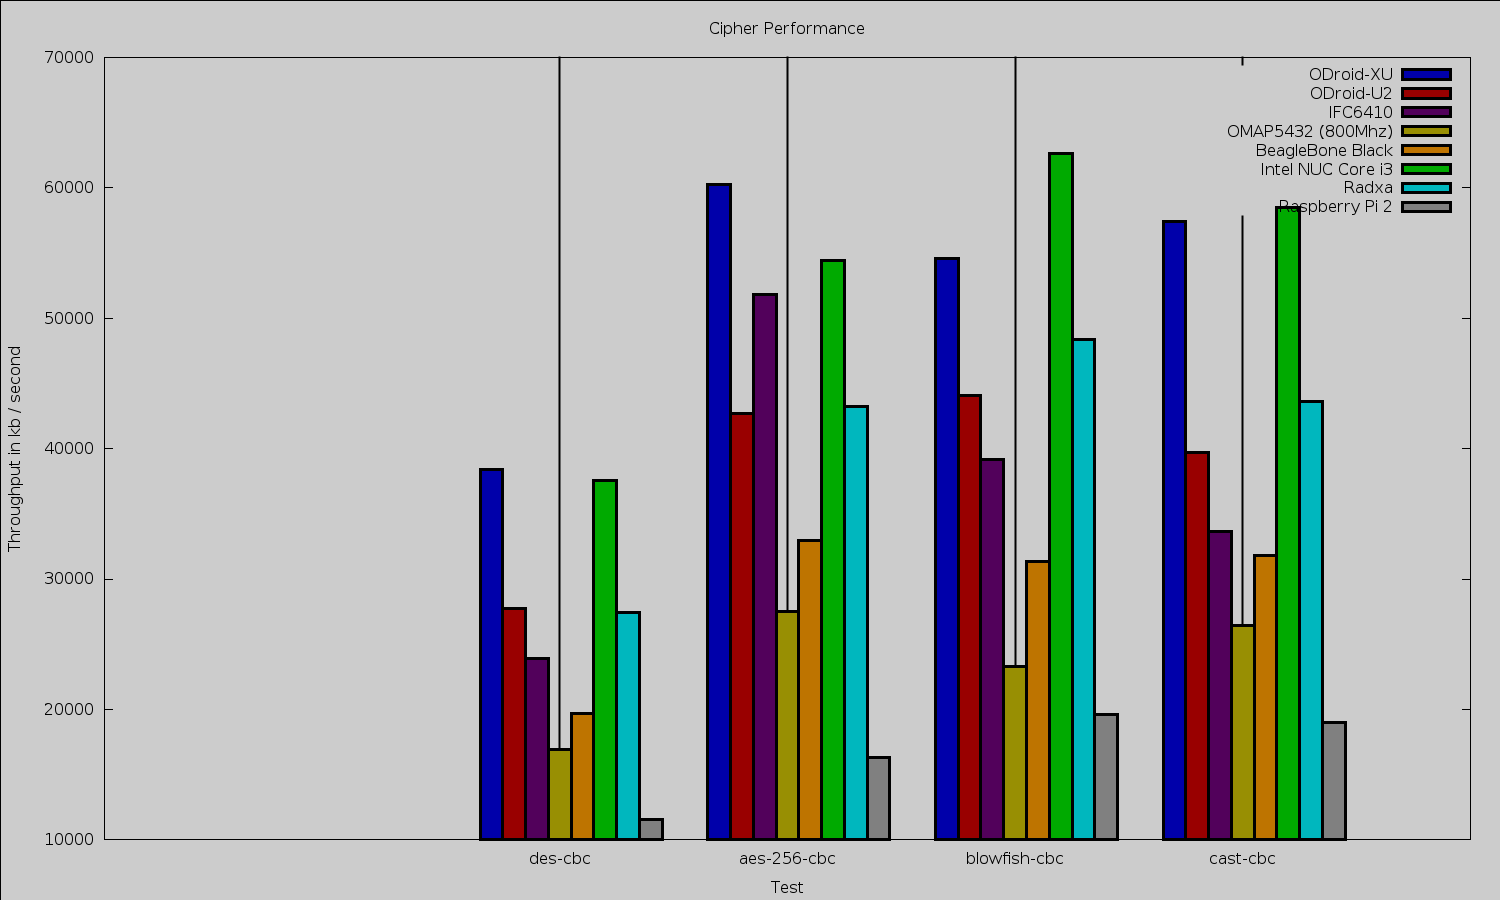
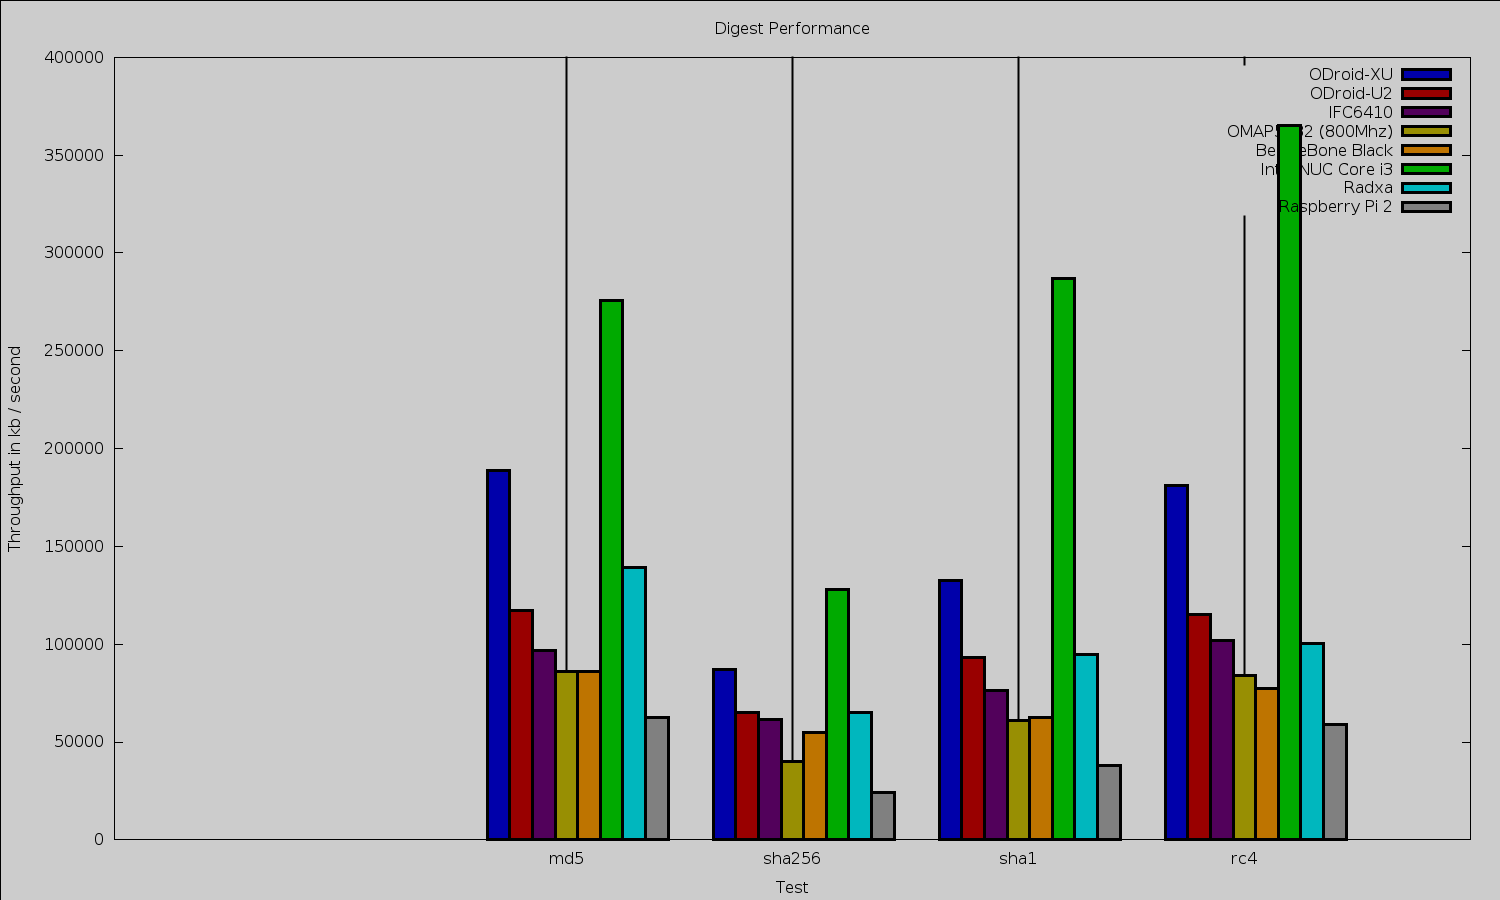
DES and AES cbc mode ciphering was substantially slower on the Raspberry Pi 2 than one might expect. For the Blowfish cipher the Raspberry Pi 2 was much closer to the performance of the BeagleBone Black. The same situation is evident for digests, the Raspberry Pi 2 being 1/5 to 1/3 slower than the BeagleBone Black. Remember though that the Raspberry Pi 2 is a cheaper machine than the BeagleBone Black and the Raspberry Pi 2 also sports four CPU cores relative to the single core of the BeagleBone Black.
To test 2d graphics performance I used version 1.0.1 of the Cairo Performance Demos. The gears test runs three turning gears; the chart runs four line graphs; the fish is a simulated fish tank with many fish swimming around; gradient is a filled curved edged path that moves around the screen; and flowers renders rotating flowers that move up and down the screen. For comparison I used a desktop machine running an Intel 2600K CPU with an NVidia GTX 570 card which drives two screens, one at 2560×1440 and the other at 1080p.
| Test | Radxa at 1080 |
Beable Bone Black at 720 |
Mars LVDS at 768 |
desktop 2600k/nv570 two screens |
Raspberry Pi 2 at 1080 |
|---|---|---|---|---|---|
| gears | 29 | 26 | 18 | 140 | 21.5 |
| chart | 3 | 2 | 2 | 16 | 1.7 |
| fish | 3 | 4 | 0.3 | 188 | 1.6 |
| gradient | 12 | 10 | 17 | 117 | 9.6 |
For testing Web browsing performance, I used the Octane Javascript benchmark. For reference, using The 64-bit version 32.0.3 of Firefox an Intel 2600K gives an overall figure of around 21,300 while the Intel J1900 chip comes in at around 5,500 overall. Using Iceweasel version 31.4.0esr-1 the Raspberry Pi 2 got 1,316 on Octane.
Power usage was around 2.3 Watts idle. When compiling openSSL using four cores power reached up towards 4 W. During the cairo benchmarks power got up to around 3 W.
Getting at those 40 pins
The GPIO interface is exposed at /sys/class/gpio by the Linux kernel. Once you export a GPIO pin, the filesystem lets you set it as an output and then change the voltage on the pin. In the following code, you need a little circuit with the anode of an LED at one end, the cathode of the LED connected to a resistor and the other end of the resistor connected to pin 6 (ground) on the Raspberry Pi 2 header. Then connect pin 8 (GPIO 14) to the anode of an LED circuit. You will then be able to turn on and off the LED by writing 1 or 0 to the gpio14/value file.
root@radxa:/sys/class/gpio# ls -l
total 0
--w------- 1 root root 4096 Jan 1 12:00 export
lrwxrwxrwx 1 root root 0 Jan 1 12:00 gpiochip160 -> ../../devices/virtual/gpio/gpiochip160
lrwxrwxrwx 1 root root 0 Jan 1 12:00 gpiochip192 -> ../../devices/virtual/gpio/gpiochip192
lrwxrwxrwx 1 root root 0 Jan 1 12:00 gpiochip224 -> ../../devices/virtual/gpio/gpiochip224
lrwxrwxrwx 1 root root 0 Jan 1 12:00 gpiochip256 -> ../../devices/virtual/gpio/gpiochip256
--w------- 1 root root 4096 Jan 1 12:00 unexportroot@pi:/sys/class/gpio# echo 14 > export
root@pi:/sys/class/gpio# cd ./gpio14
root@pi:/sys/class/gpio/gpio14# echo out > direction
root@pi:/sys/class/gpio/gpio14# cat value
0
root@pi:/sys/class/gpio/gpio14# echo 1 > value
root@pi:/sys/class/gpio/gpio14# cat value
1
While I had told the raspi-config tool in the advanced section to load and setup both TWI and SPI I could only see the SPI files. Running ‘modprobe i2c-dev’ gave the device files though. I hope to cover digging in and using these interfaces in a future article.
root@pi:/dev# ls -l /dev/i2* /dev/spi*
crw------- 1 root root 89, 1 Feb 6 10:45 /dev/i2c-1
crw-rw---T 1 root spi 153, 0 Jan 1 1970 /dev/spidev0.0
crw-rw---T 1 root spi 153, 1 Jan 1 1970 /dev/spidev0.1
Final Words
The Raspberry Pi has wide community support, and a fully compatible but much faster Pi 2 with more RAM is a great thing to see. At the lower end of the price range shipping costs can account for a significant part of the total purchase price. I was able to find local distributors of the Pi 2, some of which offer free shipping.
I hope to take a look at video decode performance on the Raspberry Pi 2 in a future article, including the Kodi distributions.


