
By Rui Lopes
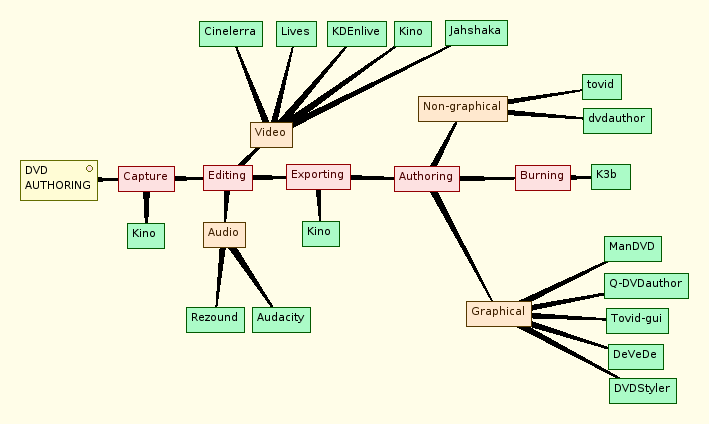
Let’s say you want to create a DVD with video footage made with your camcorder (if you just want to create a photo slideshow, I’ll deal with that in a bit). The first thing you’ll want to do is capture the footage to your computer using Kino. Kino is a very basic video editor, but is immensely useful at capturing and exporting video. If you want to edit the video later in a more powerful application, such as Cinelerra, Jahshaka, or KDenlive, capture it in raw DV format (Edit -> Preferences -> Capture -> Raw DV) in order to keep the highest possible quality. Kino also allows you to export the audio track separately (Export -> Audio) for editing with applications like Audacity.
After pruning and brushing up the footage elsewhere, you can import it back in Kino, and use that application’s excellent export function to output the video in a more usable format. Raw DV files won’t play on home DVD players, so you’ll want to convert the footage to the MPEG format, and preferably MPEG-2. I don’t advise doing any more converting than this, because every time you transcode a video file, its quality degrades.
To export the video from Kino, choose Export -> MPEG or Export -> Other. In Other -> Tool, choose DVD-Video Dual Pass (FFMPEG), then under Profile decide what option best suits you. Standard/Widescreen VOB will just create a VOB file, which you can import into a DVD authoring application. If you just want to burn the footage as it is, then choose Standard/Widescreen DVD-Video directory (All only). This will create the correct DVD directory structure for you to use to burn directly to a blank DVD.
As for the MPEG tab, you’ll have to choose either File Format -> 3 – Generic MPEG2 or File Format -> 8 – DVD. Since the options here are richer, you’ll have to play around with them until you find which ones best suit you. Exporting can take a long time, so export just a short piece of the footage first, in order to see if it ends up as intended. I usually choose None in Deinterlace, or YUV Deinterlace Film-like, which helps smoothing the image (sometimes considerably), and in Aspect Ratio use option 3 – 16:9, since my camera can record video in true widescreen. Leave Scene Split unticked if you want to export the video as one big file, and ticked if you want each scene to be an individual video file. Leaving Cleanup unticked can save your day if the exported video ends up wrong and you need to use the original raw DV files again. Finally, here’s what I usually put in the the Advanced Options:
Video Pipe: mpeg2enc -v 0 -4 1 -2 1 -q 1 -c –keep-hf
Audio Encoding: mp2enc -v 0 -r 48000
Multiplexer: mplex -v 0
Authoring: possible choices
Once you’re ready to author your DVD, with fancy menus and all the bells and whistles, the choice of available applications is larger than you might think. I’ve tried Q DVD-Author, DVDStyler, DeVeDe, ManDVD, and tovidgui. Other options, such as Varsha or Polidori, no longer seem to be developed. I had no luck compiling KDE DVD Authoring Wizard or Kmediafactory on my Ubuntu Studio system, but feel free to try them. If you prefer to do things the hard way, dvdauthor and tovid are command-line tools that offer much more power and versatility than most of the graphical applications.
There are some technical aspects you’ll have to take into account when creating a DVD. You have to know if the original footage has a 4:3 or 16:9 aspect ratio, what’s its resolution, if you’re in a country that uses the PAL or NTSC standard, and so on. In most cases, the correct options will be autodetected (or suggested) by the authoring application. If your footage is in another video format, such as MPEG-4, the application will probably be able do convert it to DVD-compliant MPEG-2. Of all the applications I worked with, DVDStyler was the only one that couldn’t.
The process of authoring a DVD doesn’t change much from application to application, and always revolves around creating a menu structure for the DVD, importing the video footage, dividing it into chapters, and maybe adding subtitles. You can also make layout changes and add “fireworks” as needed (background images, interactive menus and buttons, a soundtrack). The program then creates the final DVD structure, consisting of two folders, AUDIO_TS (which is usually left empty) and VIDEO_TS (which will contain the VOB files, amongst other things). This stage can take several hours. The last thing left to do afterwards is burn the result to a blank DVD. Burn at values below your DVD writer’s top speed, and don’t do heavy work with the computer at the same time, or the DVD can end up with playback errors or quirks.
Of all the aforementioned applications, ManDVD is the one with the most linear workflow; the authoring is done as you walk through a wizard. One of the most pleasant points about it is the video effects dialog, which allows you to remove logos from your footage and adjust the brightness and the contrast. Another great detail: when adding videos, ManDVD allows you to immediately take an image from the footage, edit it in the GIMP (if need be), and use it as a button on the DVD menu. This concern for user convenience is shown throughout the whole process, but the application lacks power and clarity in its layout tools. Another flaw is that its “save” function doesn’t seem to work, so you’d better create your DVD in one go. If you need to come back to the first window to change something, you’ll lose everything you did in the layout section. Rough edges aside, ManDVD seems the most promising application for the beginner.
DeVeDe isn’t as simple to use as ManDVD, but it’s quicker for users with a little bit more experience. The interface is the traditional centralized window where you add the the footage, create the menus, and adjust video settings. It has the best set of options regarding video and audio size and quality. It would be even better if it also had video effects like ManDVD. Its layout capabilities are almost absent, but at least it allows you to preview the final menu correctly.
The interface of tovidgui looks something like those of DeVeDe and ManDVD put together, consisting of a centralized window divided into sections (Layout, Encode, and Burn). I personally find its interface the most useful and clear of the lot. Tovidgui also has some of the best built-in help I’ve seen. That doesn’t make up for its shortcomings, though: the application is lacking in power options, especially regarding the final output, and should offer support for subtitling and better previewing. But tovidgui is built on top of tovid, which is a good application, and given that the version I tested was 0.30, things may get better.
The last two applications I tried were more layout-oriented. DVDStyler has a simple interface, but using its more advanced options can be a headache if you don’t know what you’re doing. It allows much more power than the previous applications in terms of layout, but is weak regarding all of its other functions.
Q DVD-Author is the best application of the lot in terms of layout capabilities, but it’s also the most complex. Its interface is the exact opposite of ManDVD — a centralized window from which you can access every element of the DVD structure through tabs or hidden options. This helps users keep the big picture in mind. Novice users can easily create a playable DVD while skipping the power options, and more experienced users can employ them to great benefit. You can add intros, submenus, background music, freely manipulate the graphical elements of the layout, and define animation and highlighting for buttons better with Q DVD-Author than with the other applications.
You can also download a set of layout templates directly from the program. Other advanced options include the ability to import SMIL files created by Kino, and the XML Out tab, which allows you to see the XML output generated by the application.
Previewing the results
Quite often, the final DVD output isn’t near what you wanted, so before you start burning a stack of blank DVDs, preview the result on the computer first. If your graphics card has a TV-out connection, you can even preview the DVD on a separate TV screen (which is more realistic for testing the quality of the image). I find it fast and convenient to preview the DVD folder with various players (just to be sure) from the command line:
For VLC: vlc dvd:///media/work/DVDauth/
For MPlayer (with a GUI): gmplayer dvd:// -dvd-device /media/work/DVDauth/
For Xine: xine dvd:///media/work/DVDauth/
Conclusion
Currently, DVD authoring applications for Linux do a good job for the casual home user, but I’m not sure if they can shift the professional media creator away from more powerful commercial or closed-source applications. I found ManDVD to have the best workflow for the casual user, while DVDStyler and Q DVD-Author have the best layout features, with Q DVD-Author also sharing with DeVede the honors for most advanced video/audio options. Tovidgui has the best built-in documentation. Of the apps I tested, only DVDStyler was cross-platform, able to run on both Linux and Windows.
Personally, being a more advanced user, I find myself mostly using Q DVD-Author, but I appreciate the diversity of available applications and their approaches. I hope they all keep improving.


