Author: Ben Martin
With the JShot screen capture and uploader utility, you can quickly put all or part of your screen on the Web and send a URL to it to a friend. JShot is free for noncommercial use, and is great when you want to show people a screen capture and don’t want to have to deal with file names and upload permissions.
I tested jshotinstall.jar version 0.9.8.5b on a 64-bit Fedora 9 machine. JShot is written in Java, so you’ll need a Java Runtime Environment installed to proceed. Running java -jar jshotinstall.jar starts an installation process. You can nominate where to install to and what plugins to install. Under Linux, ImageShack and FTP plugins are all that’s available; a Skype plugin is for Windows only.
JShot has two main parts: a tray applet that allows you to capture and upload part or all of the screen, and an image editing application. While the latter is probably not going to displace the GIMP or similar tools for editing images, it does let you manipulate a captured image from the tray applet and give it a slight edit (blacking out user names, for example) before telling JShot to directly upload the edited image. By using it, you can avoid storing both raw captures and slightly touched up captures on your local filesystem.
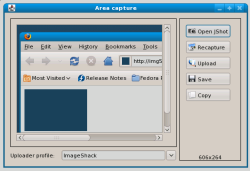
Double-clicking the JShot tray applet or choosing Select Region from its context menu lets you draw a rectangle over an area on the screen. JShot then asks what to do with the capture with the window shown below. The Open JShot button launches the image editor with the current screenshot. The Upload button sends the screenshot using the Uploader profile shown at the bottom of the window. The default case is to use the ImageShack image hosting site, which lets you upload without setting up any user account or password.
You can go one step better than the Select Region option by using the Upload Region context menu option from the JShot tray applet. Once you select a rectangle from the screen, it will be uploaded right away, and a window that displays the Web-accessible link will be presented on completion of upload. You can send this link off to someone else or click the Open button to see the image in your Web browser. It would be hard to trim any steps from this process — initiate capture, select region, and here is the link to that uploaded screenshot.
To change your settings you have to start the JShot image editor and select the Config wizard from the Edit menu; you cannot get at this wizard from the JShot tray applet context menu. The Config wizard allows you to set your preferred Web browser, an external image editing application (defaulted to the GIMP), and set upload profiles for where JShot should put an image and how to authenticate with that server. The context menu for the JShot tray applet includes a submenu to let you select which upload profile is used when you select Upload Region, so that you do not have to keep selecting where to send your screenshots.
If you elect to send a screenshot to the JShot editor, then once you have made your edits you can select Picture -> Upload picture to send your modified screenshot to the Web. I found this slightly confusing — I looked first in the File menu for a “Save to Web” or “Upload image” option.
With the JShot applet you can quickly select a region of your screen, upload an image of it, and have a Web-accessible link to that screenshot. JShot avoids the tedium of having to save the screenshot in a temporary file and switch tools from capture to upload. If you use the ImageShack profile that is automatically set up when installing JShot, you can be sharing screenshots without the need to configure any user names or passwords.
Categories:
- Tools & Utilities
- Graphics & Multimedia


